Why Doesn’t This Look Like The Pattern Cover? (Pattern Fitting Tips Galore!)
So, you've made your first outfit from one of my patterns. It went together without a hitch...until you put it on and stepped in front of a mirror. "Wait a minute!" you exclaimed. "This waistline is way too high! This sleeve just doesn't hit me where I thought it would! How am I supposed to be comfortable in this?" Hold on! Don't throw that pattern out yet! Don't consign that dress to the dustbin! It's simply time to learn some of the tricks of the trade for fitting patterns to suit your personal shape.All of us are built differently. Even if we fit into a standard "size" on the pattern chart, we may find that the final results are less than flattering because we failed to take into account one or more unique features of our own body type. This page is here to help you identify those features and modify any pattern to better suit your figure type.
Culprit #1: The "Ballerina" Neckline
Let's start with one of the more common fitting problems on the Regency Gown pattern (or any Regency Era pattern, for that matter!). You love the look of the ultra-high empire waist, but when you put the gown on, the "waistline" hits you across the middle of the bust, as shown in the illustration below.
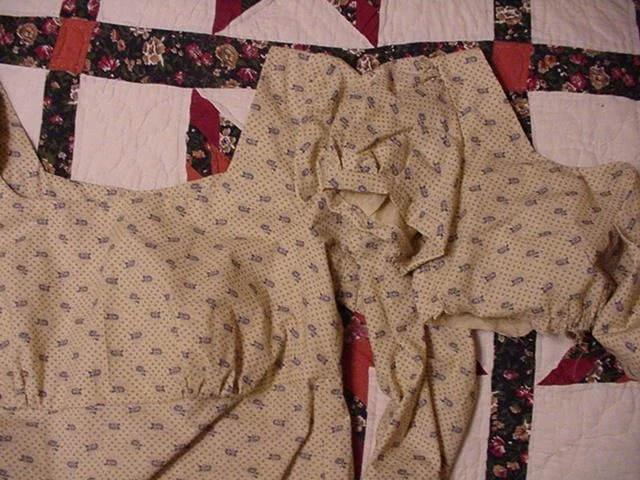
Does this mean the Regency style cannot flatter you? Not at all! It simply means that you have what I call a "ballerina" neckline. Ballerinas have that regal, swanlike neck from years of perfect posture and practice. Whereas the average bust point on most of us is about 10"-10.5" down from the shoulder, the ballerina has an elongated collarbone/neckline area, and her bust point hits closer to 12" from the shoulder. (You don't have to be a real ballerina to experience this, by the way; you might have just been born with this figure type.) Because of the elongated neckline, a typical Regency "waistline" is going to cut you right across the center of the bust or make it very uncomfortable for you to raise your arms even the slightest fraction. Fortunately, the remedy is extremely simple, and, thanks to one of my customers, I have photos to show you how it is done!In the first photo below, you see two Regency gown bodices. The one on the right was created first, and the wearer found it too short (she has that regal ballerina neckline!). She wrote me to ask if there was a mistake in the pattern pieces, since the gown just wouldn't work as-is.
I explained "ballerina syndrome" and confirmed that the solution she had come up with (lengthening her bodice pieces to accommodate her lower bust point) was absolutely correct. As you can see in the photo below, she ended up adding two inches to each piece.
She then removed the small bodice (upper photo, right) and replaced it with the longer bodice (upper photo, left). Voila! A perfect fit, as you can see below:
So, if you've got that beautiful ballerina neckline, enjoy it! Just modify your pattern pieces to suit your lower bust point, and you'll be able to create a bodice that flatters your unique neckline without compromising the empire style of the period.
Culprit #2: The Short-Waisted Silhouette
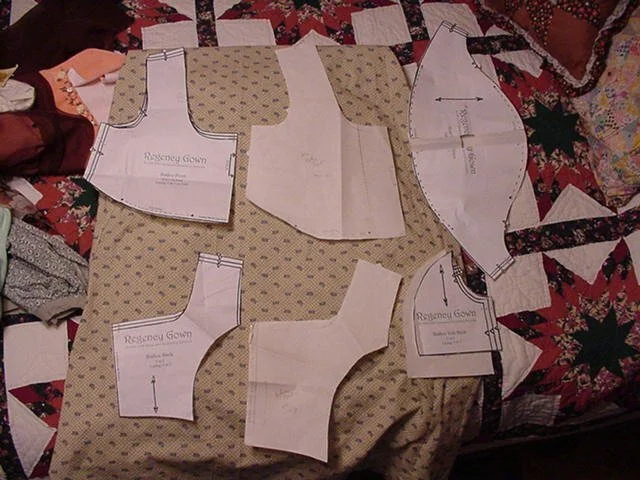
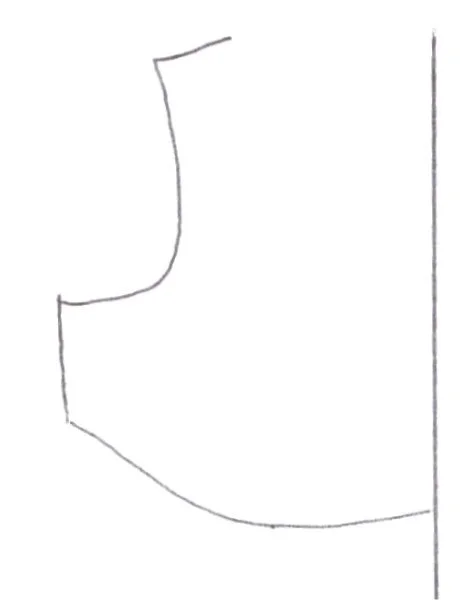
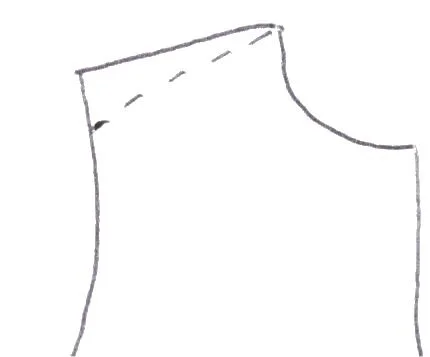
This is a problem I was born with, so I can empathize! Those of us who are short-waisted have a nape-to-waist measurement less than 15.5". The natural waistline of just about any off-the-rack dress hits us right across the hipline and makes us look dumpy. Or, because we are so short-waisted, we have a higher bust point than average, meaning that what might be a modest neckline on someone else is pretty much "show and tell" on us! So here are two problems we can tackle.The short-waisted problem isn't going to affect the high empire waistline of the Regency Era (in fact, this is one style that totally flatters the short-waisted gal). We'll discuss the waistline problem as it relates to the Edwardian/Titanic Era styles in a moment. The main problem we short-waisted ladies experience with Regency Era dresses is the neckline. Now, I know the necklines of the era (particularly for evening gowns) were meant to be low, but I prefer mine higher (as did Jane Austen) and created the pattern to have a far more modest neckline than the more daring French styles of the period. But even this neckline is going to appear decollete' on a short-waisted gal with a higher bust point. Or perhaps you're not short-waisted but would like to create a neckline that works better for winter wear and hits higher up (nearer the collarbone). It's extremely easy to make this change.First of all, measure to decide where you want your neckline to hit once it is sewn. You can measure from the top of your shoulder to the bottom of the neckline. Compare this measurement to the actual pattern piece (measuring from the "cross" on the pattern's shoulder area to the bottom of the neckline for your size). Let's say you want to add two inches total. Make a note of this.When you cut out your bodice toile (see the "Final Reminder" below), leave the neckline until last. Go ahead and cut around the bottom and sides of the pattern piece, all the way up to the shoulder, as shown below:
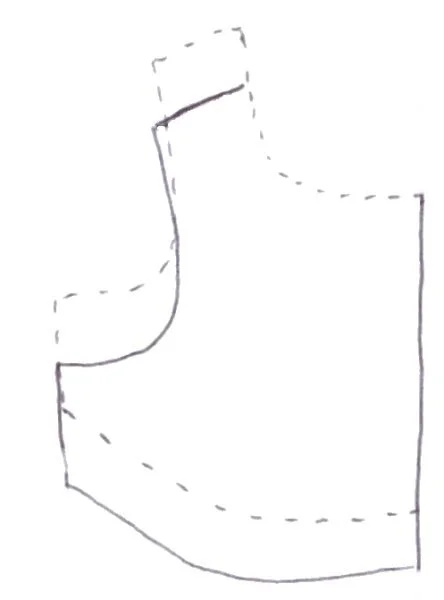
Now, lift the pattern piece and reposition it so that the neckline curve hits (as in our example) two inches higher, as illustrated below:
The dotted lines show the repositioned pattern piece.
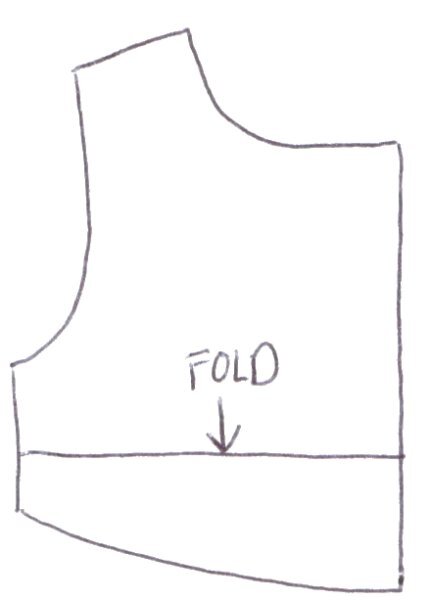
Cut around this raised neckline curve, smoothly joining it to the shoulder at the top. You can repeat this process for the back neckline as well if you wish. As you can see, this is extremely simple and requires no special grading techniques or mathematical equations! You're just using the neckline curve as-is from the pattern piece, raising it to hit where you prefer it to hit (always remember to include the 5/8" seam, since that amount will be "lost" when you sew the bodice to the lining around the neckline). Piece of cake! And you can, of course, get really creative and try out different neckline shapes (less square, wider, narrower, etc.).Okay, now let's tackle short-waisted problem #2, which is going to occur on just about any pattern with a natural waistline. My 1910s Tea Gown pattern has a slightly raised waistline, but it will tend to hit short-waisted ladies right on the natural waistline. If you want it slightly raised, you'll need to alter the pattern as I'll show below. For the Edwardian Walking Jacket, "Beatrix" Jacket, Edwardian Apron, and 1914 Afternoon Dress, you are also going to need to make alterations to shorten the pattern pieces so the final outfit will hit you at your natural waistline.If you have the most recent version of the Edwardian Apron pattern (2003 or later), you already have the "Miss Petite" lines drawn on the pattern pieces in the appropriate spots. You'll just fold the pattern to raise the waistline. This is the same technique you can use on all of the other patterns that hit at the natural waistline. In the illustrations below, I'll show you where to fold any jacket pattern piece and where to fold the 1910s Tea Gown and 1914 Afternoon Dress patterns.Below is an illustration of the center back piece of the "Beatrix" Jacket pattern:
Before you alter any pieces, compare your nape-to-waist measurement with the nape-to-waist measurement on the center back piece of the pattern. I designed the jacket patterns to hit the natural waistline of an average gal (around 16-16.5"). Let's say your nape-to-waist measurement is 15". You'll need to subtract 1.5" from the pattern pieces to get a correct fit. To do this, you will simply fold the pattern pieces down right above the waistline at the same point on each piece. The fold will be 3/4" deep (taking up a total of 1.5"). Here's what you'll see when you've folded your piece properly:
Make sure you are folding horizontally (at a 45-degree angle from the "straight grain" arrow marking) all the way across the pattern piece. Repeat this on each pattern piece. When you've finished, cut out your toile from the adjusted pieces for a try-on. I think you'll be pleasantly surprised at the delightfully tailored look that results -- no more bagging and bunching above the hipline!To alter the waistline of a dress bodice, you're going to do essentially the same thing (only you won't have as many pattern pieces to change!). For the 1910s Tea Gown, which has a one-piece bodice back/front, you'll fold both the "upper" and "lower" portions of the bodice pattern piece like this:
For the 1914 Afternoon Dress, you'll fold the back piece and the front piece. You can fold the back piece anywhere below the armhole, but you'll want to check the positioning of the fold on the front piece so that you don't interfere with the curving line of the bottom of the bodice (where the gathers go):
This is truly all there is to it! You won't need to change your skirt pieces at all, since the hipline will automatically be raised when the skirt is sewn to the adjusted bodice. But what a difference in fit can be made with this simple adjustment! You won't have "bodice hangover" or awkward wrinkles and puckers just above the waistline, and the hipline of the skirt is not going to be too tight.
Culprit #3: The Long-Waisted Silhouette
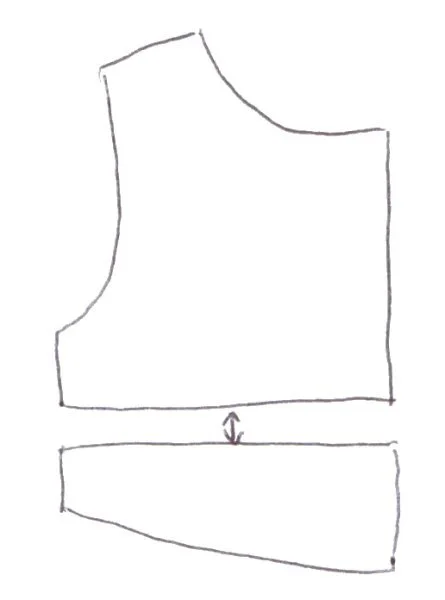
This is simply the reverse of the problem discussed above. Instead of finding that something hits you below the natural waistline, on you it rides up, leaving you looking like a little girl who is outgrowing her dress! The solution for this problem is just as easy as the one for the short-waisted gal.Instead of folding your pattern pieces down to shorten them, you're going to slash them horizontally and spread them to add the appropriate amount of length. You'll need to compare your nape-to-waist measurement with the nape-to-waist measurement on the pattern pieces in question. If your measurement is 17", and the pattern's measurement is 16", you'll be adding an inch.Using the illustrations above as a guideline, slash horizontally across your pattern pieces where the short-waisted gal would be folding hers. Now spread the slashes so they are an inch apart (for example). Tape pattern paper or interfacing behind the slash lines, making sure you keep the slash at one inch all the way across:
Nothing to it, right? Make the same change on all bodice pieces, and you've got your personalized pattern ready to go. Cut out a toile and check the fit to be sure the waistline hits you just where you want it to (and remember you'll have a seam allowance at the bottom of any dress bodice piece, so be sure to account for the "loss" of the seam allowance).Now, you may wonder why I didn't just go ahead and put lengthening/shortening lines on all the pattern pieces to make things simple. The answer is that there was no way to do this without creating "clutter"--having lines running across other pattern markings (like the nursing slits on the 1914 dress or the darts on the 1910s Tea Gown). I probably should have included instructions for lengthening and shortening in the pattern instructions, but it didn't cross my mind at the time, so I'm doing penance by posting all the details here on the site! ;-)
Culprit #4: Shoulders of All Shapes and Sizes
This is one area that is, perhaps, more prone to variation than almost any other! There are ladies with square shoulders, ladies with sloping shoulders, ladies with narrow shoulders, ladies with wide shoulders, and ladies with every kind of shoulder type between. A lot can depend on posture, but many times we're just born with the shoulders we have and cannot do anything to change them (save adding shoulder pads!). A pattern that fits one gal beautifully through the shoulders might be too tight or too loose on another gal who is the same "size." Time to make some adjustments!
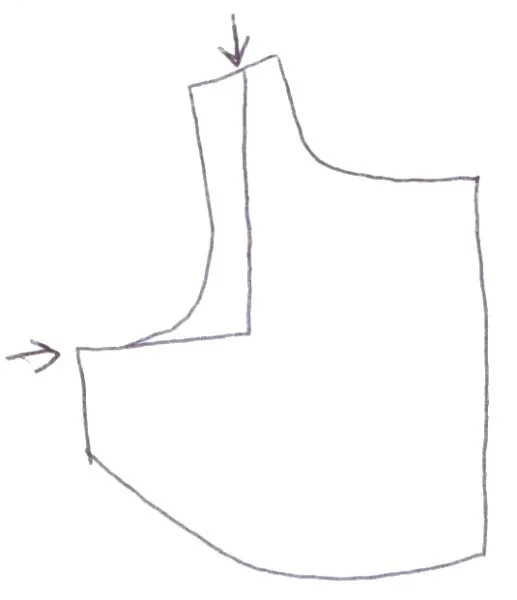
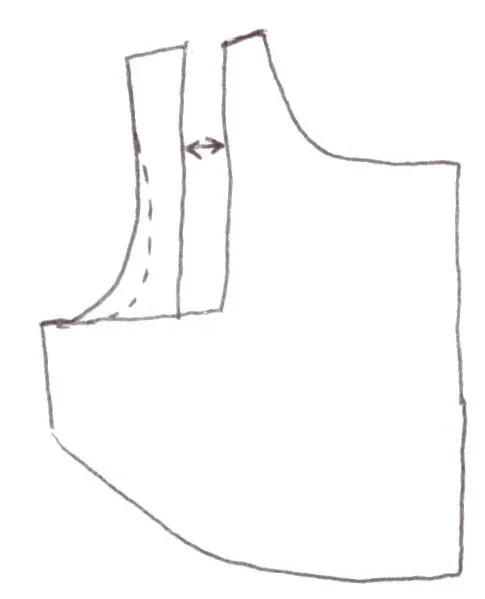
One word before I begin: When I started designing patterns, I made a conscious decision not to widen shoulders dramatically on the larger sizes (18+). This is because I kept finding that "standard" patterns assumed that a gal with a 44" bustline had linebacker shoulders! This is definitely not always the case. Just because someone has a larger bustline does not mean her shoulders are exponentially wider! But computer-drafted patterns merrily add width as they add to the bustline, leaving many gals with gowns that fall off the shoulders or look bunched and unflattering at the armhole. I wanted to avoid this from the get-go, so I did not "supersize" shoulder width on my larger sizes. Instead, I assumed that most gals will still have average shoulder widths. This does mean that some ladies who do have broader shoulders will need to make some modifications (as I'll explain), but the majority will not have to change anything. If you fall into the former category, this section is for you.If your shoulders are wide or more angular than they are rounded, you may find that the sleeves of a gown or jacket (particularly cap sleeves) are just too tight, making you want to go stoop-shouldered. All you need to do is to add width to the bodice front and back pieces at the shoulder (or to the jacket pieces which make up the outermost edge of the shoulder). To add width, you'll slash your pattern pieces vertically, then horizontally at the bottom of the armhole, like this:
You will not need to slash down the entire length of the pattern piece unless you want more room in your side seams as well. Instead, you're just going to move the top of the shoulder and armhole out a bit. Spread the pieces to accommodate your wider shoulderline (you will already have tried on a toile and discovered the problem, of course!).
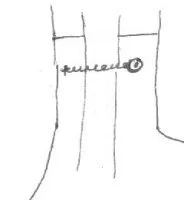
Tape paper or interfacing behind the slash, and there's your new pattern piece, ready to go! Make up a new toile to double-check the shoulder area. As you see in the illustration above, I've also drawn a dotted line to show where you might want to trim down the armhole curve. Try on the new piece first to determine if you need to do this. (If the front of the bodice puckers or pulls along the armhole edge, you need to trim it down. Just remember to leave yourself the 5/8" for the seam allowance!)Obviously, if you are very narrow in the shoulders, you can simply reverse this process to prevent the bodice from slipping off your shoulders. Instead of spreading, you can slash and move the shoulder area towards the bodice (rather than away from it), overlapping the pattern piece and taping the slashed piece down. Again, it's best to do this after you've tried on your toile, since you'll know just how much farther in the shoulders of the bodice need to go.If you've got sloping shoulders and find that your bodices with wide necklines keep slipping down, there are a couple of remedies. One is simpler and doesn't involve altering the pattern at all. The second remedy means adjusting the slope of the shoulder seam to help the bodice stay put.If you find that the shoulder width is fine on your bodice (the edge of the armhole hits the edge of your shoulder), yet your bodice tends to keep sliding off, try this easy solution first. If you're wearing a conventional brassiere or even underpinnings with straps beneath your outfit, you can create lingerie straps to secure the shoulders of your outfits to your underthings, thereby anchoring the bodice in place (though it will still slide if your brassiere slips off your shoulders, too!). Here is a picture of a lingerie strap seen from the inside of the bodice at the shoulder:
As you can see, the strap goes across the brassiere strap and snaps on the other side.
You can make the strap out of embroidery floss or heavy-duty quilting thread. Here's how: Thread your needle, doubling the thread to make it substantial enough. Take a couple of intitial stitches into the lining material at the top of the shoulder to anchor the thread. Now take one stitch and pull until you have a loop wide enough to reach through with two fingers. Put your fingers in the loop and grab the "free" thread hanging down from the needle. Pull this until the first thread loop closes and you are left holding a new loop (from the "free" thread you grabbed). Repeat this over and over until you have created a "chain" of thread wide enough to go over your brassiere (or corset) strap. When the chain is wide enough, run your needle through the loop twice and pull it tight to knot it. Now take one half of a snap and sew it to the end of the chain (you really only need to sew into two of the holes out of the four; just make sure you create a strong attachment). Finally, take the other half of the snap and sew it to the opposite side of the shoulder lining (the "chain" of thread should be pulled flat against the lining--not too loose, or your undergarment's strap will have wiggle room).
Here is the thread "chain" ready to be snapped in place.
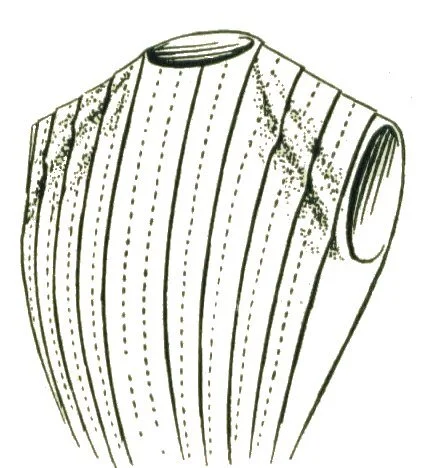
Whenever you wear your outfit, you can secure the shoulders to your undergarment straps, and this will prevent slippage. Custom garments from my grandmother's day (1940s and 1950s) all had these to prevent lingerie from peeking out of necklines or sliding down into sleeves. I've found these little straps also work wonderfully for gals with sloping shoulders. If your brassiere or other undergarment strap is tight to the shoulder and doesn't tend to slide down, the shoulder of your dress will stay put when you snap the lingerie strap to it. Piece of cake!Now, if the method above just isn't for you (if your lingerie slides just as much as your garment, in other words), it's time to check your shoulder seam angles and adjust them. Here's a period illustration of a garment that has shoulders too squared for a slope-shouldered lady:
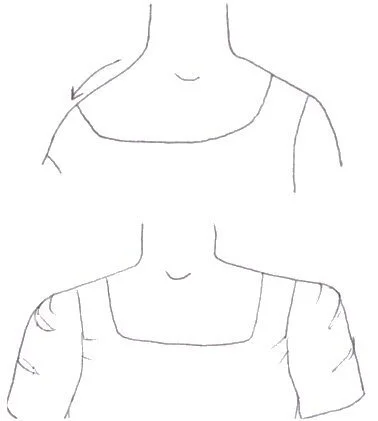
Up to this point we've been talking about garments that have a wider neckline, but you can see how this illustration will apply to tailored garments like the Edwardian Walking Jacket and the "Beatrix" Jacket. In the case of a garment with a narrower neckline, you won't be dealing with the problem of slippage but with the problem of odd wrinkling or puckering, as the illustration above shows. The woman with sloped shoulders essentially has "too much" material in the shoulder area of her garment. Either she buys huge shoulder pads, or she learns to adjust her pattern pieces to fit her unique shape. I think the latter option is easiest and best, personally. :-)It is very easy to make adjustments for sloped shoulders. When you first try on your toile, you should put it on wrong side out so that all the seams are accessible. Stand tall, but don't try to overcompensate for your sloping shoulders by shrugging or assuming an uncomfortable posture. Instead, let your gracefully rounded shoulders relax right where they belong! This is when you'll see the puckering pictured above. To correct this problem, you are simply going to create a new stitching line below the current shoulder seam, like this:
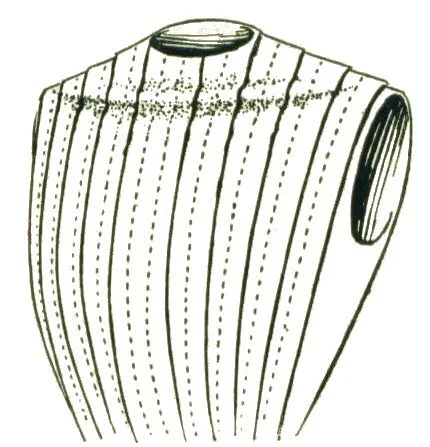
Having a helper is key, since trying to do this on yourself will not work (you'll have to raise your shoulder in order to place pins!). Have your helper pin the new seamline to match the slope of your shoulder. You'll know the new line is right when the puckers or wrinkles vanish. After you have the new seamline basted in place, you can trim off the excess material above it, leaving your 5/8" seam allowance and simply following the new diagonal line. Be sure you alter your master pattern piece to reflect this new shoulder seam angle. Then you won't need to adjust future outfits from the same pattern. If you're working on a pattern for a garment with a wide neckline (like the Regency Gown), you'll find that the adjusted seam prevents the neckline from slipping down your shoulders. Voila'!Now, if you're square in the shoulders, you'll find you have excess material and puckering across the collarbone, as this period illustration shows:
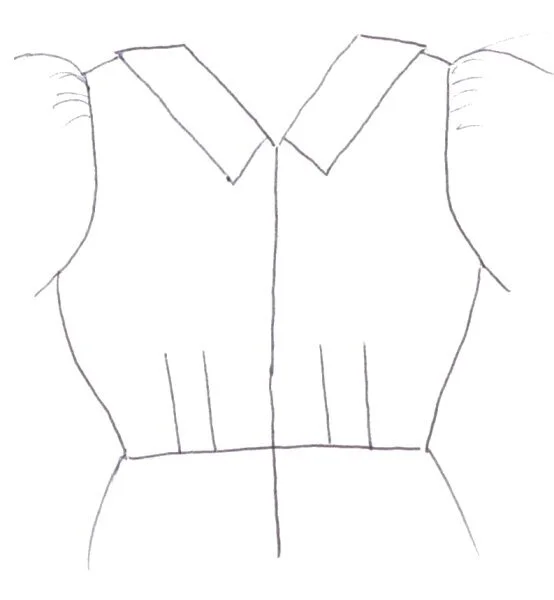
Your remedy is similar to the one for the gal with the sloping shoulders. Put your toile on wrong side out and have your helper at the ready with pins. Pin baste a new seamline along a different angle, like this:
Changing the angle will be especially helpful on tailored jackets, but you'll also find garments with wide necklines more comfortable, because the neckline won't have a tendency to pucker or gap at the sides. It really is easy, and you'll be delighted to see a garment that might have looked dumpy or just plain unflattering shed its ugly duckling status and behave beautifully!
Culprit #5: Arms and Armbands
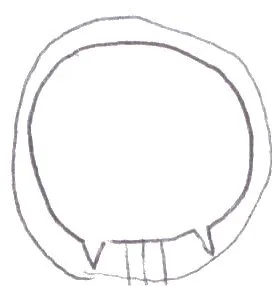
Armholes too tight or binding when you move? Sleevebands cutting off circulation? This problem can show up in armholes if you are broad-shouldered, so check #4 first. If you're not especially broad in the shoulders (more of an average 15.5" across), then you might just have what I call "bread-kneading biceps." After years of baking bread, my mother's upper arms are beautifully rounded (really muscular!). Mine are getting that way, but she has 27 years on me, so I'm not having to adjust armholes just yet. ;-) If you try on a toile and find that the armholes are too tight for comfort, there are a couple of things you can do to correct the problem. And if your sleevebands are too close for comfort, read on below. We'll cover those, too.First of all, when you try on a bodice toile, keep in mind that you do not have sleeves sewn into your armholes yet. Adding sleeves is going to take up a 5/8" seam all the way around the armhole, which will give you that much more room. I also recommend clipping the curves at the bottom of each armhole after you've inserted the sleeves, like this:
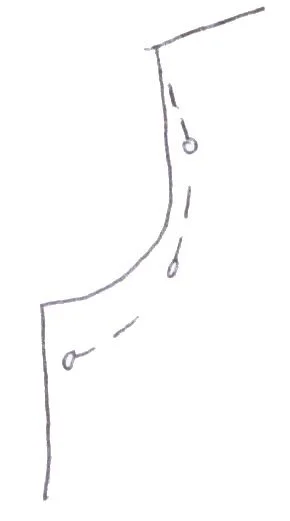
This is going to loosen up the armholes quite a bit and make them much more comfortable than they are during the toile stage. If, however, you have already done this and still find the armholes too binding, you will want to trim the armholes down to suit. This is very easy to do, but I recommend having someone help you, since it is easier to gauge how much needs to be cut off while you are wearing the toile. Have a friend mark the areas of the armhole that need to be trimmed with pins while you are wearing the toile. When you remove the toile, your armholes will look something like this:
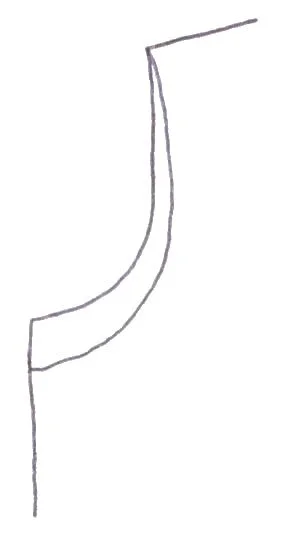
Now trim along the pinned lines, easing carefully back into the front (or back) armhole curves as you go (so you don't reduce the shoulder width unless you intend to do so):
Be sure to transfer this new armhole curve marking onto your master pattern pieces as well so you won't have to repeat this process again if you use the pattern to create another outfit. When you sew your sleeves in, you'll have plenty of room to move.Now let's assume the armholes are fine, but your sleevebands (on the Regency Gown with short sleeves, for instance) are too tight. The problem here is cutting sleevebands according to your "size" on the pattern piece. As I noted on the revised Regency pattern (2003), the sleeveband piece is just a guideline. There is no such thing as a "standard" sleeveband measurement, since all of us have different biceps (whether or not we knead bread!). It is best to measure around your flexed bicep before you ever cut out your sleevebands. Take that measurement, then add half an inch to an inch for comfort and 1 1/4" for the seam allowance (that's 5/8" times two). So, assuming your flexed bicep measures 13", you'll add a total of 2 1/4" for a fairly "forgiving" sleeveband or 1 3/4" for a more fitted sleeveband. You can baste the sleeveband ends together and try one sleeveband on for size prior to making your sleeves just to be sure of the fit. Nothing to it!
Culprit #6: Darts Missing the Mark
No, this isn't about Cupid and his little arrows! Almost every woman on the planet is going to have to adjust the bustline darts on a fitted bodice pattern (like the 1910s Tea Gown or my Romantic Dress pattern). If you don't double-check these with a toile first, you may end up with darts that hit too high or too low on the bustline or darts that are too far to one side of the center bust point. Fixing this problem involves trying on a toile in front of a mirror (or with a helper) and figuring out exactly where the darts need to be positioned on the bodice front in order to match your own unique bustline. There are very few gals out there who can make up a darted bodice as-is and find the darts are perfectly positioned, so don't despair if you need to make changes.The 1910s Tea Gown pattern has darts that are stitched and not cut out, while the Spencer jacket pattern has cut out darts. For the 1910s pattern, you can go ahead and baste your darts in place to double-check them, but for the Spencer pattern, you'll want to mark the darts with pins and not cut them out (or you can baste along the dotted stitching lines and leave them uncut). You will obviously want to try on your toile over top of the undergarments you intend to wear with your outfit. This may mean a regular brassiere, but if you're striving for accuracy and have a corset or set of stays (and a chemise underneath), you definitely want to have those on prior to trying the toile. With the darts either pinned or basted in place, try on the toile (having a helper is a bonus), pinning the bodice closed (and pinning the inset in place on the 1910s Tea Gown). Now check to make sure your darts hit you properly both vertically and horizontally. On the 1910s Tea Gown, the darts should come at the center of the bust point and not go up over the bust point (a corset will, of course, raise the bust point slightly). On the Spencer jacket, which has two darts on either side of the bodice front, the darts should hit just to the side of the bust point and not go up over it. Properly placed darts will look like this:
The darts end at the bust point, and the space between the two darts is centered upon the bust point.
If you find the darts are too long (and therefore hit you too high), you'll just need to mark how much lower the topmost point of the dart should hit and adjust accordingly. If the dart hits too far over to one side of the bust point, simply note how far it needs to move and reposition the dart marking(s) on the original pattern. After you've made any adjustments, change your toile and try it on again. Perfectly placed darts make all the difference in the world on a fitted bodice, as you'll see!
One Final Reminder:
Always make a toile of the bodice to try on prior to cutting into your fashion material!
If you've never used a particular pattern before, it is simply vital to create that muslin mock-up and try it on before you take your scissors to your garment material. I know I say it in the pattern instructions, but it bears repeating here. Making a toile will save you endless heartache, because you can identify unique fitting problems and solve them before you "ruin" the beautiful fabric you've chosen for your final outfit. This is especially true of patterns with fitted bodices and/or waistlines. What fits a "standard" mannequin perfectly on my end isn't always going to look good on you in the flesh! You might be one of the lucky ones who just hits the "standard" mark in every major area (bust, waist, hips), but it's better to find out before you cut into that fashion material. ;-) It's never a "waste" to throw out a toile and start over. Muslin is cheap, and learning on the toile is far less painful than learning on the final outfit!
I hope these instructions are helpful. Don't feel intimidated about changing pattern pieces. Each one of us is unique, and the wonderful thing about sewing for yourself is that you can achieve a beautiful fit that no off-the-rack garment can touch. There is nothing like a custom-fitted garment! Have fun as you explore your patterns and learn more about your own shape and style. Once you've got the basics mastered, you can change any pattern you find to flatter you perfectly!
Cheers,
