Modifying Your Regency Gown Bodice
There are so many fun ways you can alter your gown bodice to make it uniquely your style! Below I've illustrated two additional ways to change the look of your gown. The first method creates a fitted bodice with darts under the bustline. The second gives you a more "fan"-shaped bodice with the gathers in the center. I strongly recommend that you play around with a muslin bodice or two first until you achieve the exact fit and look you want. You might want to try different neckline treatments while you are at it (I've done a bodice with a "V" neckline and darts).
Darts
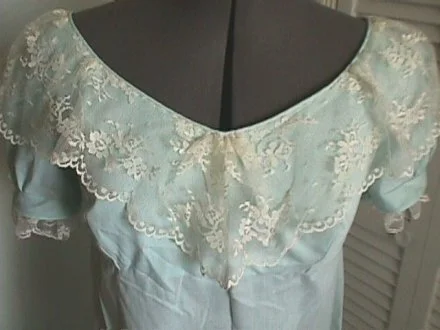
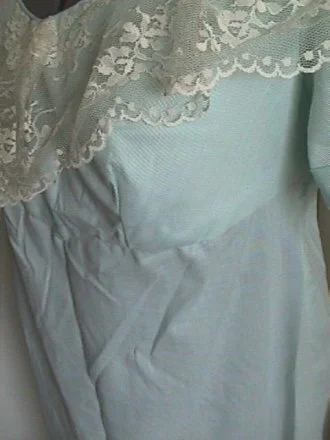
Above are three pictures of a Regency gown made with a darted bodice (no gathers). This makes for a smooth fit across the front, though you will have to watch how you taper the darts so that you don't end up with "points!" I apologize for the wrinkled gown in these photos—my iron had gone missing when I took these!
Step One: Measuring
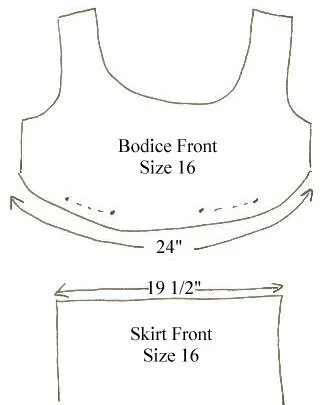
Okay, now to make your darts: To begin with, let's figure out how big your darts will need to be. This may sound complicated at first, but once you've walked it through, you'll see that it is all just common sense. In the first illustration below, you see a bodice front and skirt front opened out and measured all the way across. For the purposes of this lesson, I've used a size 16. Now, when you take these measurements, you'll be measuring from the side seam to the center front of each pattern piece (bodice and skirt), since the pattern piece is only one half (placed on the fold). For instance, the measurement from the side seam to the center front of the size 16 bodice is 12". Double that (as if the piece was folded out) and you get 24" as I've shown below.
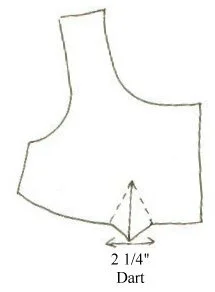
Here you can see that the bodice is 24" all the way across, and the skirt front is 19 3/4". Usually this difference would be eliminated when you pulled up the gathers in the bodice and pinned the bodice to the skirt. But we want to make darts instead of gathers, and we still need to make sure the 24" bodice fits perfectly onto the 19 3/4" skirt. We have a 4 1/2" difference. This means that we can have two darts that take up 2 1/4" of material at the widest point (at the bottom). That means that the dart, when folded over and stitched, will be 1 1/8" wide at the bottom. In my second illustration below, you can see the what the darts should look like. You can simply draw them in, centering them on the gathering lines already marked on the pattern piece (since those come directly beneath the bustline). The little triangle of fabric beneath makes for a nicer dart that doesn't "eat" into your bodice fabric.
Step Two: Setting the Dart
Determining the height of your darts is a bit tricky, but the best way to do it is to go ahead and cut out a muslin bodice and pin the bottom of each dart together. Try the bodice on with the underthings you intend to wear and mark where you want the top of the dart to hit (generally it should come to the middle of the bust). Once you have it marked, make sure you note that marking on your new master pattern so you won't have to measure each time. That's all there is to it! A little experimentation will save lots of frustration and give you a beautiful fitted look!
Cutting a "V" Neckline
This is actually quite easy and just involves deciding how deep a "V" you want prior to cutting. This will depend on your bust point, so measure carefully from your shoulder to the desired point of the "V", keeping the seam allowance around the neckline in mind (as that will subtract 5/8" when the neckline is finished). Now, use your measurement to mark the point of the "V" on the center front of your bodice piece. When you lay out the piece on the fold of the material, you will ignore the curve of the neckline and cut a diagonal line from the shoulder to the point to make your "V". If you’re still not sure how to proceed, there’s a wonderful YouTube tutorial that takes you through these steps.
When you cut out your bodice, use it to cut out a matching lining, which is how the neckline will be finished nicely. When the two are sewn together, snip into the point of the "V" on the wrong side of the material (being careful not to cut into the stitching), and understitch to make everything nice and neat. Voila!
Creating the “Fan” Bodice
This style of bodice came in during the late Regency and continued into the 1830s-1860s. In the illustration above, you can see what the finished bodice will look like. The gathers (or pleats, if you like) are centered and create a beautiful "fan"-like effect.
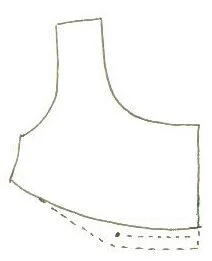
Creating a bodice with center front gathers does not require any changes to the gown pattern. You can just run the gathers across from one side bustline gather mark to the other. But to achieve a real "fan" look, you do have to alter the pattern piece slightly. As you see in the illustration below, the new shape has a bit of an angle under the bustline. You are adding the extra material so that the fan can be gathered or pleated with a bit of extra fullness in the bust. The added material at the left (the angle) will be completely pulled up into the center of the fan if you pleat instead of running gathering stitches.
The pleating effect really works best with very crisp fabrics (like dupioni silk)--otherwise you can't really see that they are pleats. When you pull up your gathering stitches to fit the skirt front, put the bulk of the gathers into the center of the "fan," but remember that you need to leave room to be comfortable! Spread some of the gathers evenly on either side to accommodate the bustline. If you pleat, begin with one pleat in the center (a "box" pleat) and continue making tiny knife pleats on either side until you can fit the bodice perfectly into the skirt front. Again, play around a bit to see what looks nicest with your material. You might even want to run some basting stitches across your gathers or pleats and try on the bodice before you sew it to the skirt. Voila'!
