Sewing Help for the Titanic Dinner Dress
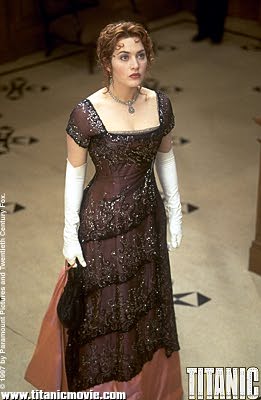
I have received numerous requests for help in re-creating Rose's first class dinner gown, so I decided to put up some quickie sketches and detailed descriptions of the draping on this beautiful dress. I have seen the gown up close (it was behind a scrim, but I was able to see the side and part of the back), so I know how the overskirt was attached. I do not know how well I can describe this, so bear with me! Also keep in mind that I did not drape or construct my version of this gown in the exact way it was done for the film, so these sketches and descriptions will be different than what you see in the "Project." Have fun!First off, here is a detail from a photograph of Winslet in the gown. The odd drapery under the right arm is what gives most people fits, since you cannot see the back of the gown.

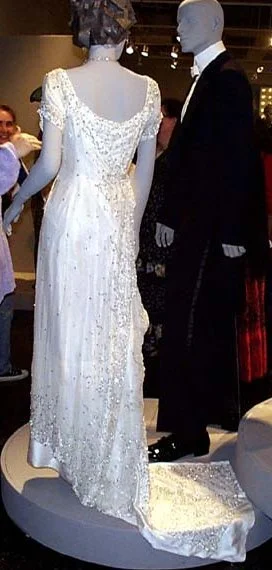
Next, I do have a photo (thank you, Robin Pavlosky!) from the FIDM exhibit in Los Angeles, which shows the back of the white version of this gown, constructed in the same way. (Click on the thumbnail.) In the sketches below, I will attempt to explain how this draping effect is achieved.

The front of the gown is relatively easy to figure out. In the sketch above, I've shown you the two pieces that make up the overskirt front. The left side of the overskirt is all one piece and is fairly narrow, since it extends to the left side seam only. The piece has beads all over and a beaded design along the hem that matches the design on the overskirt back. The right side of the overskirt is made up of four diagonal layers which are sewn onto a backing (when I made my version, I just sewed each layer to the next, since that was easier than using a backing). The layers of the right side overlay should be cut slightly on the diagonal, but not drastically so, since they will be pulled up a bit more by the rhinestone clasp on the left front of the bodice (just below the bustline). The skirt layers are attached to the bodice overlay at the waistline, which is slightly higher than the actual waistline of the wearer. As you saw in the first photograph, the right side seam of the layered overskirt is farther back--almost around the back of the skirt and not directly over the hip on the side. When I made my version, I used a more conventional side seam, but I don't think placing the seam farther back would present any difficulties (just remember to cut the overskirt layers a bit wider).

Above is my sketch of the right side of the gown. You can see that the drapery from the back is "caught" under the arm with a round rhinestone button or clasp (it looks black in the photo, but on the real thing it is of rhinestones). The remaining fabric then hangs down the side (heading toward the back of the dress at the bottom). This makes for a very fetching look. Draping was the rage during this era. Seamstresses would create a basic underdress, then hand drape it with costlier fabrics and trims and add beading to finish. It made every dress truly unique and beautiful.
Finally, below is my sketch of the dress back. The tricky part is figuring out where all of the fabric on the right comes from and how this unusual piece is attached the rest of the gown. It could be that the back of the gown and the left front overskirt piece are all cut out together (no side seam on the left). I am unsure, since there are no photos of that side of the gown, and I could not see it when I examined the gown in person. I'd wager it would be easier to try to cut the back piece out by itself, though, and sew it to the front left overskirt at the side seam. In the sketch, you will see my guess as to how the back drapery piece was cut out.

This is how I would do it if I tried to re-create the draping effect. The piece would be slightly longer on the right side, since it is going to be caught up into the clasp under the arm. That would allow some extra folds of fabric to hang down nicely. (Note: In this sketch, I have left off the train to avoid confusion. As you can see in the photo of the white version of the gown, the back drapery extends onto the train. I don't believe it does this on the dinner dress, however. I think the overskirt is the same length all the way around the back.) At the top, the piece is hand sewn onto the bodice, which has another overlay on it already (the back drapery will cover some of it). At the left shoulder, the back piece comes up into a point. then it curves gracefully downward towards the right side seam, where the clasp holds all of the drapery. I'd recommend running a small hand-stitched hem around the top and sides of this drapery piece, then sewing it firmly to the back of the gown. You might even want to put some narrow binding material under the hem to strengthen the material, since the beading and drapery are so heavy, and you don't want the fabric to tear or the stitching to come loose. Continue stitching everything down to the underarm seam, but do not stich the side of this piece in place. Gather it into your hand and pull it over to the side seam so that the back of the gown is perfectly smooth and the remaining fabric hangs down the side. Then firmly sew the drapery at the underarm, placing a rhinestone or other button/clasp over top of your stitching to cover it. Hem the sides and bottom of this piece, as you do the rest of the gown, and add your beads. Voilá!
March 2003: From a fellow costume nut...
A costume enthusiast who was able to observe the dinner dress up close sent me this excellent description to help you figure out how to recreate the gown!
"The dinner dress is made of shiny satin-backed silk with the satiny side topmost. The overdress is made entirely of very fine black tulle (which looks like chiffon from a distance). It is difficult to tell from photographs whether or not the tulle overskirt layers are sewn onto the silk underskirt. My instinct is that they probably are (at least across the top of each layer), since that is the best way to support the weight of all the beading. And in a couple of photographs, you can see the silk underskirt beneath an overskirt layer (implying that the layer is sewn to the underskirt). But I feel fairly certain the rest of the overskirt (the left side, the back and the train) is sewn into the waistline and then hangs free.The trimming used on this gown is varied -- there are silver sequins, silver seed beads (with some black seed beads used at the bottom of each overskirt layer), silver hexagonal beads and tiny rhinestones scattered randomly for sparkle. The pattern of beading almost looks like sanskirt or arabic writing -- or like smoke curling up from a fire (which may be more appropriate, given Rose's character). One other place where tulle is used is in the neckline of the gown, where you can see a narrow strip of tulle in the front and in the back. I believe this is more "open" tulle and not as fine as the tulle used for the overdress."