The Titanic Project

[Note: This project was originally done over a few months in early 1998. I shot the first photos with a film camera that I developed and scanned, then with a very rudimentary digital camera that took a 3.5” floppy disk. Enjoy a trip down memory lane—back before we had Pinterest or influencers!]
What do you get when you cross great film costumes with two high school seniors possessing exquisite taste in clothing? The answer is a challenging dressmaking project which will thoroughly involve the seamstress and keep her on her toes!
For the next two months, I will be recreating two of the costumes worn by Kate Winslet as "Rose" in the movie "Titanic." My customers, Stacy and Joslyn, saw the film and decided they wanted 1912 gowns for their senior prom. Talk about wonderful taste! Considering the current crop of prom dresses (which I must frankly say I find ugly), these gals are going to knock 'em dead when they step onto the dance floor. To stay within a reasonable budget, I'll have to cut some corners, but I hope to remain as true as possible to the originals.This page is here to chronicle the progress of the gowns from start to finish. I will take detailed pictures of each major step and put them on the page, updating as often as possible. Since I am busy completing several other orders due before this one, the work on these gowns will go forward in spurts. Keep checking back. Eventually, I will post photos of Stacy and Joslyn wearing their completed creations!Thanks for dropping by, and feel free to leave comments or suggestions here.Cheers,JennieP.S. - These gowns are one-of-a-kinds, and I will not be adding them to my catalogue. Sorry to disappoint the many ladies who have requested me to make them jump dresses, but I am a one-woman operation at this point and cannot turn out such detailed creations in a great quantity. I'm doing these two for the sheer challenge and fun of it and for the experience.
Update, 2001: I do have a pattern available that is very close to the "Swim" dress. It is my 1910s Tea Gown Pattern.
The Swatches
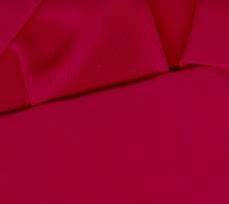
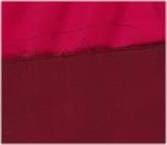
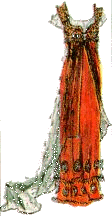
February 9, 1998: Having received the go-ahead from the gals, I made the trek to G Street Fabrics in Centreville, Virginia, today to purchase the materials for the gowns. I had to order the lace overlay for the dinner dress, but I left with a swatch of what was left on the bolt so I'd have something to scan. Below is the taffeta with the lace swatch.Here is the red crepe georgette and the chiffon I will be using for the jump dress and overlay. (The red fabric is actually closer to what was used in the film than the designer's sketch.) The black overlay gives the red fabric a deep, luscious tint to which these scans do not do justice. Believe me, all of these fabrics look much better in person! The lace on the far right is what will be used on the bodice of the "jump" gown. I will be adding sequins and beads to this as well.
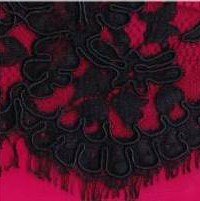
Below is one of the sequin trims I will be using on the "jump" dress. I did not scan the regular black and silver sequins and beads I'll use on both gowns, since most folks know what sequins look like.
February 18, 1998:
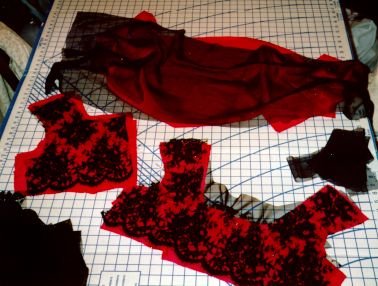
I cut out the "jump" dress on Monday, slicing fearlessly through crepe georgette and chiffon, but biting my nails when I came to the high-priced lace for the bodice overlay! After much measuring, testing, re-measuring and double-checking, I cut out the bodice overlay. The result is truly breathtaking. Here is a picture of the bodice sections with the skirt and overlay in the background. You can see that I altered the bodice to be a bit more modest than the more daring "V" on the original. Joslyn agreed, which made it easier for me, since I wouldn't have to bone the bodice.
I contacted Stacy about the train on the dinner dress, since I wasn't sure if she'd want the long train shown on the film costume. She has opted to leave the train off, since that will be easier to wear. I will also be shortening the train on the jump dress, making it more like the designer's illustration than the J.Peterman sketch.My film came back from the developers, and I nearly cried to see that only three (out of 24) turned out (the rest of the negatives were blank)! The same thing happened to our Christmas pictures this year, so I know the camera is the culprit. Went out and bought a new one today. Had to sigh, because I lost photos of gowns I'd planned to put up on my regular website. C'est la Vie!
February 19, 1998:
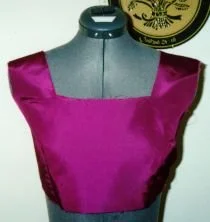
While working on six play costumes, I squeezed in time to cut out the lining of Stacy's dinner dress. Since I will have the chance to fit Stacy personally, I will not cut out the rest of the dress until I have fitted the lining. I am not as concerned about the jump dress, since it is empire waisted, but the dinner dress is so form fitting that I'd like to get a good look at the lining on Stacy before proceeding to cut into the taffeta!
March 2, 1998:
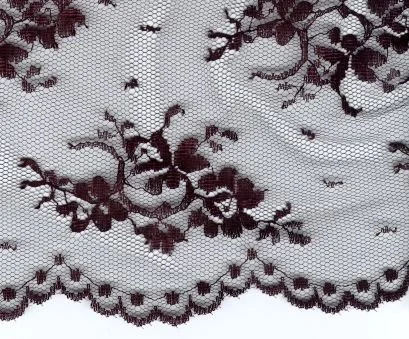
I met Stacy and Joslyn in Atlanta this past Saturday, where they tried on the bodice linings of their gowns for a fitting. I had laid out the jump dress pieces, along with the beaded fringe and sequin trim. I laid out the lining for the dinner dress as well, since I had not cut into the taffeta yet. The gals were really excited about the dresses and enjoyed seeing the work in progress. I could shoot myself--I did not remember to take any pictures!Today I went to G. Street Fabrics to pick up the lace overlay for the dinner dress, but they had ordered the wrong kind! I decided to take one last look in the bridal/evening laces, and I found one that will work nicely. Here is a scan of a portion of the lace:
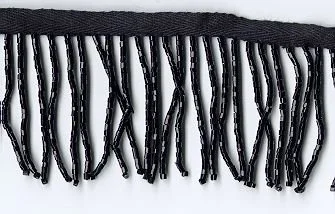
And here is the beaded fringe for the jump dress. I'll be adding some larger beads to this at regular intervals to get closer to the look of the film's gown.
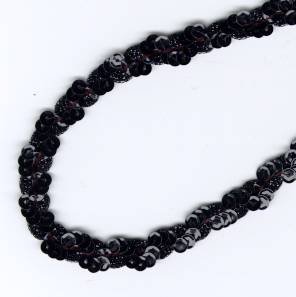
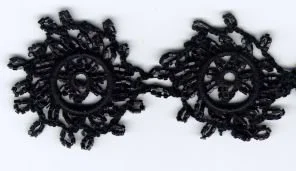
Here are a couple of the beaded medallions that will go around the bottom of the jump dress. They are a little smaller than what was on the film dress, so, again, I will add some beads. These medallions are off a ca. 1912 dress!
Dress Progress
March 4, 1998: Busy day today! I started out by cutting out two Regency ballgowns which are due on the 20th of March. That out of the way, I cut out the remaining bodice pieces of the dinner dress. Then I jumped right into sewing the bodice of the jump dress. That took three hours all told, because I took the entire thing apart once and a half, tweaking seams and curves until I had the look I wanted. Now the bodice is completed except for the hand work (beading, hemming, etc.). I also got the skirt and lining sewn together, but I ran out of black thread right as I began on the overskirt at 9:15 p.m., so I called it quits for the day. Tomorrow I will start on the dinner dress before heading off toteach a sewing lesson and pick up black thread.Sent off two rolls of film yesterday to be developed. Sure wish I had a digital camera! As it is, I have to get the film developed, then head 30 miles south to the scanner! Oh, well.... One day I'll go high tech.
Below are photos of the jump dress bodice "in progress." Left to right: Bodice with overlay and first insert pinned in; bodice sewn together with first insert and sleeves; bodice with skirt and skirt overlay pinned on for a preview. Note: Some browsers show the fabric of the jump dress here as a rather shocking hot pink. It is really a deep, rich red.

March 6, 1998:
Well, I saw Titanic once more last night, and I am glad I did at this stage of the project. I am going to take apart the front section of the jump dress once again and redo that neckline! Seeing the gown on a moving Kate Winslet showed me a lot more than the still photo and sketch ever could. For one thing, the black chiffon bodice insert goes up to the shoulders (I had it simply going across the front). Secondly, the sleeves are more fitted than the photo above shows. So, out with the ones I made and in with new ones!
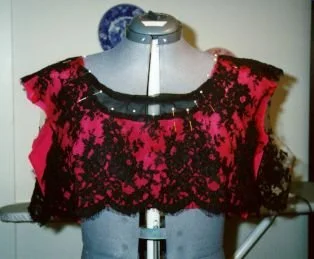
I accomplished a lot on the dinner dress yesterday. The bodice is ready to have the black lace overlay sewn on, and the skirt is ready to be attached. I have to say I am really pleased with the fit of the gown on my mannequin (set to Stacy's measurements). The trickiest part of this dress is going to be getting the overlay right. On the real dress, the overskirt lace falls diagonally over the underskirt, but not because the lace is sewn diagonally. Rather, there is a rhinestone clasp that "hikes" the overskirt up on the left side, making that diagonal look. Ought to be a fun challenge! (By the way, did anyone notice that the dress Rose is wearing after she dies and goes to meet Jack is the dinner dress done in white?)
Below left: The "first draft" of the dinner dress bodice. I later widened the neckline a bit more. Below center: Back of the dinner dress. I also widened this opening. Below right: Pinning the bodice overlay and sleeves.

Today I'll be trying to finish up all the machine work on these gowns, so that I can move on to the hand work (hemming and trimming!). My mother, a fantastic seamstress, will be helping with the handwork stage, since I could never meet deadline by myself. I'm sure we'll never want to see another seed bead when we're finished!
March 7, 1998:
Yesterday's progress was a bit slower than I had hoped, due to frequent interruptions and a couple of emergency errands for a friend. I did get the dinner dress completely together except for the skirt overlay (ran out of lace for the back!). I am really happy with the way the neckline turned out. It is exactly what I wanted. This dress hangs just beautifully, and the taffeta gives it such a lovely swishing sound. My husband brought home a copy of the March 16 edition of "People" magazine, which included a fantastic photo of Kate Winslet in the dinner dress.

Here is the final dinner dress bodice pinned together.
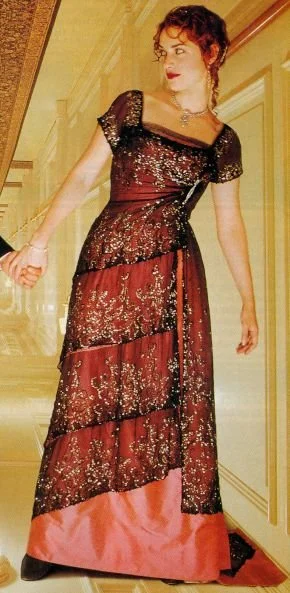
The photo from People magazine…
I also took apart the bodice of the jump dress yesterday, removing the insert and sleeves. Today I bought some more chiffon for new sleeves and another insert. While I had the black thread on the machine, I went ahead and sewed together the sections of the overskirt for this gown.Next week I've got to make two Regency ballgowns and a jumper for three other customers before I resume work on the Titanic dresses. I'll post an update when I get back to work!
March 12, 1998:
I finished up the second Regency ballgown and got right back to the “Titanic” dresses this afternoon. I worked with my mom today, since she is helping me with all the bead and sequin work. We puzzled out the remainder of the dinner dress overskirt, then Mom began piecing that together while I worked on the jump dress bodice. After seeing the photos from the LA exhibit and doing a lot of thinking, I realized that the best way to place the black net insert into the jump dress neckline is to tack it onto the lining after the bodice is finished. But since I had already taken the bodice apart, I went ahead and changed the back to a "V" instead of the scoop I had cut at first. Seeing photos of the real thing has helped tremendously! I sewed up the bodice, promising myself I'd never take it apart again, then attached the skirt/overskirt combo. Mom and I both marveled at the elegant result. [One side note here: since seeing the new photos, I realized that the overskirt is actually netting rather than chiffon, but, since I've already bought and cut the chiffon (and like it better), I am going to use it. However, I will use netting for the sleeves and bodice insert.] All that's left to do on the jump dress is add the sleeves, insert the invisible zipper, hem the skirt and hand sew the bodice insert and bead and sequin trims in place. (All you vintage aficianados can scream in horror now--yes, I am using zippers with hook and eye closures to cover the seam!)

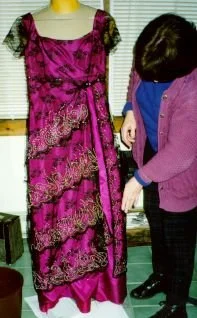
Above is a picture of Mom measuringand fitting the dinner dress overskirt. Some of the overlay is draped over the shoulder--it isn't there on the finished gown!
The dinner dress is finished but for the invisible zipper in the side, the hem and the trim. The trim on this gown is much more daunting than that of the jump dress. So much was accomplished on the latter with the pricey black lace overlay on the bodice. The dinner dress will require painstaking placement of pre-strung beads, plus sequins and seed beads. I sat down and sketched out a rough "plan of attack" for the trim design, and Mom and I talked about how best to attach the beading without going blind (or insane!). I've discarded the pre-strung silver sequins for this dress--too flashy--but I will use some here and there for highlights. Tomorrow I will try to finish all the machine sewing on the jump dress so I can dive right into trimming next week. Stay tuned....
March 15, 1998:
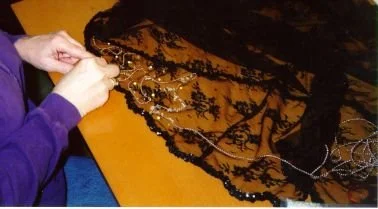
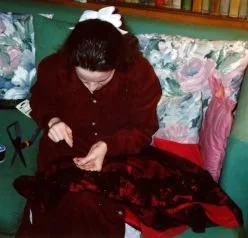
Mom and I did a bit of work on the gowns yesterday, and both are officially in the hand work stage! [I love invisible zippers now. I've always been dead set against zippers in any form, feeling they just ruin the look of a gown. But, if a zipper is absolutely necessary, invisible zippers are the only way to go! You truly cannot tell they are there.] I cut out and sewed the bodice insert and sleeves for the jump dress, then hand sewed the bodice lining in place and slip-stiched the lining to one armhole. The result is a beautiful, finished look. Mom worked on attaching sequin trim to the layers of the dinner dress overskirt. This week, we will be placing beads and sequins at every spare moment. I hope my pictures come back from the developer's soon so I can scan in the progress shots. Next time, I will go to the one-hour photo place--the suspense is killing me!Below is Mom starting the bead work on the dinner dress skirt overlay.
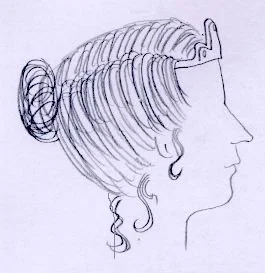
Below is a quickie sketch I did of the hairstyle Kate Winslet wore with the dinner dress.
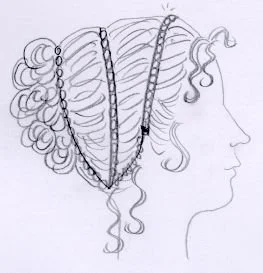
Stacy wanted to know how she could copy this, and I have a few ideas. To make the "jeweled" headpiece, just buy a thin hairband covered with rhinestones. You can usually find these at an accessory store like "Claire's" in any mall. Next, purchase about two feet of millinery wire (if you can't find this, florist's wire may work) and string it with small, round silver beads, leaving about 1.5 inches at the ends free. Twist these ends around the ends of the hairband, making sure they're secure.To figure out how to wind the beaded wire around your hair, put the hairband on your head and criss cross the wires as seen in the sketch (or some of the photos of KW's hair). My sketch doesn't really show how to do this well, but it is hard to illustrate! You basically want to create a "tube" or basket for your hair, making the wire go around the hairstyle twice, with the loop at the back being the smallest. To get your hair to stay up in this contraption, I recommend setting damp hair with a bit of gel in loose rag curls all day (or at least eight hours). Do not blow dry! When you take your hair back down, it will still be a bit damp, but the curls should stay. The gel you put in before rolling the rag curls will help a great deal.Now twist your hair at the nape of the neck as if you are starting a French twist. Secure this with lots of bobby pins. Put the headpiece on and "feed" the remaining curls through the beaded wire. You will have to separate the curls as you go and fluff them out a bit. Once you get the hair where you want it, spray! Make sure the headpiece is firmly in place. I hope this all makes sense. I'll try to get some good photos of the hairstyle up on the site this week.
Here I am pinning the beaded fringe to the jump dress bodice. You can also see the new bodice insert, which I placed there for the photo.

March 17, 1998: I attached the sleeves and bodice insert to the jump dress yesterday and started on the bodice fringe. That is pinned in place now, and I must say it is stunning. The beads will really make this gown. Mom has been plugging away at the beading on the dinner dress and has only one tier (out of four) left to do! She is amazing. I'll be going over to her house tomorrow for a day of solid work on these dresses. We want to finish them this week, since my husband, son and I will be moving on March 28th, and I have the whole house to pack up!My pictures still have not come back from the developer, and I am getting antsy. I will definitely use the one-hour photo next time!
March 18, 1998:
My hands are fairly cramped from all the beadwork done today, but I am truly pleased with what Mom and I have accomplished. First, I hemmed the jump dress and ironed that. Next, I sewed the beaded fringe to the jump dress bodice, then strung and added larger beads all the way around to get closer to the look of the real gown. On top of the fringe, I sewed the double sequin trim, then I began beading the bodice with silver beads in the hearts of the flowers. I finished the front of the bodice; now I just have to do the back before I sew the single sequin trim around the neckline, shoulders and sleeve edges. Beautiful, if I do say so myself.
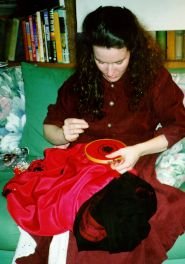
Below Left: Adding the filler beads to the bodice fringe. Below Right: sewing on the medallions and adding extra beads.
Mom continued to work on beading the dinner dress. The overskirt now has such a wonderful weight to it, and the beading looks fantastic. We looked it over after Mom had finished the top tier of the skirt, and I decided the whole thing still needs more "filler" beads to get that rich look of the original. After I finish the jump dress, I'll help Mom with the rest of the dinner dress.
Dinner dress skirt overlay almost complete.
Tomorrow I'll finish beading the bodice, then add the fringe and medallions to the skirt. That will take very careful measuring and placement, so I expect to be slowed down a bit. But I hope to finish it off, since I need to start packing for our move pretty soon (we move in ten days!). I'll probably be back at Mom's Friday, and we plan to sit and sew during the Oscars Monday night. (Have to admit I don't really like to watch Hollywood fawn all over itself, but I do want to see those costumes!)
March 20, 1998:
Yesterday was a slower workday than I had hoped, since I found that I had misplaced the fringe on the bodice back so that it caused the lace overlay to buckle out in one place. That called for removing the fringe and sequin trim to the side seam, then replacing it all again. After that, I finished sewing silver beads onto the bodice, sewed the single sequin trim around the armholes and neckline, and placed the rhinestone circles on the shoulders and bodice front. With the bodice finally complete, I pinned the beaded fringe to the bottom of the dress, then had to call it quits and head home to make supper.Mom continued her work on the dinner dress overskirt, placing "filler" beads to make the design even richer. It really looks incredible. Today I will sew the fringe and medallions on the jump dress, hopefully finishing it off completely (if I have to stay up all night to do it!). Then I'll be free to work on the dinner dress bodice.Yet another nightmare has occurred in the photo department. I took two rolls to the one-hour photo last night, one from the broken camera which will probably have only three pictures on it. When the shop assistant looked at the second roll, he said, "Oh, you got this as a freebie in the mail, didn't you?" I affirmed that I had, and he told me it has to be mailed back to the company that sent it to me! I could have cried. Fortunately, he knows a lab which is licensed to print the rolls, but he still has to mail it off. Those should be back early next week. In the meantime, I am still waiting for the two rolls I mailed off to come back. I've never been such a nervous wreck about photos, but these are all I have of the Titanic Project!
March 21, 1998:
When I said I was "on the home stretch" heading into the beading stage of these gowns, I think I had temporarily lost my mind! The beading has been the lion's share of the work by far. However, I can truly say that we see the finish line ahead. I finished all twelve medallions, sewed on the second row of beaded fringe and beaded half the overskirt yesterday. The gown is so heavy that Joslyn will have to start lifting weights now to prepare for prom! ;-) Mom finished the overskirt of the dinner dress and began sewing the sequin trim around the neckline and sleeves of the bodice. After that, she will sew the overskirt to the bodice overlay and begin beading the bodice. This gown is also quite "substantial" and hangs just beautifully. What I have left to do on the jump dress is to bead the rest of the overskirt, add filler beads to the fringe on the skirt, and sew the double sequin trim to the edge of the overskirt and on the top of the fringe. Hurrah!
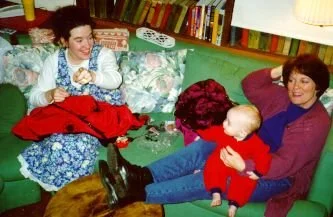
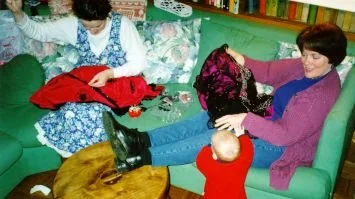
Below Left: Trying to get my son to look at the camera and not all the wonderful beads and sequins! Right: Working on both dresses with his "help."
March 24, 1998:
As of 10 a.m. today, the jump dress lacks only sixteen beads (ran out again!) and the back bodice panel which will cover the top portion of the zipper seam. I will have both these items taken care of by mid-afternoon. Mom has finished 4/5 of the dinner dress bodice, and it is looking fabulous. All that's left after that is the skirt hem.I am scheduled to take the gowns in for a photo shoot tomorrow afternoon, after which they will be shipped. I must say I actually feel sad at the thought of parting with these gowns, but I can't wait to see them on Joslyn and Stacy and hear what they think!Here is the jump dress with the bodice insert and sleeves sewn in, the filler beads on the bodice fringe, and half the beading finshed on the overskirt. Still no sequin trim on the overskirt or filler beads in the bottom two fringe layers at this point.
Now, Joslyn has been waiting patiently for me to show her how to do up her chin-length hair. Here is my sketch:
Once again, I recommend combing in some light styling gel after washing the hair, letting the hair air dry, then putting it up while it is just slightly damp. Part the hair in the middle, keeping the bangs in with the sides. Place the tiara down over the forehead. (If you prefer to keep your bangs in front, that is fine. Just curl them under a bit before placing the tiara.) Next, take the hair at each side and sweep it up towards the crown, going over the tiara band and tucking it down into the band and securing with bobby pins. Leave a bit of a "pouff" to give the illusion of more hair. If you run out of tiara, continue tucking the hair, using bobby pins to secure it. This is where the gel will help! When you reach the back of the head, take the remaining hair and make a nice, puffy bun or several curled tendrils pinned into a bun shape. Spray to set. This should work well with chin-length hair and stay if you secure it firmly. The tiara will make it especially regal.
As for jewelry, let me recommend NelsonCraft. Deborah Nelson makes beautiful retro-Edwardian necklaces and earrings which will be especially appropriate for the jump dress. For the dinner dress, a rhinestone necklace and earrings would be most correct. Stacy found some at Ron's Rhinestones, but I'm going to see if I can find something even closer to what was worn in the film. Now I must get back to work!
March 29, 1998:
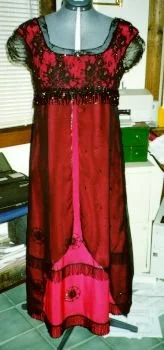
I shipped both gowns on Thursday, having finished them up the day before. I didn't post an update earlier, since we have spent the past three days packing up our house and moving 30 miles south. I feel like I've been run over by a train! I certainly don't want to move again any time soon.I took the gowns to be photographed when they were finished, and the portrait studio people went nuts. The photographer ran out to grab any females he could find nearby in the mall and asked them to come look. It was rather amusing. The same thing happened when I took the dresses to be shipped, since I had to buy the box and pack them in the store. All the ladies went bananas. Now I'm on pins and needles to hear what Stacy and Joslyn think! I felt sad to see the gowns go after two months of planning and work. It was certainly a wonderful project, though I can say quite easily that I will not do another one of these gowns--the hand work was just tremendous. But it was an experience I'd never trade.I have the professional portraits of the gowns ready to scan, but I will wait until Stacy and Joslyn have seen the real things before I post the photos. I want them to have a bit of a surprise!
Stay tuned, since I will also post photos of the gals in their gowns when prom is over.
March 30, 1998:
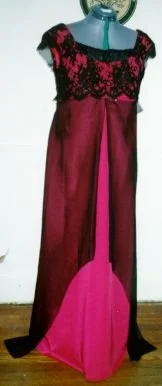
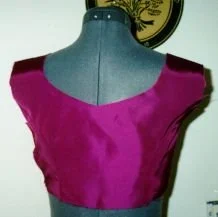
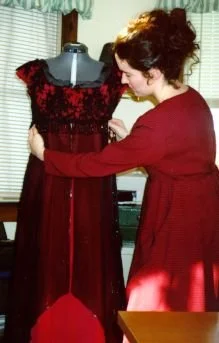
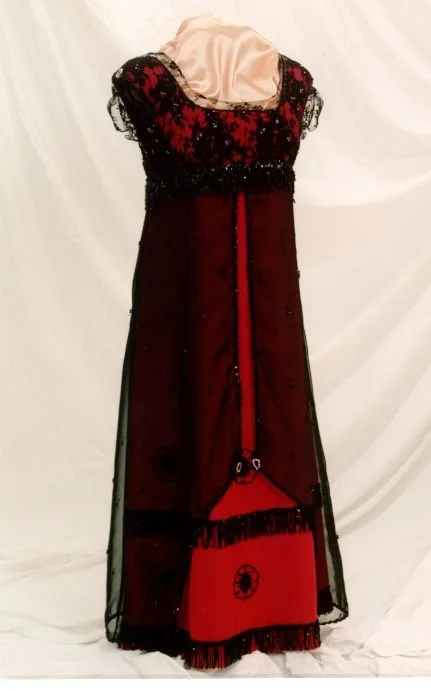
Stacy and Joslyn called this afternoon to tell me the gowns had arrived, and they fit perfectly! Now it's only a matter of finding the proper shoes and figuring out how to do their hair. I just can't wait to see photos of the gals in their gowns. They said they'll wait 'til prom night to show their gentlemen how they look in the gowns. Here are the professional photos I had taken on my mannequin. (These are copyright Expressly Portraits, 1998.)


April 4, 1998:
So many ladies have asked me where they can have these gowns made, and I am now able to recommend four sources. Tina Fisher at Sew Beautiful, Kat Hargus at Making Time, Rebecca Rizzo at Past Impressions, and the gals at "That Sinking Feeling" (in Germany) are all excellent seamstresses who are offering these gowns. [2023 update: All of these resources are no longer in business, sadly, so I’ve deleted all the links.] J. Peterman sold a reproduction jump dress, as you can see below:
May 20, 1998:
It seems Titanic clothing mania has finally hit the nation. It is wonderful to learn of all the gals with fantastic taste out there! Thank you for all the interest, not just in the evening gowns, but in the everyday dresses. Bravo! It is about time for this marvelous period in fashion to come back.
A couple of wonderful internet sites have linked to my "Titanic Project" page and given great reviews of my work. Truly flattering!
To see the gals in their gowns, go to THIS LINK!