Casey's Swing Dress Sew-Along

Jennie's Note:
The lovely Casey Maura created this Sew-Along tutorial for my Swing Dress pattern in 2011. I asked her later if I could repost it in its entirety (in a single post instead of 13) on my site, and she was kind enough to send me the text with accompanying photos. Nearly four years went by (where does it go?), and I just never managed to get around to reposting. Then a customer wrote with some very specific questions about this pattern, so the time has come to get this all up and share Casey's incredible work. This tutorial is even better than my own pattern instructions and will really get you through the tricky parts of this vintage design. Casey, thank you for this fantastic tutorial!
Part One: Supplies
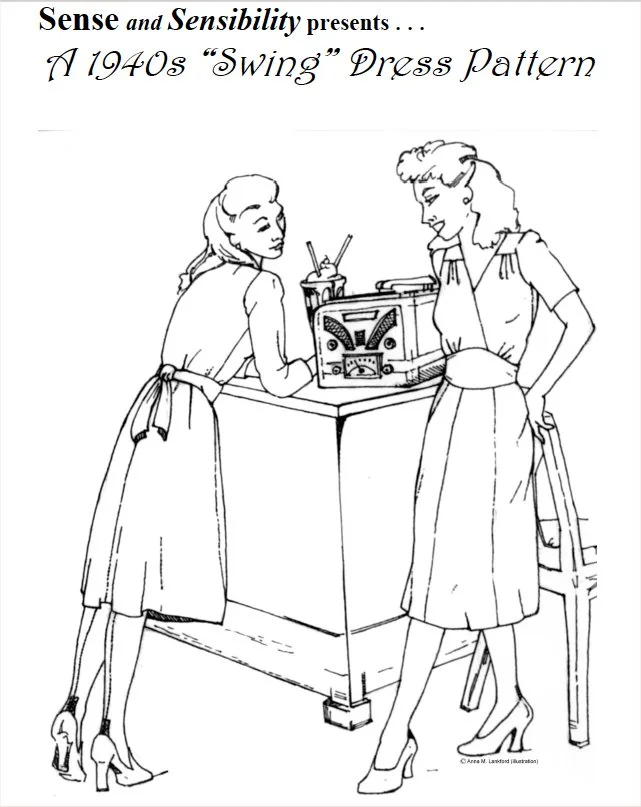
Artwork copyright Anna Lankford
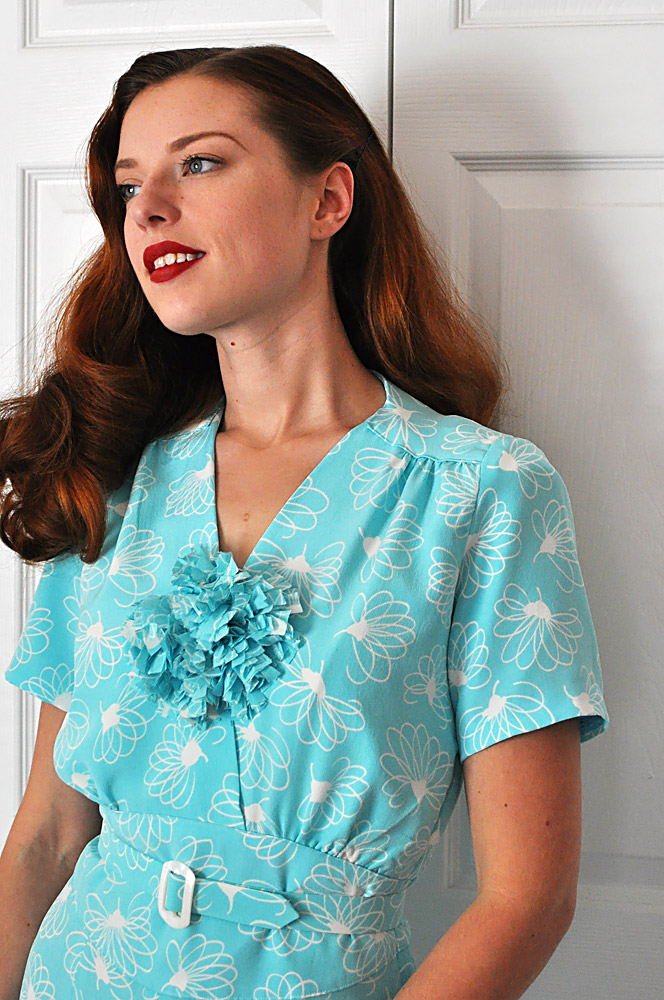
Even though I've made three versions of this dress previously, I am still not tired of it! I'm envisioning a springtime version in a pretty pastel with short sleeves for myself. This pattern is quite simple to sew up, offers a lot of options for deviating and making your own version. To top it off, Jennie Chancey based the pattern on a 40s design, so it's great for those who swing dance or participate in living history events. But even if the 40s isn't really your look, it's a classic style that lends itself well to other interpretations in modern fabric (or would even look fun made up in a 70s print!).The supply list for this particular dress is quite simple, although I've made a few additions. Better yet, the fabric requirement isn't that great (most sizes average around 3 yards), which means it's perfect for those of us on sewing budgets! I'll be discussing suitable fabric choices later this week, so sit tight for those. Until then, here's the list of supplies to start gathering:
Swing Dress Pattern: There are two forms you can purchase the Sense and Sensibility Swing dress pattern in, printed or as a download. If you're familiar with the way BurdaStyle formats their print-at-home patterns, you should have no problem with the download version. Jennie also has a helpful e-pattern faq on the site.
Fabric: Consult the size chart to get an idea of what size you'll be cutting out. I've generally found Jennie's yardage requirements are more than ample, but adding an extra 1/4 or 1/2 yard in is never a bad idea! (Remember if you choose to make this dress longer you'll need more.) As mentioned above, I'll be going over suitable fabric more thoroughly later in the week.
Stabilizer: Although the pattern does not require it, I find that stabilizing the midriff area and neckline really helps the overall look. Again, this is something that I'll be discussing going forward.
Muslin: You certainly aren't required to, but I recommend making a muslin to tailor-fit this pattern to yourself. I've tweaked my copy over time and now have a custom-fit version and it really pays off when I want to make another version! Get at least a yard more of muslin than the yardage required for your size. (Of course, you don't have the buy what's labeled "muslin" on the bolt--any inexpensive fabric that isn't too heavy or stiff should work. This dress is best suited towards soft, drapey fabrics so something around a lightweight cotton will work for the test version.)
Shoulder Pads: No, we're not talking line-backer style pads! Rather we'll be making the more moderate pads that I wrote about here. You can always opt for pre-made though.
Cotton Batting: Only if you opt to make your own shoulder pads.
Matching Thread: Just the usual, all-purpose type should suffice.
Closure: The pattern uses an 8" invisible zipper, but for this tutorial I will be showing you how to insert a regular zipper using a method that was popular in 40s sewing books (just get an 8" to 10" regular zipper if you opt for this method). You can also opt for snaps if you're using a very soft/sheer fabric instead. (I'll include a short overview of this as well.)
Brooch/Decorative Button: Optional to attach at the neckline to keep things closed, but if you prefer a few discreet handstitches will work too!
Pattern Alteration Supplies: Things like pencils, markers, rulers, etc. As you go along and fit your pattern, you may wish to trace it onto new paper. I recommend using a sturdy banner paper, non-fusible interfacing, Swedish Interfacing or medical table paper (I use this and it's cheap and slightly transparent).
Basic Sewing Tools: The usual things like fabric shears, sewing machine, iron, hand sewing needles, etc. I'm sure you already have most of those!
Now, just a quick word about skill level. This pattern doesn't have any techniques--besides inserting a zipper and topstitching--that I would classify as "hard". If you're an ambitious beginner and have made at least a couple garments, are familiar enough with sewing and garment construction, you should be fine! (As much as I'd like to, this won't be a "how to sew" course, so just be advised I assume you have knowledge of basic construction and/or a good sewing reference.) This is part of the reason we'll be making a muslin: to familiarize yourself with the construction before cutting into your fashion fabric!
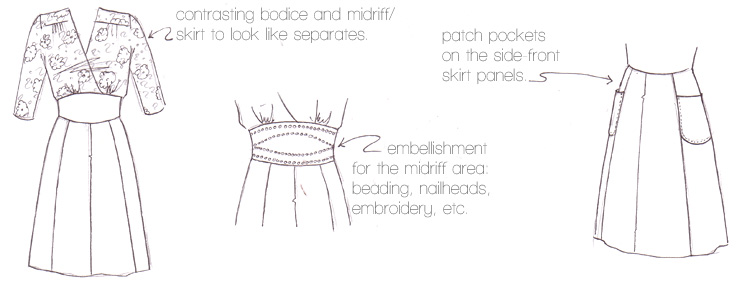
What about variations? This pattern, as I mentioned, is such a simple style that can be tailored to your own aesthetic vision easily! Some ideas would be: contrasting fabric for the midriff, leaving off the sash ties and swapping out for a belt (as I did on my most recent version), trying some embroidery or trapunto on the midriff piece, using a bordered fabric along the neckline, making it floor length for a sumptuous evening gown, adding embroidery or beading to the bodice... The list is endless! Here are a few images that I found in my files to inspire you for similar styles:
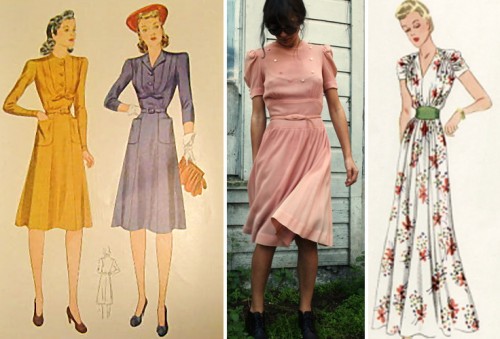
l to r: patch pockets on a paneled skirt similar to the Swing Dress pattern | a vintage dress (Ebay) sporting a self-fabric belt and button embellishments | an evening gown with a contrast midriff section.
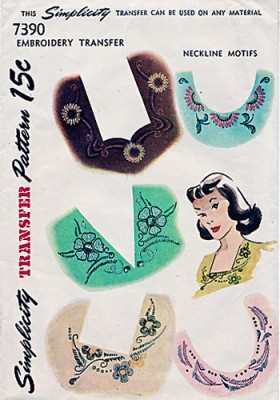
40s embroidery motifs that could easily be reworked and added to your Swing Dress version.
Part Two: Fabric
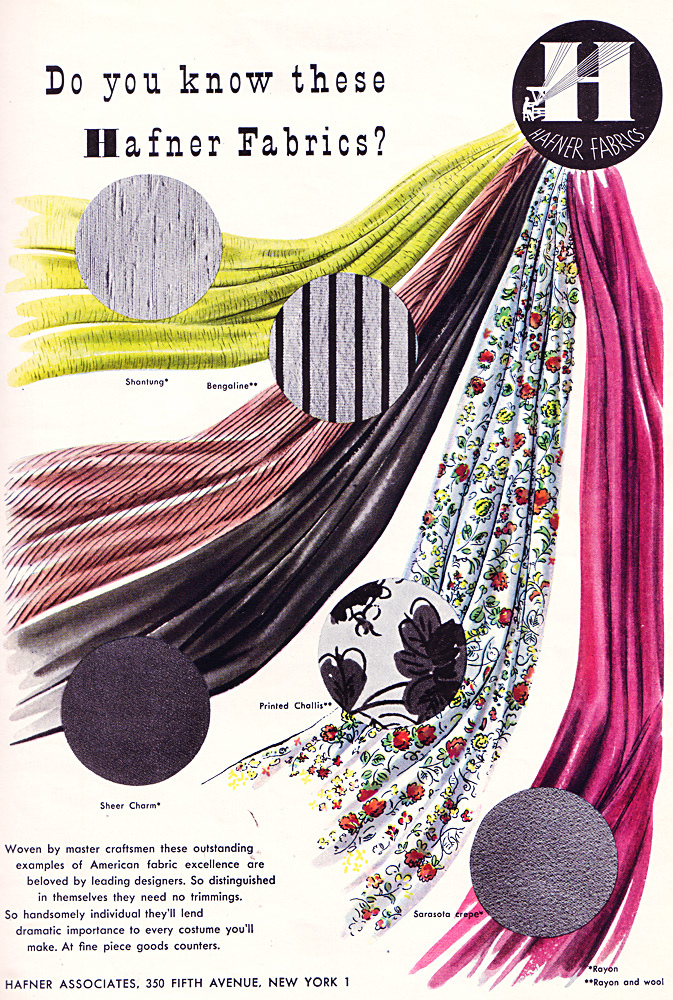
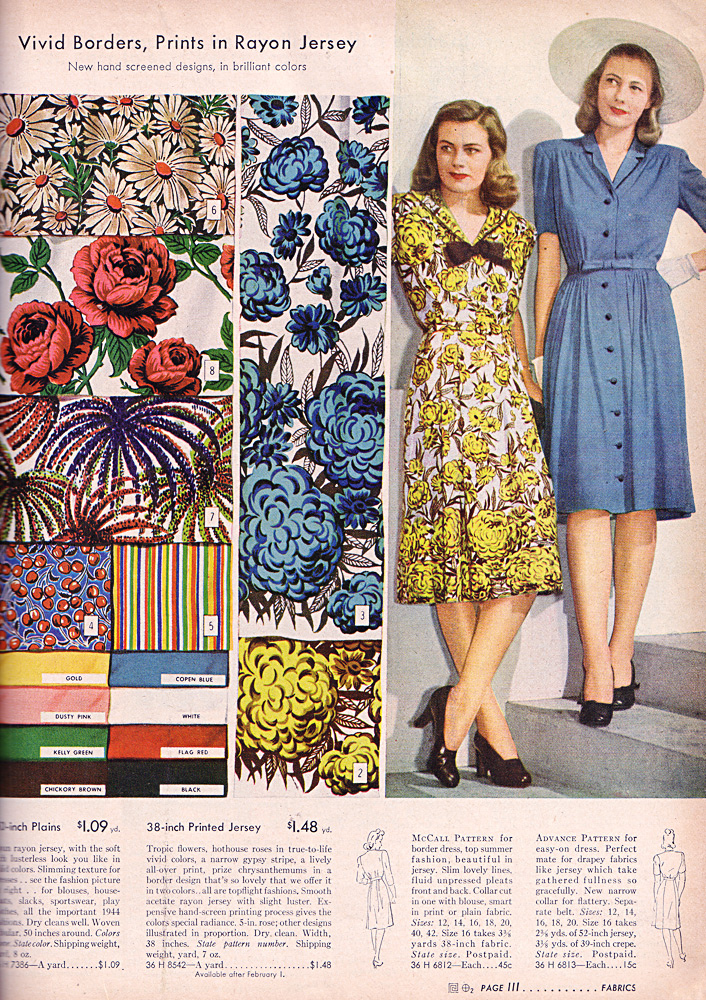
One of the biggest features of any garment you sew is fabric selection. This can be especially tricky with vintage patterns (most up until the 50s don't include any suggestions!), but happily Jennie has included several suggestions that can serve both as literal and "clues" to the type of fabric this dress is most suited for! Even if we can't choose from the array of (drool-worthy!) rayon fabrics that designs like these were whipped up in back in the day, there are still plenty of options for the modern seamstress. The pattern recommends: Crepe, heavy rayon, rayon/poly blends, silk charmuese, lightweight wool.
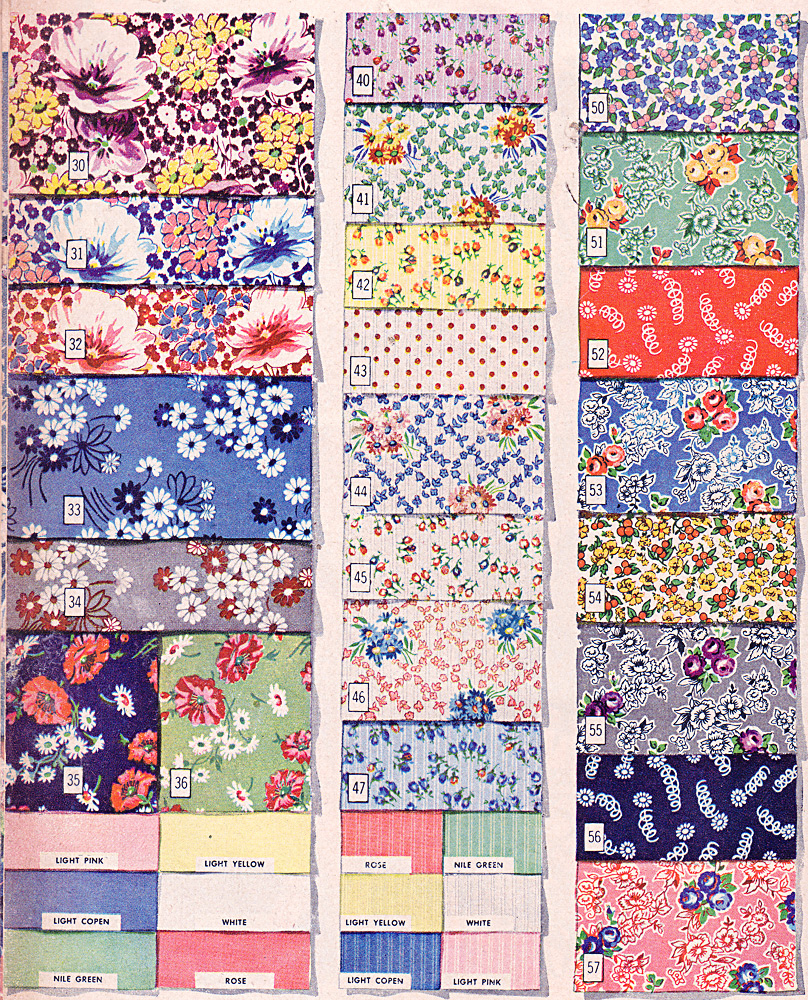
Now, if you were planning on using any of these sorts of fabrics, you're in luck! But what if you had something else in mind? Now is time for doing a little "fabric sleuthing" and figuring out some other options. Looking at the list of fabrics above, we can deduce that all are light to medium-weight material that has drape. Meaning it's not stiff or bulky. You want something that is supple and fluid. Other options that I think would work as well: Cotton voile or lawn, georgette in silk or blends, a very lightweight and soft linen, sueded rayon or silk, soft eyelet. Notice all these fabrics are soft or the sort that have good drape, and are lightweight. If you're unfamiliar with any of these fabrics, I highly recommend Claire Schaeffer's Fabric Guide or this online textile dictionary for a description of the fabric you're considering. Let me also say here that I strongly do not recommend quilt-weight cottons. Generally these fabrics are stiffer than what is suited for most (not all) garment designs, including this one. Stick with a fabric that is a garment weight, and you should be good. I know it can be hard with all the adorable reproduction prints available in the quilting department, but trust me: I've made that mistake in the past and it can make or break how the finished garment looks.
You certainly don't have to stick with a fabric that reads as "1940s". This dress looks equally stunning in a classic solid or modern print. You could even go with a 70s print for a different look! Your imagination and aesthetic preferences should lead the way on picking color or pattern--have fun! I do want to mention that because of the pattern pieces in the skirt, lining up plaids, stripes or other directional prints that need to be matched may be tricky. I won't be able to cover that from start to finish in this particular sew-along, but if you choose to go with one of those I'm sure I can dig up some references for you!
Don't have a good fabric store in your town? No need to fret--there are a lot of apparel fabric retailers online. Here are just a few of the better-known ones: Gorgeous Fabrics, Denver Fabrics, Mood Fabrics, Fabric.com, Vogue Fabrics, Apple Annie Fabrics, Michael's Fabrics and Emma One Sock. There are a variety of price points on each, from budget-friendly to couture quality, so be sure to do a bit of snooping to find something that fits your budget. Threads Magazine also published a great list of online fabric shops last year that is a good starting place. Don't forget to check Etsy and Ebay either; especially if you're looking for a vintage rayon to make your dress up in!
Now let's talk a bit about stabilizer--also known as interfacing. Firstly, I do not claim to be an expert on this subject and am only offering my personal opinions/preferences and what I've discovered. Though the pattern does not call for it (as it is with most 40s-era patterns), I have found that adding interfacing to the midriff really helps how the dress lays over the stomach and adds some stability to a curved join that otherwise has a tendency to stretch or pull around. If you're opting for an lightweight fabric (such as a rayon challis, for instance), I usually go with a very lightweight interfacing--one of my favorites is a fusible knit interfacing. I know it seems counter-intuitive to use a knit interfacing, but it does give a little bit of stability to the area but usually does not affect the weight of the garment fabric. For slightly heavier fabrics I got with a light-medium weight interfacing. If you're using a semi-sheer or sheer material, you will have to experiment a bit to determine what would be the best option for stabilizing. I do not recommend using a fusible in this instance--sew-in is the way to go. Some options could be: self fabric, silk organza or cotton voile in a similar hue. Further reading: Thread's interfacing brands chart and SewBox guide to interfacing.
You will need to experiment a bit with picking out an interfacing to suit your fabric if you're unfamiliar with them. If I'm not sure how an interfacing--especially a fusible one--will affect the drape and weight of a garment fabric, I always do a test swatch first (usually an 8"-10" square suffices so I can see how the drape looks). Sometimes the adhesive makes the fabric too stiff and I have to try something lighter or switch to a sew-in. Generally, the rule of thumb for this particular project will be: when selecting and apply a stabilizer, you do not want to dramatically affect the "hand" or drape of the material. Meaning you don't want to make it as stiff as a board or dramatically heavier or bulkier than it is without the stabilizer. Not only does this make the interfaced area drape differently than the rest of the garment, but can make for bulky seams!
Part Three: Pattern Prep
Rarely do I just cut out a test garment straight from the pattern; usually I do some measurements and adjusting before my scissors ever touch the muslin. Why? Because this eliminates some (not all!) of the fitting problems I might encounter and allows me to focus on the larger issues that may need to be fine tuned.
But first, I would highly recommend taking a set of measurements for yourself. This can be a bit tricky if you're alone, but is very helpful to have. Threads Magazine published a great guide on what measurements to take and jot down. (If you have Cal Patch's Design It Yourself Clothes, so has a good section on measurements and how to take them.) Of particular note for this project will be: bust, waist, hip, waist to desired skirt length, and shoulder to waist.
Once you have your measurements in hand, it's time to pick out a size. I recommend tracing this pattern since it's printed on heavy paper--or if you're using the at-home printing option because of taped together the paper pieces (which just get awkward to work with). This will allow you to create a custom-fit garment pattern without ruining the original pattern. For tracing I use medical table paper, but as I mentioned in Part One, banner paper, large sheets of tracing paper or even non-fusible interfacing will work.
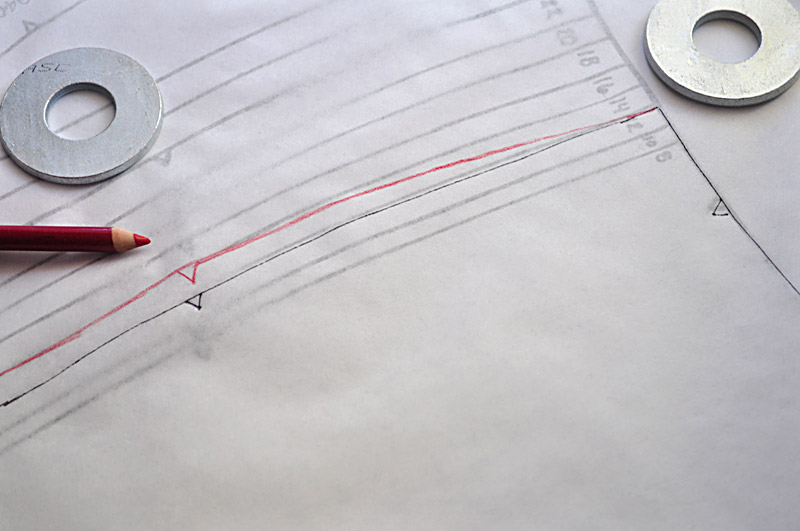
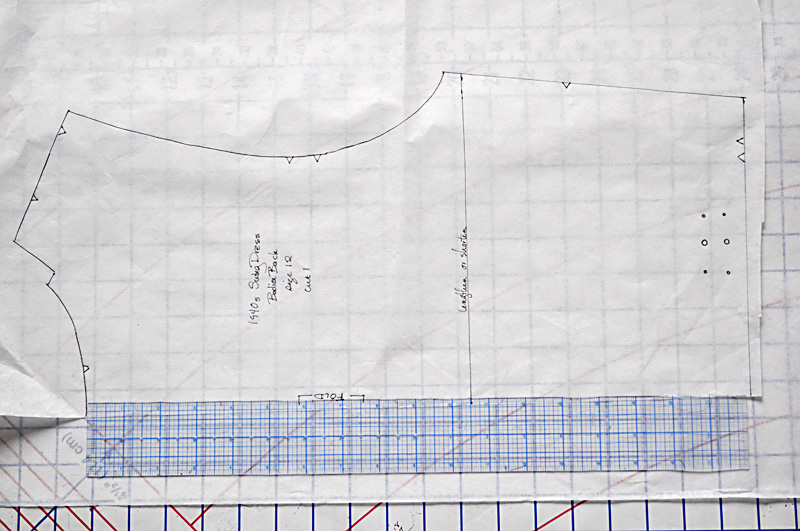
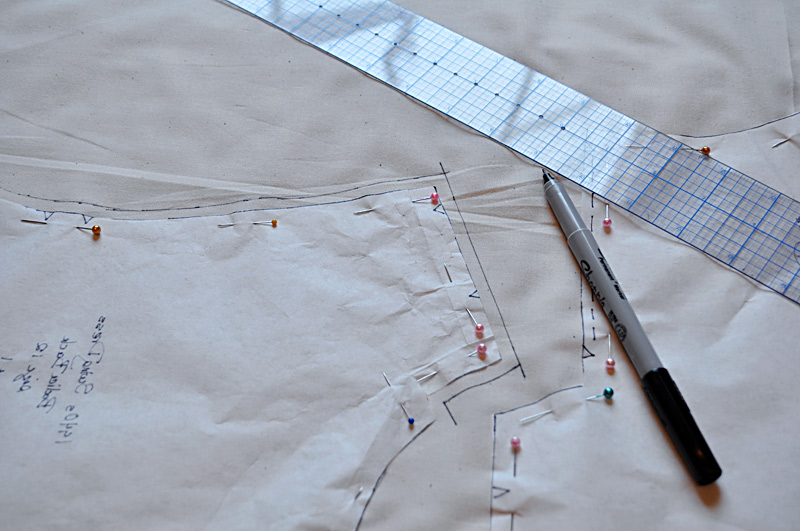
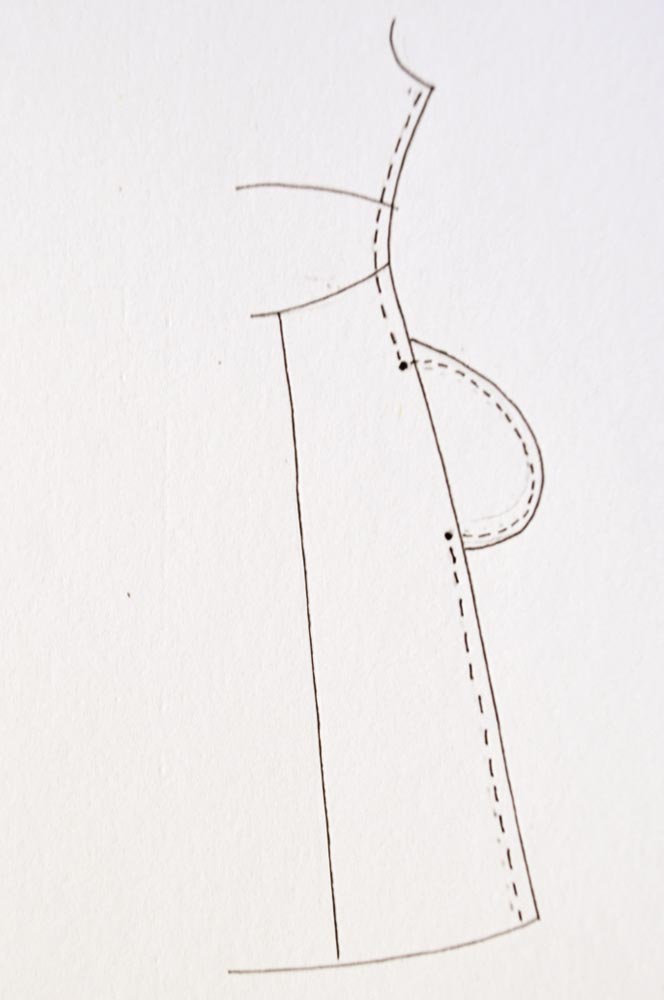
Now if you're like most women, it's likely you may span more than one size. If you do, don't worry! You can easily blend one size to the other over various areas where you need to go up or down a pattern size. For example if you have a hip measurement a size larger than your waist: trace the waist measurement from the smaller size and gently curve a line out to meet the line for the larger size over the hip. I've included an example above of just that (black line is size 12, and the red line shows blending from the size 12 waist to a 14 hip).
Once you have traced all your pattern pieces, you will want to start making some preliminary adjustments to the pattern. Further along, I talk about adjusting the bodice and sleeve lengths, but some others that may need to be taken into consideration:
Sleeve Cap Ease Like most 40s inspired styles, there is a lot of ease in the sleeve cap, which makes it tricky to sew the cap in smoothly. I did an entire post on how to adjust this here. I highly recommend doing this prior to cutting the muslin!
FBA or SBA Large or small busted, you may need to make a Full Bust or Small Bust Adjustment to this pattern. I think this pattern will work well for ladies with a C or small D cup size, but outside of that you'll need to do some tweaking (I need to do an SBA on mine). Despite how intimidating it sounds, it's a very simple adjustment to make. Gertie posted a roundup of tutorials on bust adjustments awhile back that are super helpful.
Skirt Length I have short legs, so I almost always have to adjust the length of a skirt. While you could just chop off the couple extra inches at the hem, this will also affect the sweep or hem circumference of the final skirt as well. Plus if you've got the opposite problem (taller than the pattern allows for), you'll need to lengthen it. I've documented how to make this easy adjustment below.
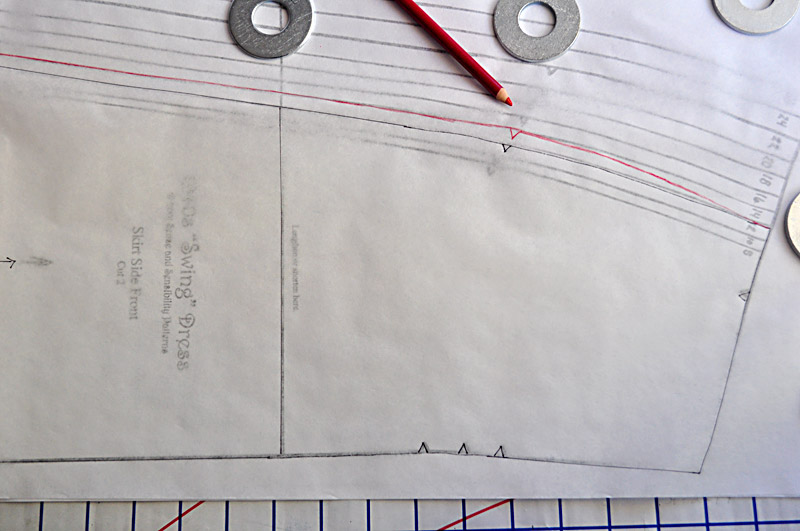
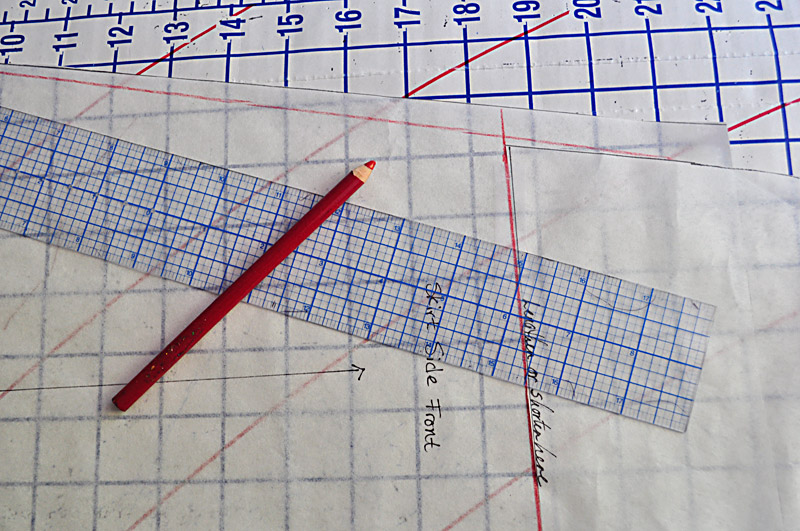
First, determine how much you need to add or subtract from the skirt length. Remember I said to take note of your desired skirt length measurement? Generally most 40s dresses end just below the knee, although I tend to make it slightly above because that's a more flattering length on me. Take the front skirt piece and measure it from the top to the hem, subtracting 1 1/2" (1/2" for the waist seam allowance and 1" for the hem) from this length. Compare this to your skirt length measure (which is just your waist to wherever you want the skirt hem to hit), and figure the difference. For me, it's about 3" that needs to be subtracted from the skirt. So I'll be taking 3" off the length of all the skirt pieces. Jennie has made it super easy by including a "lengthen/shorten" line on the skirt.
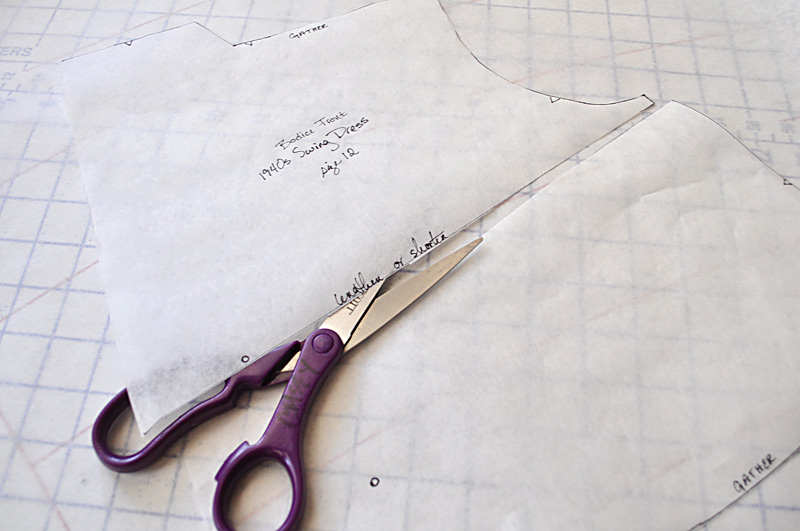
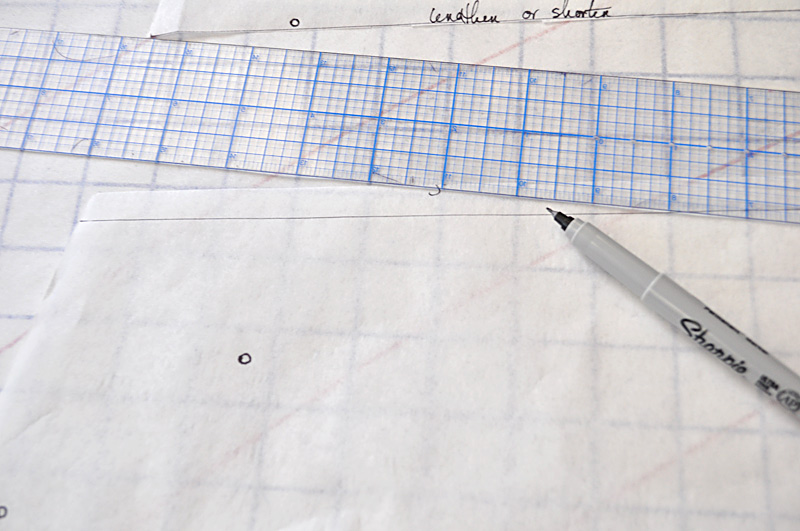
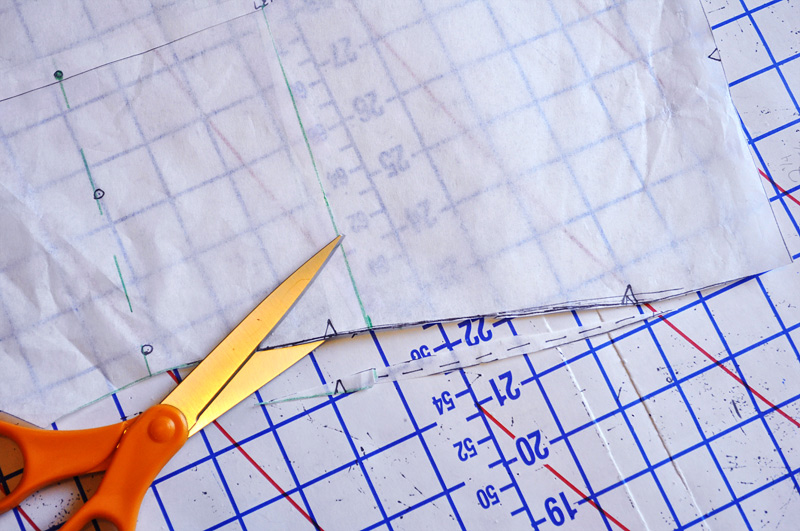
Begin by cutting the skirt piece at the "lengthen or shorten" line. Using a ruler, mark a line the length you need to shorten this piece (in my case, 3") from the cut line.
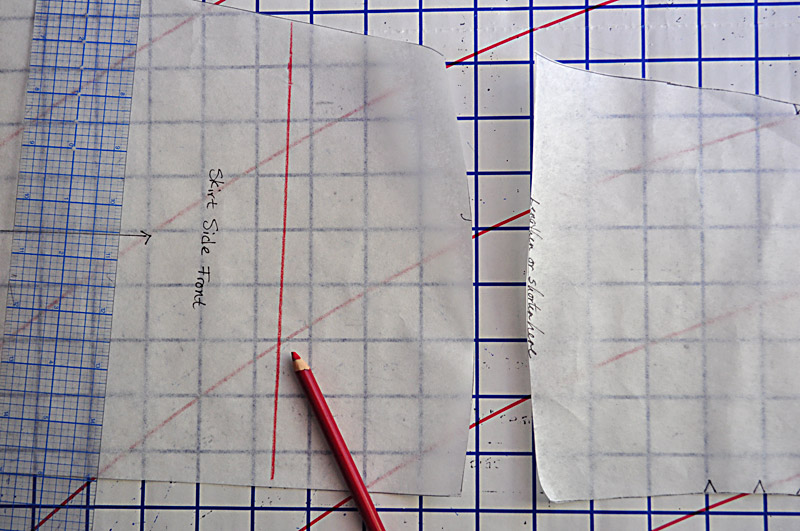
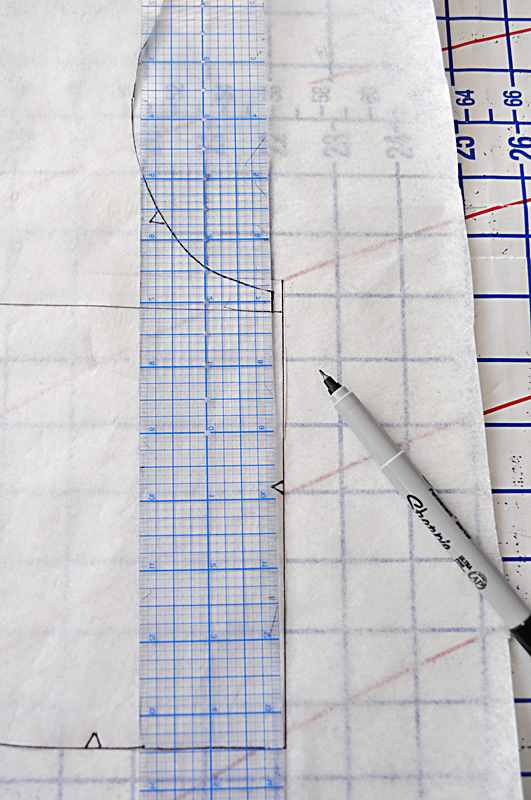
Overlap the top of the skirt with the bottom, lining up with the line you just marked. Tape the pieces together. Using a ruler or yardstick, blend the side seam edge from the hem to the point where the pieces are taped together. Trim the excess away from the side seam and you're ready to go! You can also opt to fold rather than cut the pieces along the "lengthen/shorten" line, but the end result is just the same.
To lengthen your skirt pieces: cut along the "lengthen/shorten" line and spread the pieces apart the desired length to be added. Tape a piece of paper underneath the two pieces to reconnect them with the desired space between, and smooth the line from the hem to the join at the top piece as shown above. Basically it's just the opposite of the shortening process!
Small Bust Adjustment: If you'd like to do small bust adjustment prior to cutting out your muslin, I came up with a fairly decent solution for this particular bodice style, although like all fitting adjustments done on paper, this does not replace the need for a fitting muslin!
A video seemed like the best method for documenting how I did this, and I included the formula for determining the amount needed for your SBA. As I said in the video, do let me know if you have any questions and I'll do my best to answer! This whole fitting series has been a great lesson for me too... Having to translate what I do know and realizing how much I still have to learn about fitting has been somewhat humbling! But stretching myself a bit in sewing isn't a bad thing, right? I referred to several online guides for small bust adjustments, as well as pouring over "Fit for Real People" and "Every Sewer's Guide to the Perfect Fit". Hopefully it makes sense--this is the first time I've tried to explain something like this (and SBA's are still something of trial and error for me!).
Note: I posted this in reply to a couple of comments in my original post, but I think it's helpful: "I just pulled out 'Fit for Real People' to check what they are saying about the bust cup difference, and I'm wondering if the other formula I used was slightly off (it's from a different source and they said it could be used both ways, but I'm thinking perhaps it was really only useful for FBA). An A cup is 1" difference between high and full bust, B is 2" and C is 3", etc. So if you are an A, I'd suggest taking an overall 2" off the pattern, for a total of 1" on the half piece. (Or whatever the case may be.)"
Other resources online for SBA adjustments:
Gertie's method for adjusting a bodice for a smaller bustline: trying on the tissue pattern (or tracing in this case) and pinching out the excess fullness as needed, and then translating that to the flat pattern. Keep in mind that this design is not meant to be skin tight; the bodice should have a bit of blousiness. There is also a great illustration of where to slash the pattern on a similar surplice bodice here (scroll down to Simplicity 3775).
Part Four: Adjusting the Bodice
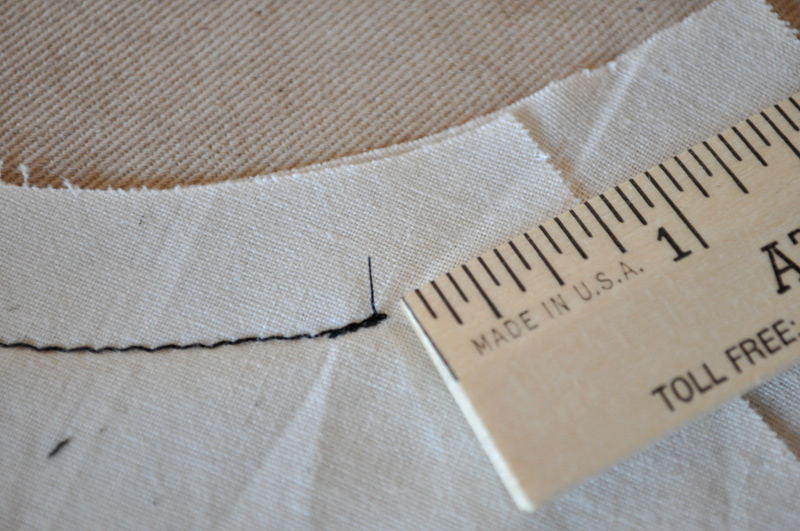
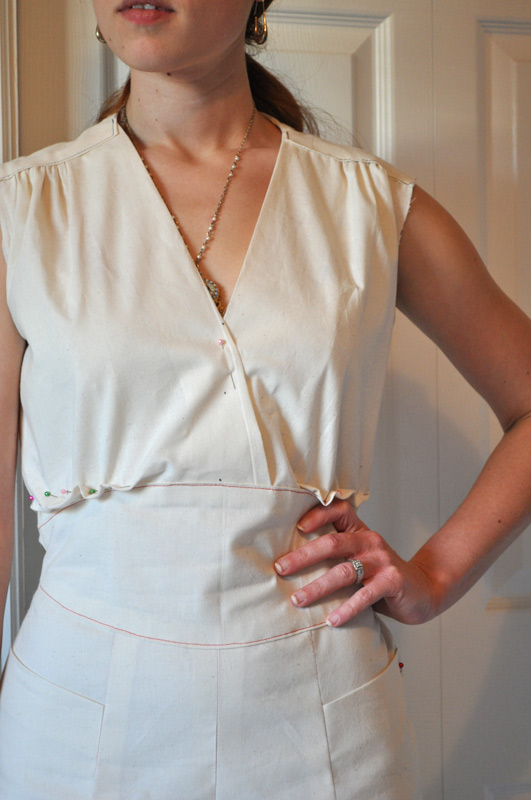
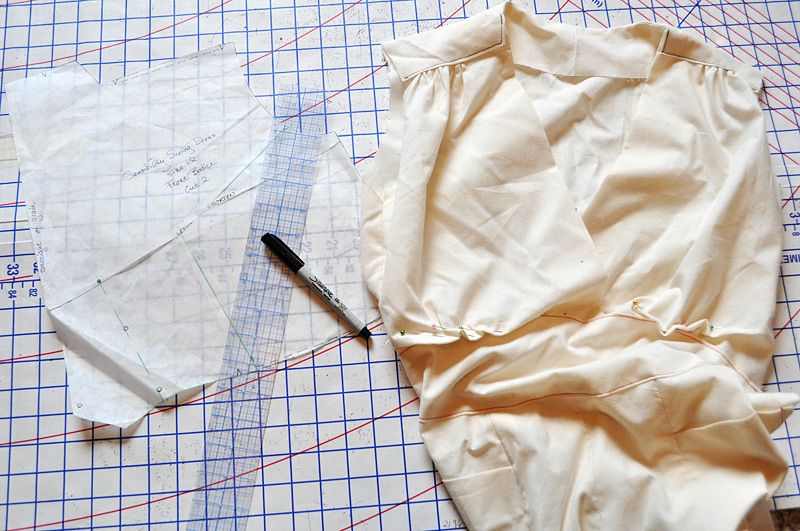
Lengthening or shortening the bodice is a quick and easy fix and all you'll need to get started is your pattern, the usual pattern-tracing tools (pencil, scissors, tape, ruler, etc.), paper and your measurements.I'm only showing the front bodice piece, but the same applies for the back as well. Remember: what you add to the front, you'll want to adjust for in the back as well so that the side seam lengths are the same! Now this piece is a bit tricky to measure for length, because of the way the neckline and waist are (yet another good reason to make a muslin so you can double check things!). But to get the neck-to-waist measure, use a ruler or tape measure to measure as in the photo below on both the bodice front and midriff pieces (note that the midriff piece is measured from the top edge to approximately the center where the side seam dips in for the waist):

Add the two measurements together and subtract 1 1/2" (for seam allowances). Compare the length measurement to your own neck-to-waist measure and find the difference. Whether you are lengthening or shortening the piece, the next step is to cut the pattern along the "lengthen/shorten" line.
To shorten the piece: on the bottom half of the bodice piece measure down the amount you need to reduce the length by. Draw a line this width across the piece.Overlap the top half of the bottom, lining it up with the line you just ruled across the piece, and tape in place, lining up the front edges.

Along the side seam, use your ruler to smooth the seam line and reconnect the underarm and waist edges (this is called "truing" in pattern drafting--Jacki posted a good explanation recently).
To lengthen the pattern piece: Tape the bottom half of the pattern on a piece of paper. Measure up from the cut edge the amount you need to lengthen the piece. Draw a line across your paper at this width. Line up the top piece's cut edge with this line and tape in place. Along the side seam even-out the line from the underarm to waist.

To lengthen the back piece, you will want to follow the same procedure, but instead measuring the length of the pattern as shown below (just remember to subtract 1" for seam allowances):
As for the bodice, lengthening the sleeves are just a matter of measuring and comparing (your overall arm measurement, shoulder/elbow or elbow/cuff length), cutting the pattern apart and either overlapping or spreading it the desired amount. Just be sure to blend the seam edges with each other so to create a smooth and even line as shown above for the bodice.
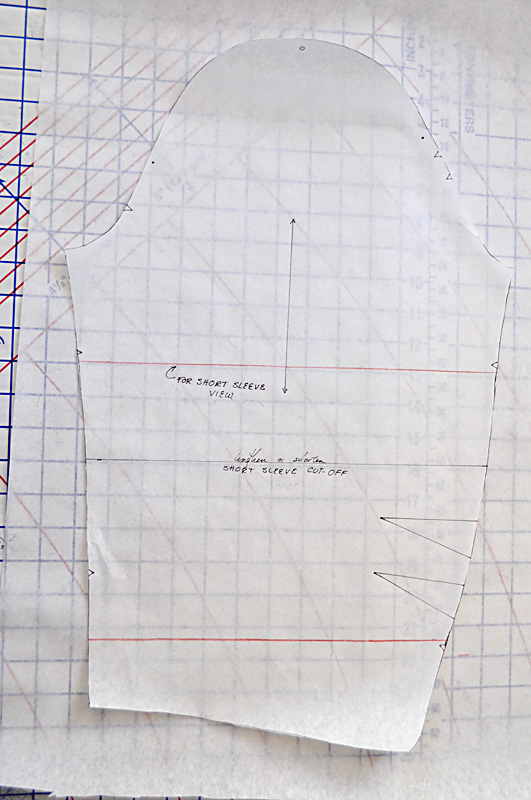
For long sleeves, you can cut the pattern apart at one of two places: the "lengthen/shorten" line indicated on the pattern (black line) to decrease/increase the shoulder to elbow measure or below the elbow darts to shorten/lengthen the forearm length (red line below the elbow darts) if needed. Or you can use a combination of those two points as required as well, especially if you have to adjust the length drastically. To mark the bottom cutting line, measure down from the pattern-marked "length/shorten" line past the elbow darts and mark a line across at this point. Cut and spread/overlap as required. Just remember if you are using more than one adjustment line to divide the amount you need to adjust by two! Note I've included the shorten line at the top for the short sleeve version in this image. Ignore if you're adjusting the 3/4 length sleeve!
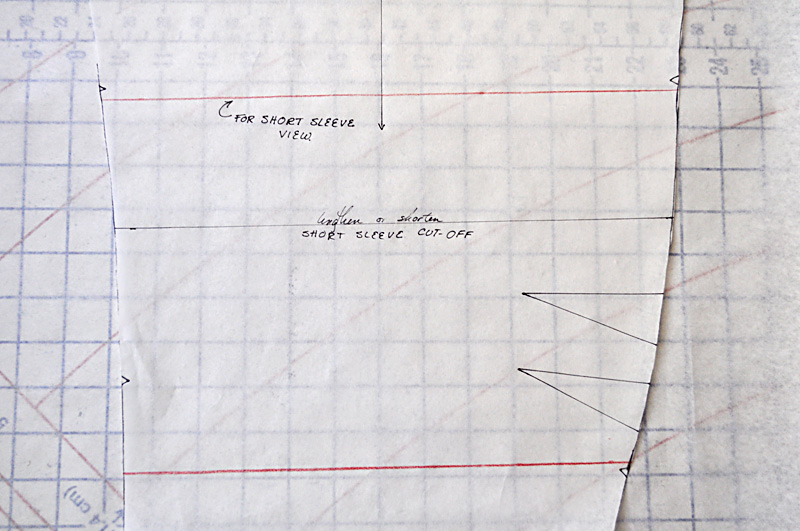
For the short sleeve view, if you want to adjust the length you can do one of two things: Shorten the sleeve at the hem edge or create a horizontal line to lengthen/shorten as for the long sleeve view. I tend to do the latter since I like to keep the original hem circumference (which is narrower, as the sleeve seams curve inward slightly).
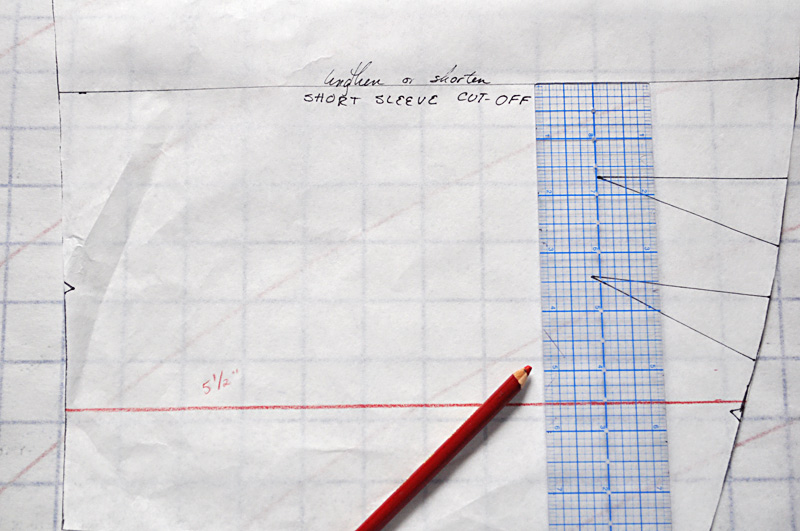
You will want to create this line by measuring up from the pattern's original "shorten/lengthen" line about halfway up the short sleeve length (not taking into account the cap height). Mark this line across and continue as before to reach the desired length.
Does all this make sense? Honestly, I think it's a lot easier once you begin to make these adjustments--the only possibly tricky part is marking the lines and making sure you measured right. Otherwise piece of cake!
Part Five: Making the Muslin Toile
Before you cut the muslin, here are a few things to keep in mind:
Final adjustments: make any remaining "pre-muslin" adjustments that we've covered previously on your paper pattern.
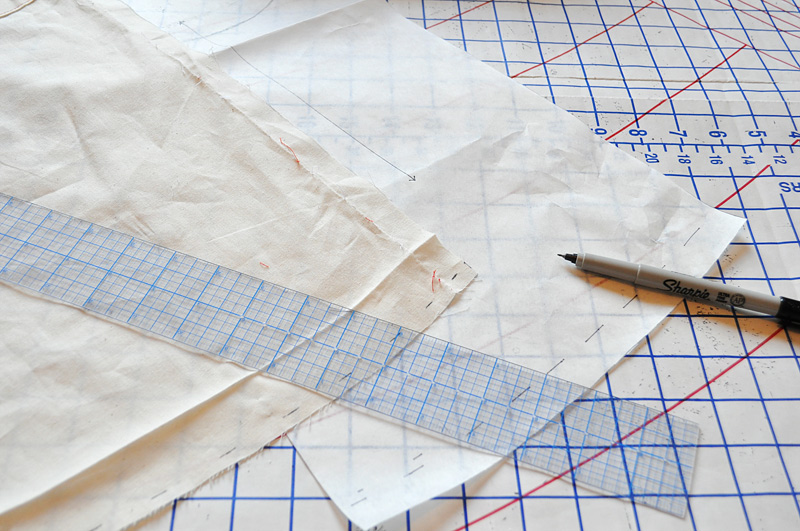
Seam allowance: the original pattern only allows for 1/2" seams. If you'd like a bit of wiggle room to adjust things, I recommend increasing these to 3/4". I usually just pin my pattern down to the fabric and pencil an additional 1/4" around the edges.
Cutting out: follow the layout diagram included with the pattern for cutting out your muslin. If you're using narrower/wider fabric, you can adjust your layout accordingly, but just remember to follow the grainlines marked on the pattern pieces!
Following the directions: construct your muslin as the pattern instructions specify, but don't worry about finishing seam allowances, adding the zipper, hemming, etc. Since this is purely a dress for fitting purposes, I usually just iron and tack up hems temporarily and pin together the opening edges where the zipper will go. Also be sure to use a basting stitch when sewing your muslin up--this makes things easier to let out!
Marking adjustments: pinning and using a marker to mark areas that need to be adjusted are invaluable tools. I usually just pinch out excess fullness, pin and then mark the muslin once I take it off. Conversely, if you need to let a seam out, this is where the extra width comes in handy. We'll delve more into how to transfer these fitting marks to your pattern pieces next week.
Design tweaks: if you're planning for any adjustments/additions to the design, add those now to check proportion and placement. I'm planning on adding pockets and will be including those in my muslin.
Laying out the pieces on muslin and adding an additional 1/4" to the seams.
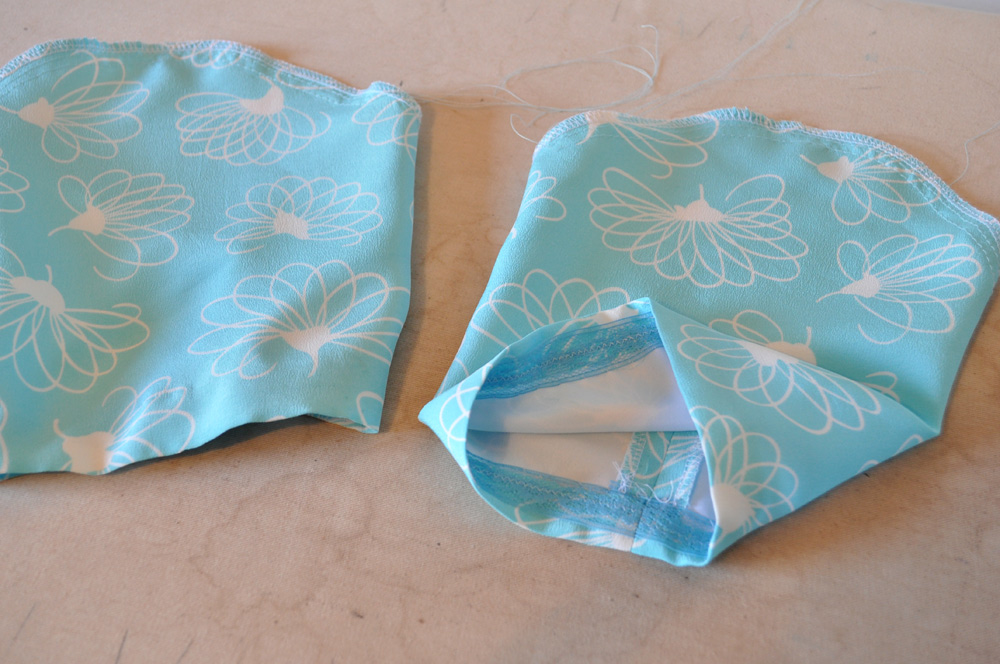
This is perhaps the trickiest part of the entire dress--the shoulder yoke. Believe me: the first time I made this dress I sat around scratching my head for a bit until I figured it out, and it's been a breeze to do every time I've made the dress since! I took step-by-step photos of this part of the construction, so hopefully that will help anyone having a problem with this (or if you're like me and tend to understand things better through images than words!). It's super easy--promise!
Follow step 1 and 2 for sewing the back dart and attaching the facing. Note with the facing I stitch to within the seam allowance at either edge (in this case, it's 3/4" for my muslin).
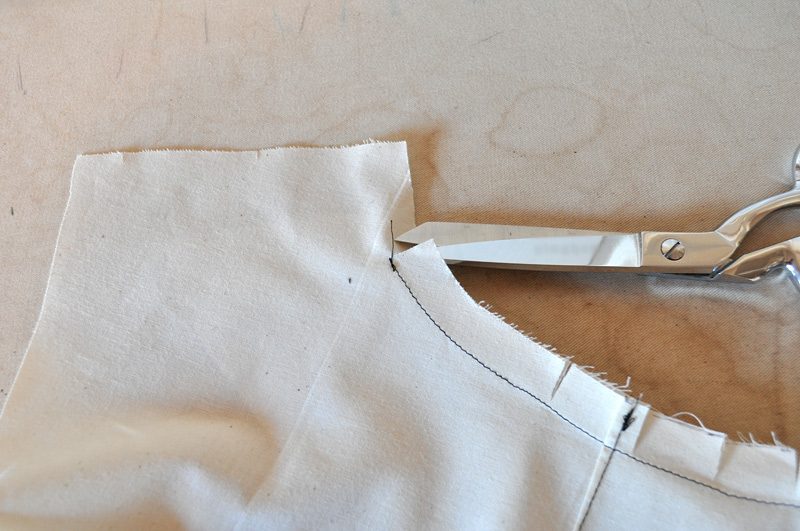
Clip the back bodice only to the seam allowance where the neckline stitching ends (at either end). This will allow you to turn the bodice shoulder yoke edge under smoothly.
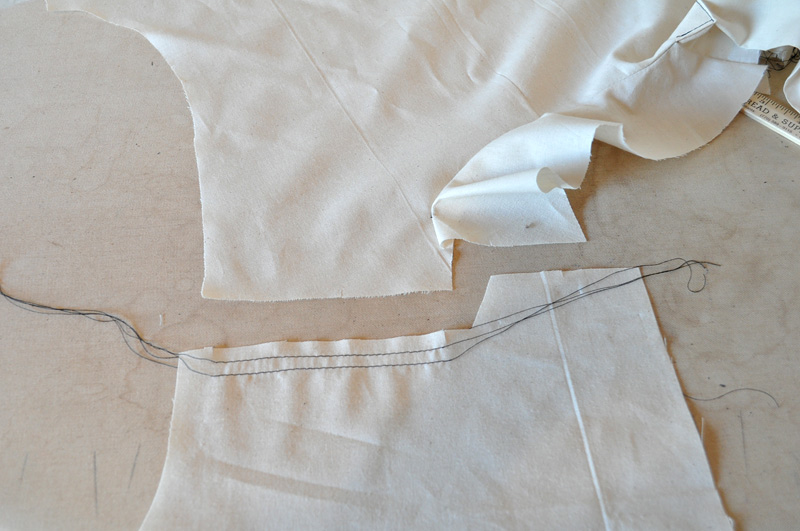
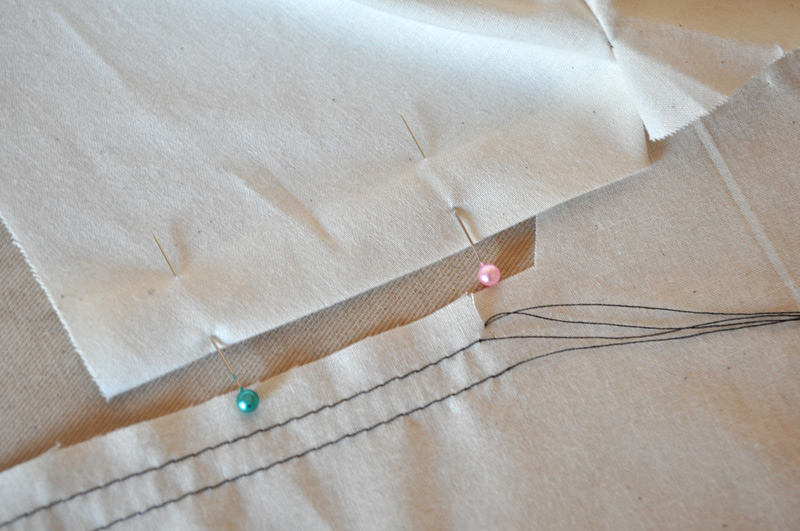
Sew two rows of gathering stitches along the upper edge of the front bodice, between the notches as indicated on the pattern.
Press under the seam allowance along the shoulder yoke edge and short neckline edge to the clipped seam.

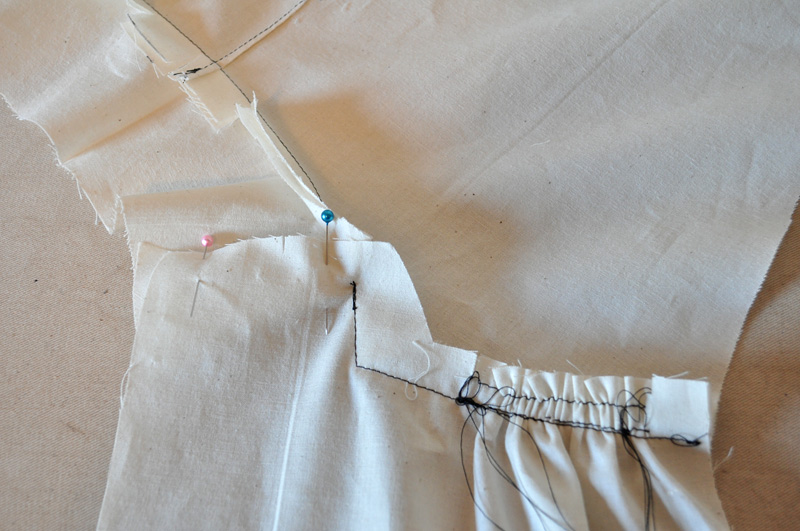
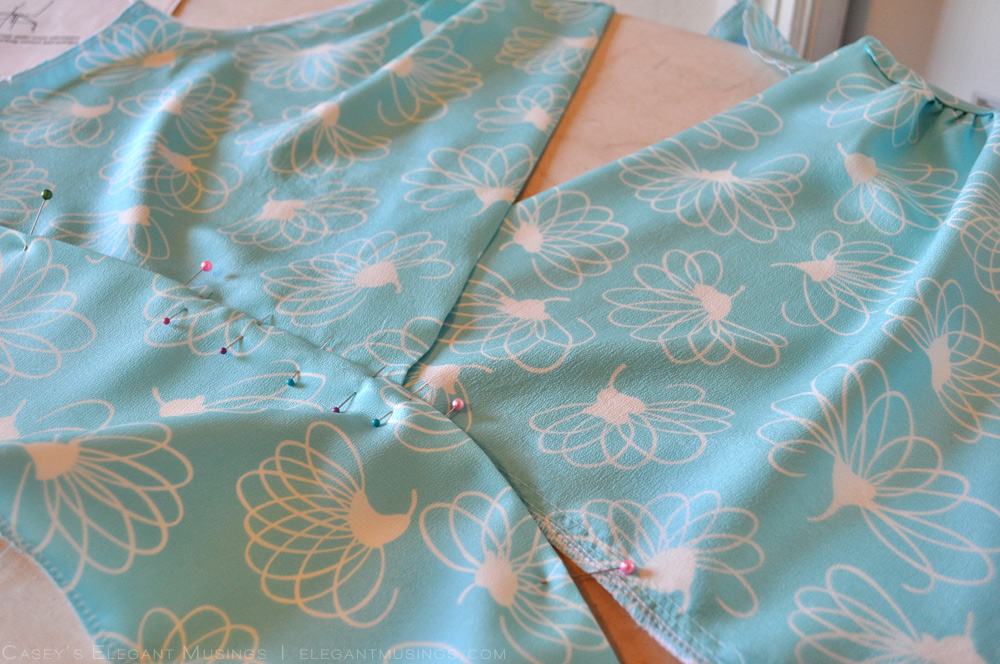
The next step is optional, but I find helpful! Use a pin to indicate where the notches are on the shoulder yoke at either end.
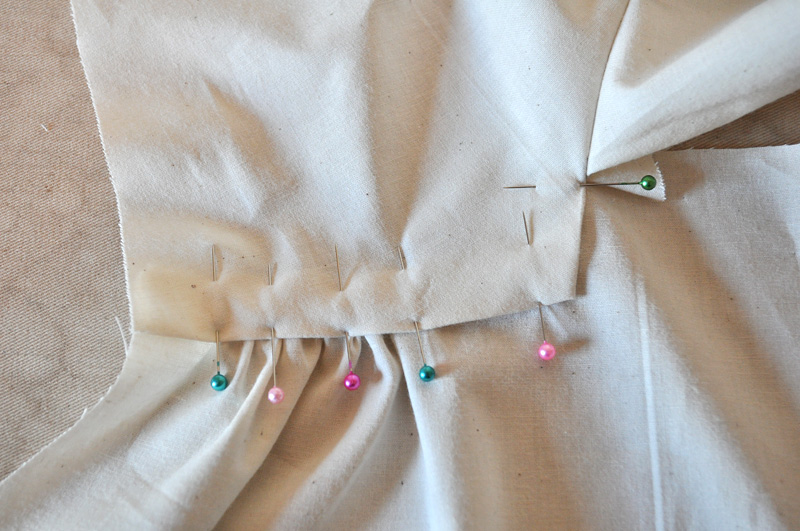
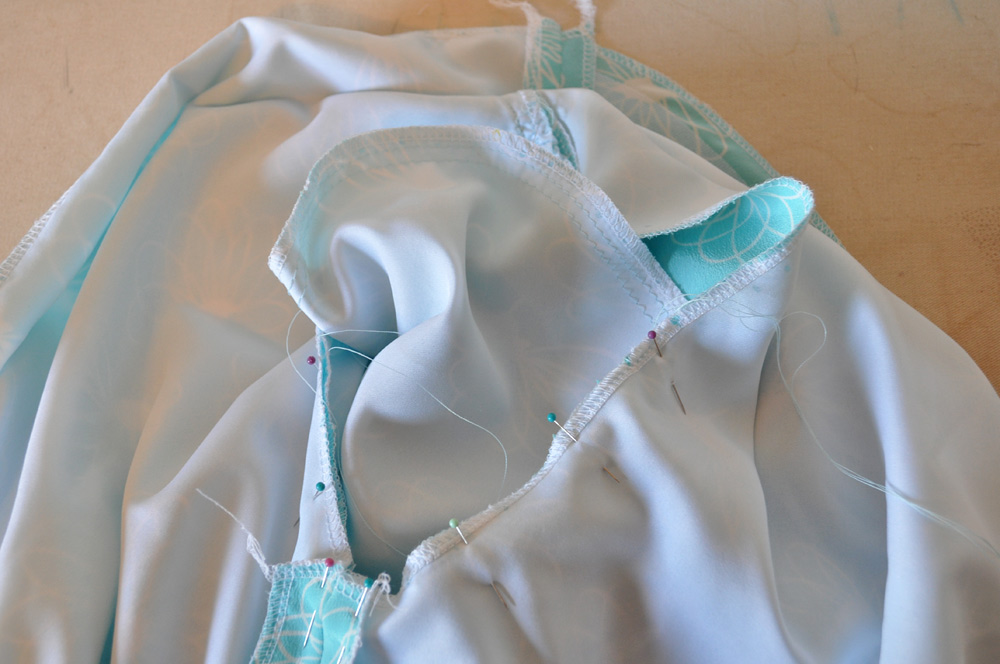
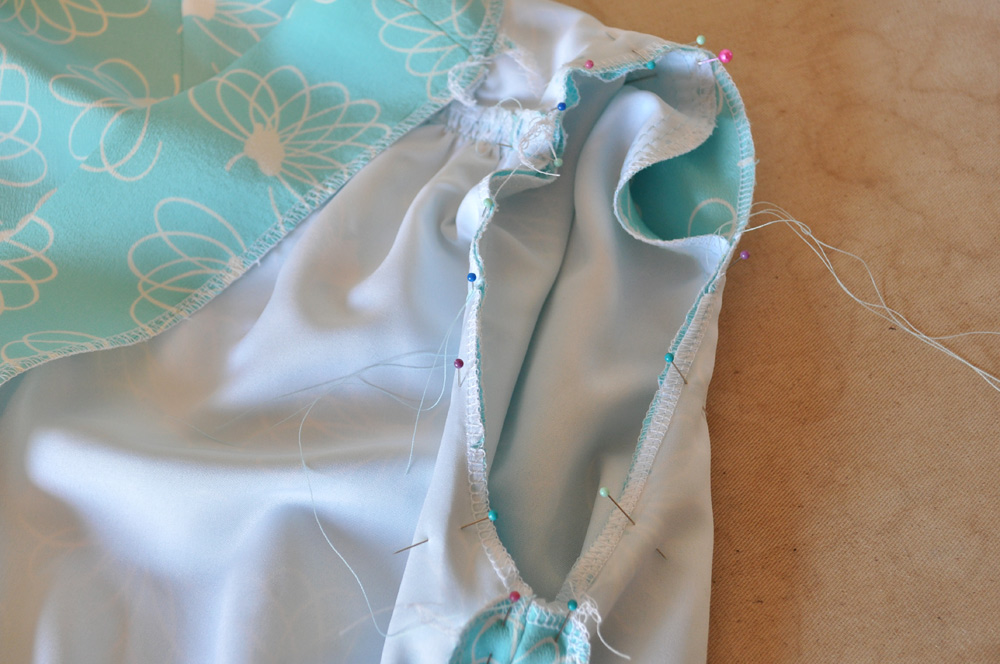
Pin the shoulder yoke to the front bodice. The neckline facing will extend towards the back neckline facing, but do not pin this edge. Pin down the short vertical, folded-under edge of the neckline yoke starting where the stitching for the back neckline/neckline facing stops (green pin). Continue pinning the longer, folded-under horizontal edge of the shoulder yoke to where the gathering stitches begin using the pins to match up with the notches on the bodice front.

Gather the bodice front to fit and continue pinning to the armhole edge, matching notch and seams.
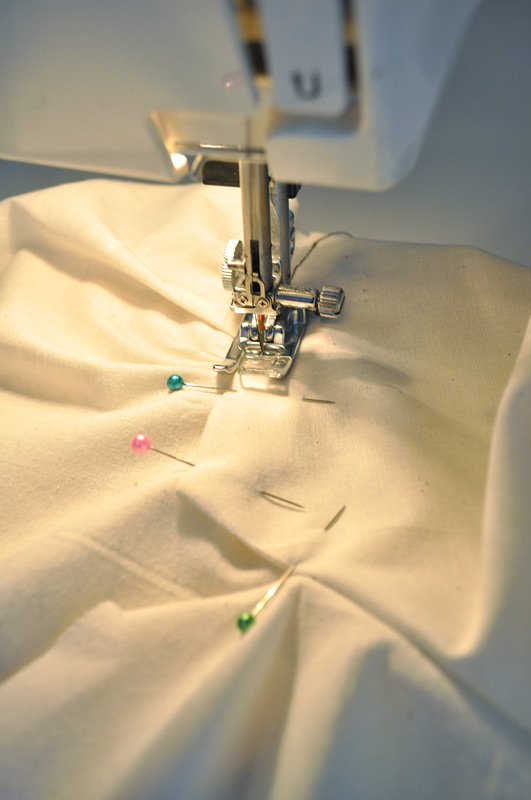
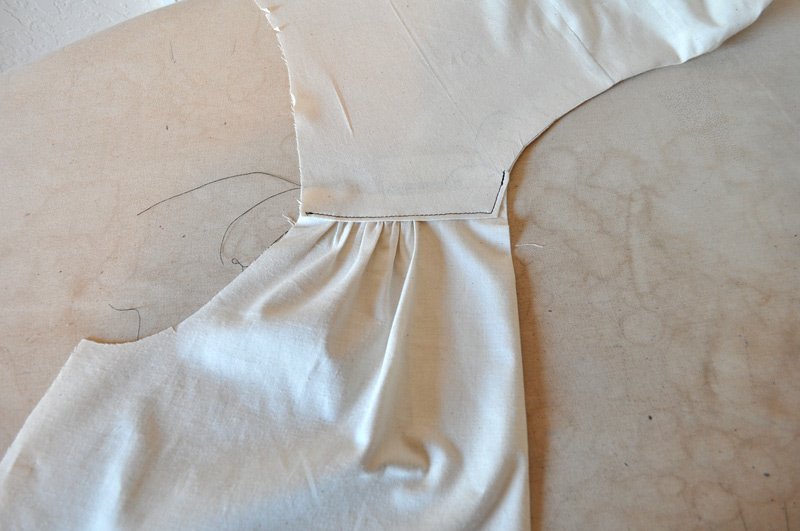
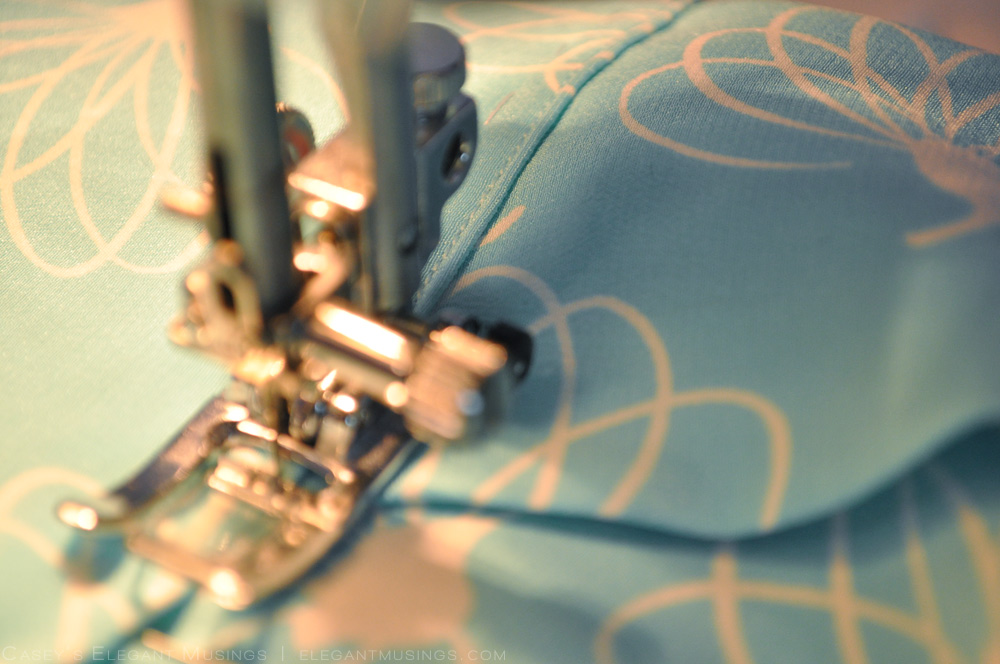
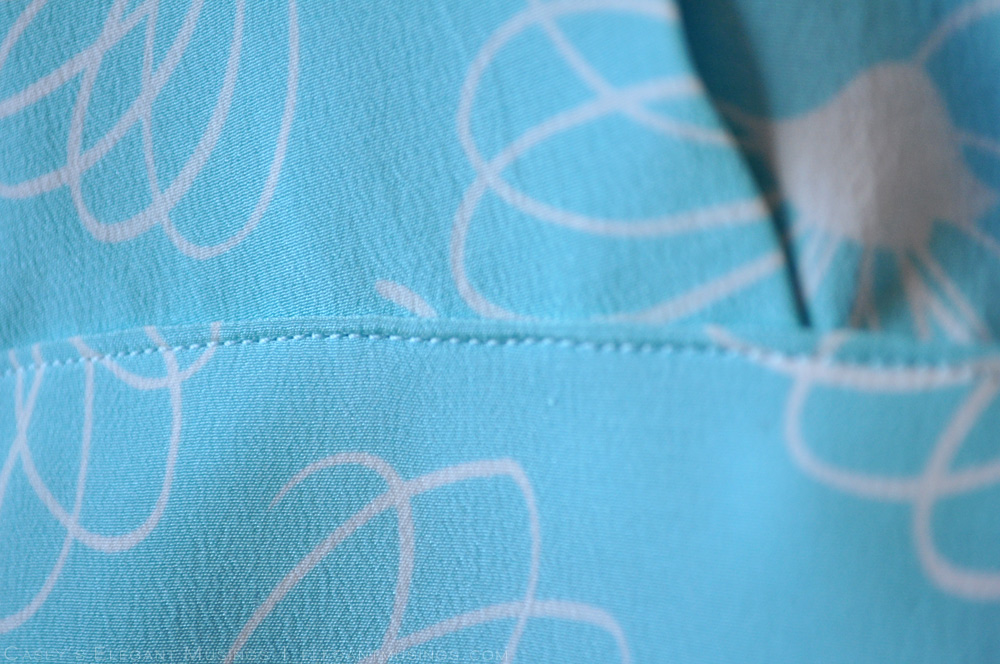
Begin topstitching the shoulder. I find it easiest to start with the longer (horizontal) edge. Pivot at the corner and continue up the short edge to the point where the back neckline/neckline facing stitching stops. Backtack or tie ends off on the inside.
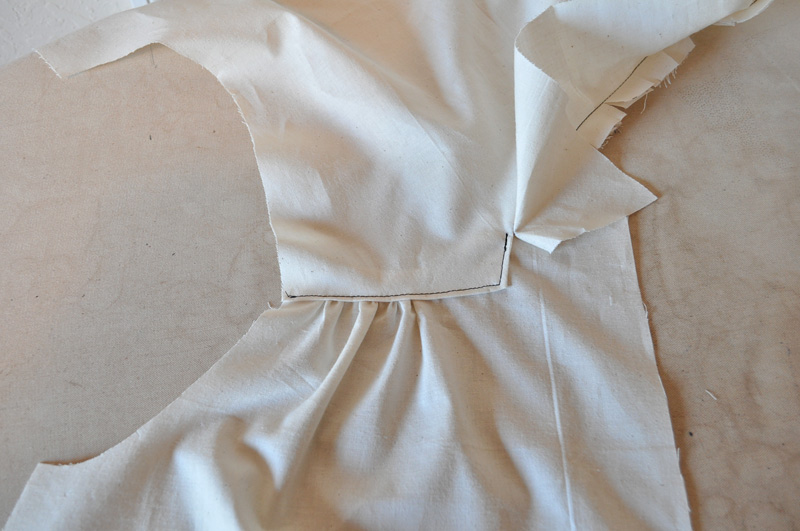
This is what your piece should look like.
On the inside, pin together the front bodice facing extension and the back neckline facing pieces along their short edges, matching notches.
Stitch these pieces together. Clip along the seam allowance of the back neckline and facing seam to allow the facing to easily turn to the inside and lie flat.

Fold the front facing extension to the wrong side, along the dots indicated on the pattern. Press well. Repeat for the other front bodice piece.
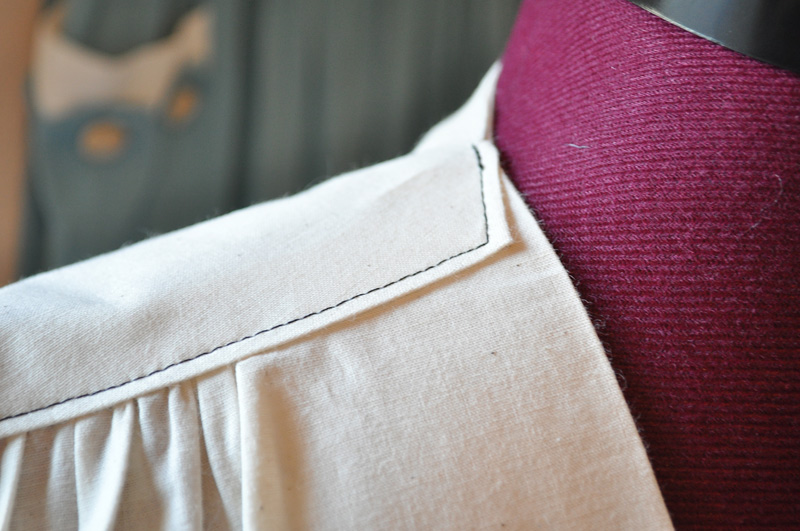
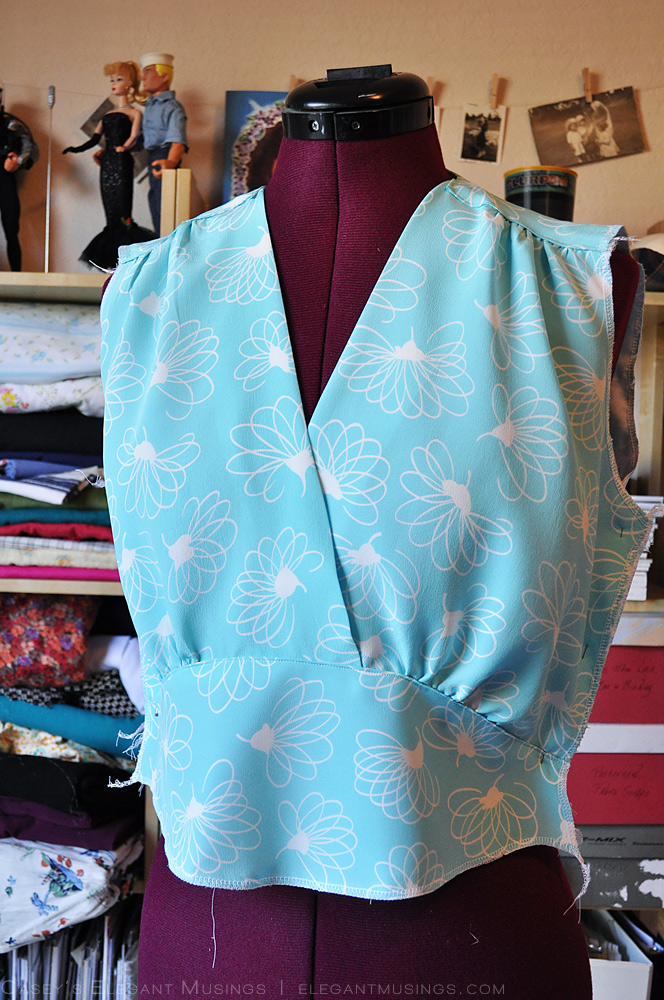
It looks kind of complicated, but as I said: once you do it, you'll get it! This is an advantage to doing a muslin as well--you get to practice any construction techniques that are potentially troublesome!
Part Six: Drafting Side Seam Pockets
Overall I'm fairly happy with my muslin and the changes I made prior to cutting this out. One thing I did test were patch pockets, which did need a bit of revision (more room for the hand! Lesson no. 1: do not draft any pattern pieces after 9pm... lol!), but redid the tutorial this morning to reflect those changes. I still have not decided if I want to do patch pockets or side seam pockets! The only issue is that pockets set into the side seam present certain new steps and hurdles since the dress has a left side-seam zipper. It's not impossible (see the pockets section below for more information on this!), but I think I'm going to run through a test to make sure I have my head properly wrapped around how to do this.
02_05_11b
Here are the changes I'm going to make to my final pattern based on my muslin fitting observations:
Take off a smidgen of length underneath the bust gathering. The SBA I did prior to the muslin really helped a lot with the fit of the bodice, but I could still use to loose about 3/8"-1/2" under that gathered portion. All the other length measurements for the bodice (center front and side seam) are correct. Notice the bodice isn't skin tight--it still has some blousiness as is necessary for this style.
Let out the center front seam about 1/4" over the tummy. I have a little "belly" over that area, and these pictures were taken right before dinner, so it only gets bigger after a meal! lol. Letting out a teeny bit will just make things more comfortable. I'll probably also add a bit more to the midriff piece as well over the bottom edge.
Shorten the skirt a tiny bit. I only want to take off about 3/4" of length to have the hem hit at the most flattering level at my knees.
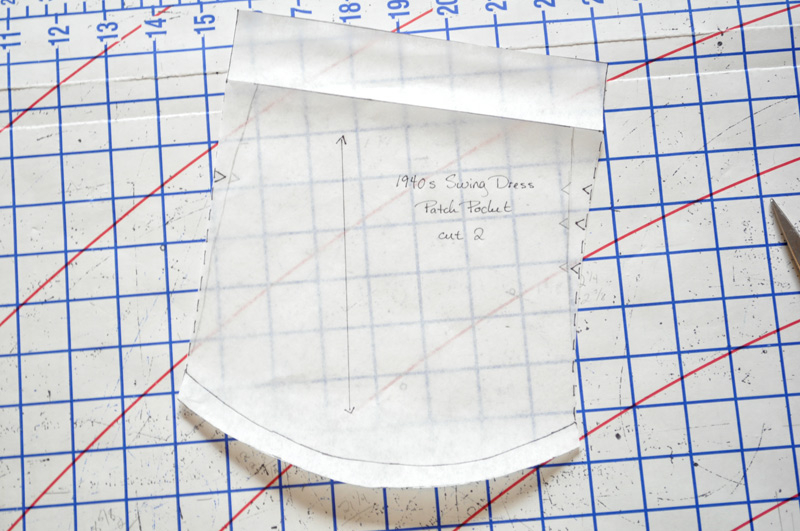
Now for pockets! Adding pockets to this pattern is not too hard at all--especially patch pockets set into the side skirt front piece. (I'll show you how to draft bag pockets to be set into the side seam below.)
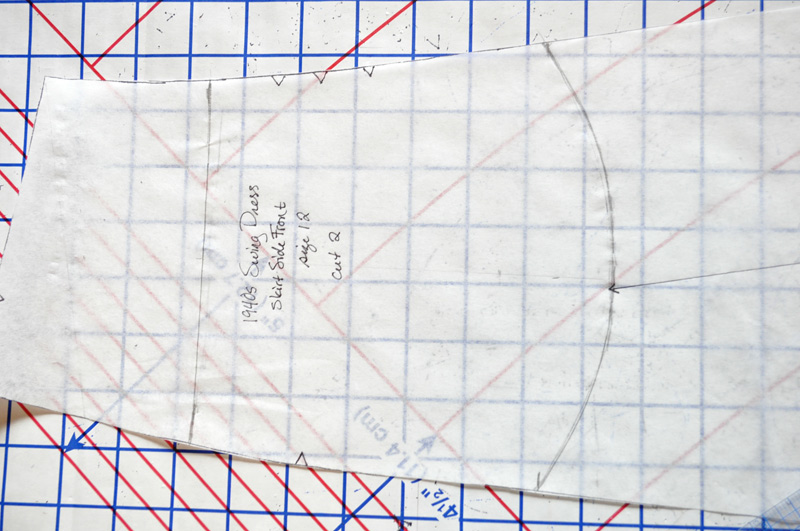
Measure down from the top edge 3" along the side with three notches (joins the center front piece) and 4" along the edge with one notch (side seam); mark. (If you'd prefer your pocket further down from the waist, you can increase these measurements as required.)

From these marks measure down 6" to 8" (this will be the pocket depth; it depends on your preference and hand size). At each of these points, measure and find the center point across to create a vertical center line down the depth of your pocket.
At the top of the pocket, rule a horizontal line connecting the two marks for the top of the pocket. At the bottom use a curved ruler or free-hand draw a curved edge connecting the two bottom points.
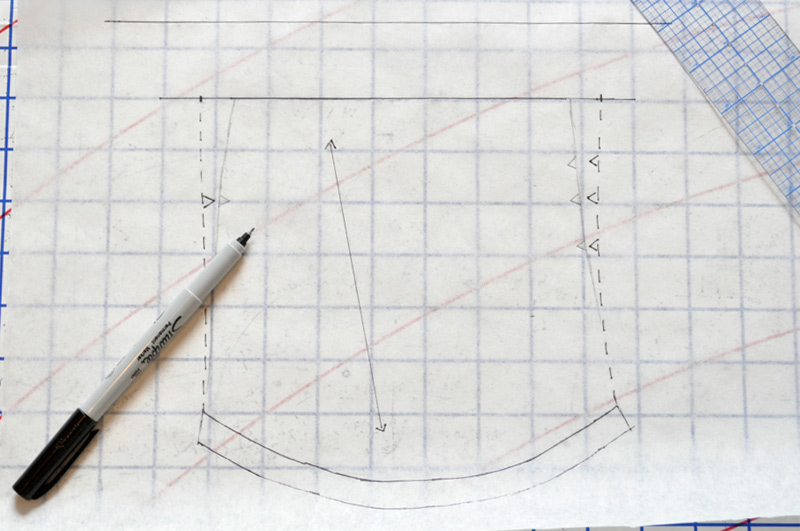
Place a piece of tracing or translucent pattern paper over the skirt piece. Trace the outline of the pocket as plotted on the skirt. Now we are going to add a bit of ease into the pocket so you can fit things in!

At the top add 5/8" to 3/4" at either edge. Blend this new top edge width into the side seams (dotted lines), being sure to transfer the notches along the new edge lines. Also transfer the grainline from the skirt piece onto the pocket.
Remove the skirt pattern. Add 1/2" along the bottom edge for turning under. Along the top edge measure up 1 1/2" and draw a line parallel to the top edge.
Fold the top edge under along the original top edge line. Trace the outline of the side edges onto the 1 1/2" facing. (This ensures that when you turn the facing edge under it will match up along the side edges neatly.)
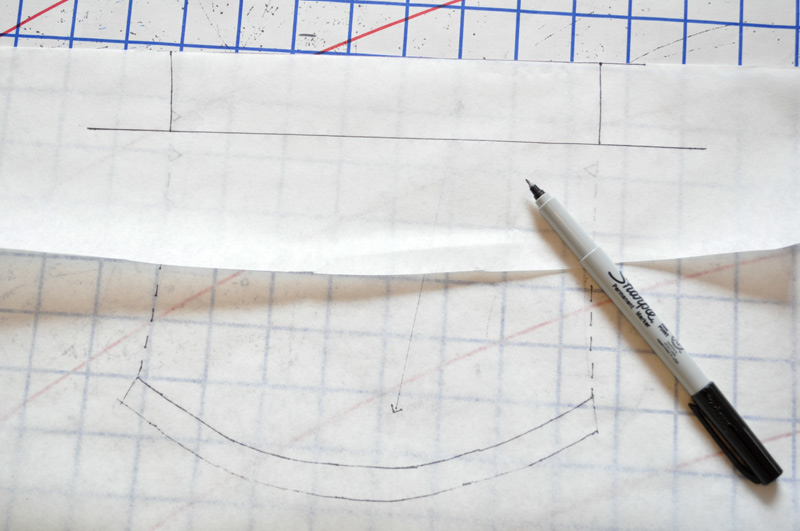
Now you have a finished pocket piece! To construct, turn under the 1/2" and press; do the same for the facing edge turning under 1 1/2". Pin the pocket to the skirt side front, matching notches. Top stitch along the bottom edge to the skirt; baste along the side seams to tack the pocket in place. The side edges will be caught into the skirt seams when it's sewn up.
Would you prefer pockets set into the side seam? These are the type of pocket that are hidden on the inside and are formed with two separate pieces seamed to the front and back side seams and joined to for a bag. The only tricky part of doing this sort of pocket with this style of dress is that the zipper is inserted in the side seam. Adding this style of pocket with a zipper at the side is not impossible; but it is probably best reserved for those of you planning to use an invisible zipper or centered zipper insertion; if you plan on doing a 40s-style lapped placket insertion it may get a bit tricky. I plan on playing with this a bit next week to see if it's possible though! But without further ado, here's how to draft your own pocket pieces:
Measure down along the side seam (one notch edge) 3 1/4" (or more, depending on your pocket-level preference) and then 6"-7" from that mark for the pocket depth.Draw the pouch shape for the pocket, being sure to drop the bottom edge of the pouch below the side seam opening level.
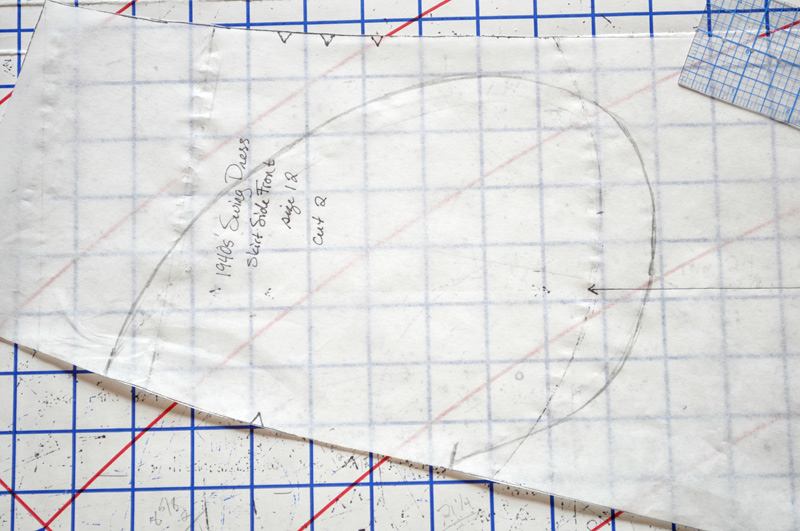
Place a piece of tracing or translucent pattern paper over the skirt piece. Trace the outline of the pouch piece, transferring the notch and grainline markings.
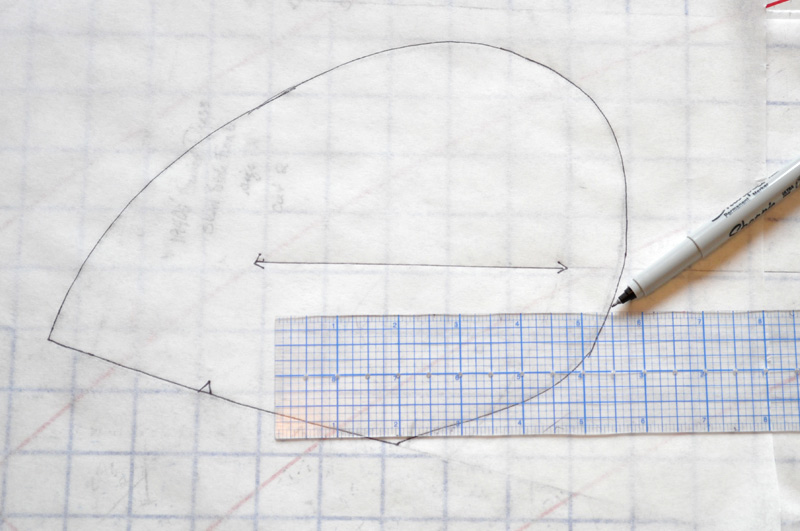
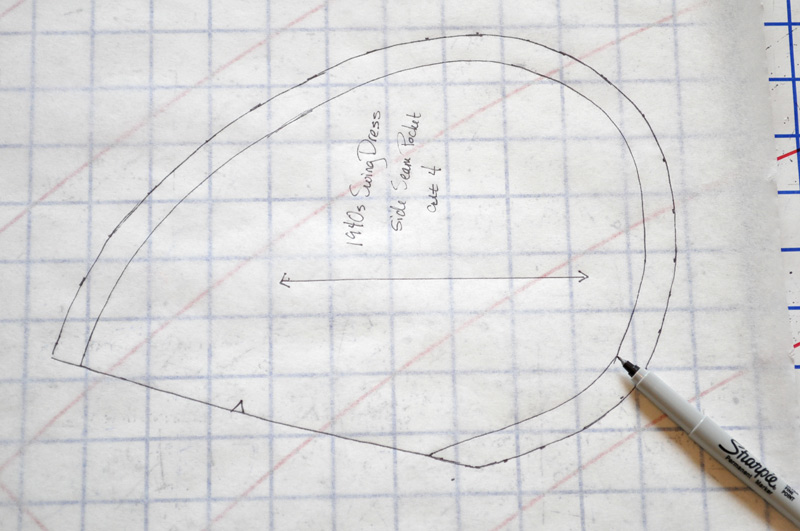
Add 1/2" seam allowance to the curved edge (not the side seam). Be sure to refer to this tutorial for information on constructing the pocket to set it in a side seam with a zipper.
Part Seven: Finalizing Your Pattern
One thing I would like address before you cut out your fashion fabric is the side seam allowances. The pattern calls for 1/2" wide seams, and while this is doable particularly if you are using an invisible zipper (though still a squeeze!), I have found that adopting the vintage method of extending my side seams to 3/4" works a lot better. I would do this to the skirt side seams, bodice and midriff pieces (just the side seams--no need to have super wide seams on all the other edges!). This is especially necessary if you plan on inserting a placket-style zipper (which I will be posting about!), since it requires a bit more fabric to work with. (But, if you've already cut out the dress with 1/2" seams, don't worry--you can always extend those seams with some extra fabric.) So if you want to do this, now is the time to adjust your pattern as necessary (I just tape on a bit of extra paper to extend the seams an additional 1/4").

But first: how do you transfer all those changes you made to the muslin onto your paper pattern? It sounds a bit tricky, but I promise you it really isn't. You have two options in regards to how you approach this.
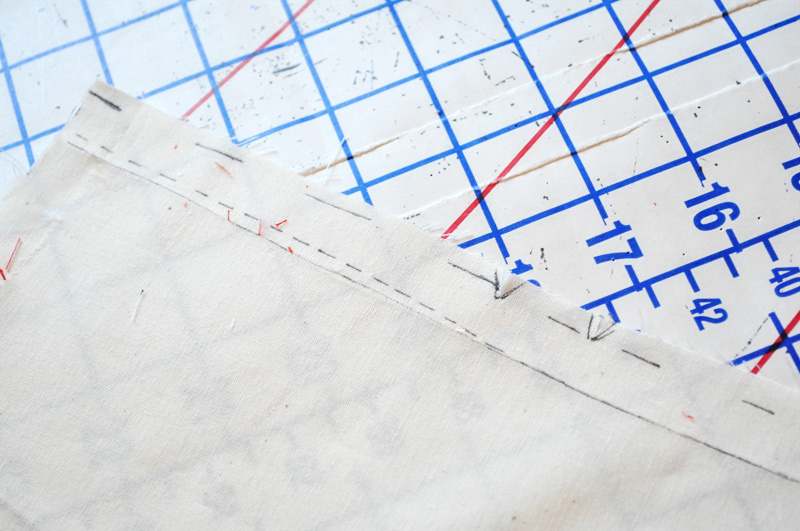
Use your muslin as a pattern. If you've made significant changes to your muslin, this might be the way to go. Simply unpick your basting stitches, marking your final stitching line on the muslin as you go. Press all the pieces flat and lay on your cutting surface. Measure from the stitching line to the edge, marking the new seam allowance (the pattern calls for 1/2"). Trim the muslin down to this seam allowance as needed. Of course the downside of this is if you have to add additional width/length to your final pattern; in that case I'd recommend going with one of the other options below.
Below you see the old seam line (solid), new seamline (small dashes), and new cutting line that takes into account the seam allowance (large dashes). Be sure to remark those notches if you're using your muslin as a pattern. You can now treat that muslin as a pattern piece; just be sure to transfer all markings and such to your fashion fabric after cutting out as you would with a paper pattern. Just be careful not to pull the muslin around so it throws the original shape of the pattern piece off (since fabric is obviously more flexible and prone to distortion than paper). Bonus: because using muslin has a bit of "grip" to it, your pattern pieces won't slide around as much on your fashion fabric!
2. Transfer all changes to your paper pattern. This is a great option if you don't have major changes, although you can still do this if you have quite a few--it may just take awhile. There are two ways I approach this. The first is to measure and mark the amount I need to let out/take in on the muslin, and then go to my paper pattern and mark this new line as well. This works well if you have a short space or "landmark" on the pattern so the difference gets marked from the muslin to the paper evenly.
The other option it to unpick your muslin, marking adjustments with a marker as you go. Iron any wrinkles and seam-folds out of the pieces, and lay your pattern overtop to mark any changes. This is a great option for changes that may be a little more involved to mark.
A good idea is to mark on the pattern pieces/muslin the month and year that you fit this. If you want to make this design again in the future, you know whether you'll need to check for fit again or not (I usually only do this if my weight has fluctuated greatly).

The real fun begins now!!! Here's a little checklist of things to remember while cutting the garment fabric:
Garment Fabric: be sure to follow the grainlines carefully on the pattern and use the cutting layout as a guideline for how to treat your placement of pattern pieces. Cut all pieces, including facings and pockets if you decided to go with them.
Interfacing: cut the interfacing for the midriff piece as well as the back neckline facing (this is optional, but I find helps).
Underlining: if your fabric is lightweight and you wish you underline it, cut all pieces out of the underlining material as well (except for pockets and the back neckline facing). The underlining is basted to the fabric and then treated as one piece.
Part Eight: Seam Finishes and Underlining Techniques
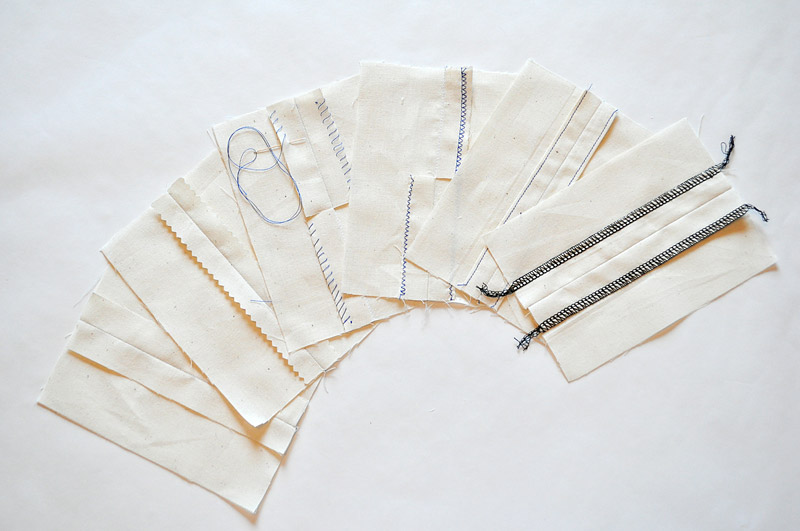
What seam finish to use? This is something you want to consider before you start sewing. (It also is a great time to do some seam finish samples with your fabric scraps!) I've listed a variety of options for finishes, but, of course, I've probably neglected some and would love to hear what your favorite finishes are for a garment of this type!
Hand Overcast This is a good option if you have a very soft, supple fabric where seam finishes could show through the right side of the fabric as a ridge. Simply whipstitch the seam allowances, about 1/4" deep after stitching the seam. Can be done either with the seams together or singly if pressed open.
Hand overcast
Pinked An easy option, especially if your fabric is firmly woven. Pink the seam edges after stitching, and make sure your pinking shears are sharp! This works best on firmly-woven fabrics that don't ravel too much. You can also stitch closely to the pinked edge with a straight or zig-zag stitch to help reduce raveling further.
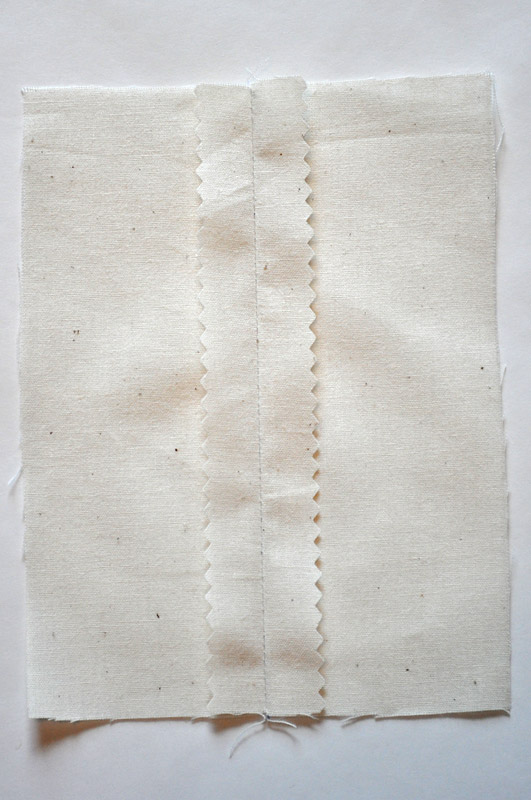
Pinked seams
Serging Now not everyone has a serger, so don't worry--I've included plenty of other options as well. I, however, do like to use my serger for day dresses like this. It's quick and holds up relatively well and gives the garment a professionally-made look inside. For this project I'm serging all the edges of the fabric before I start construction. I just drop the blade so the edges aren't cut. Because I'm also underlining my fabric, I'll be doing this after I baste the underlining on.

Serged seams
Turned Under and Stitched This is like "hemming" the edges of the seam. Simply press under a scant 1/8" and straight stitch after stitching the seam. The downside is that it's a bit tough or impossible on highly curved edges.
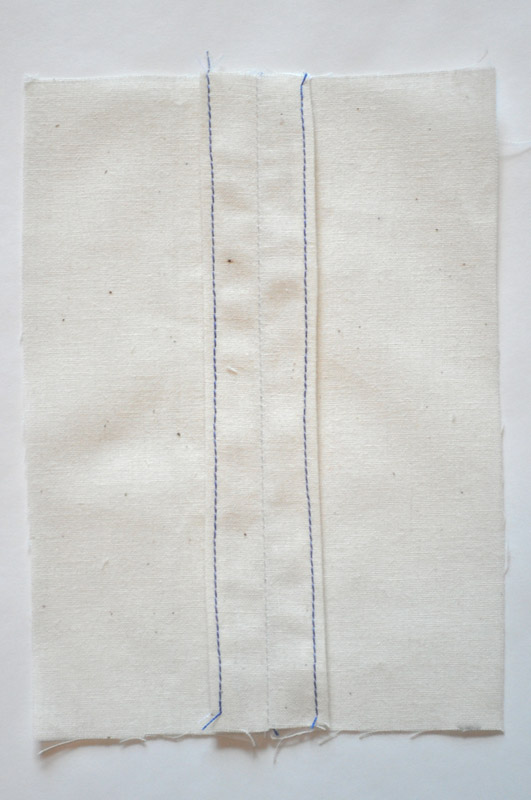
Hemmed seams
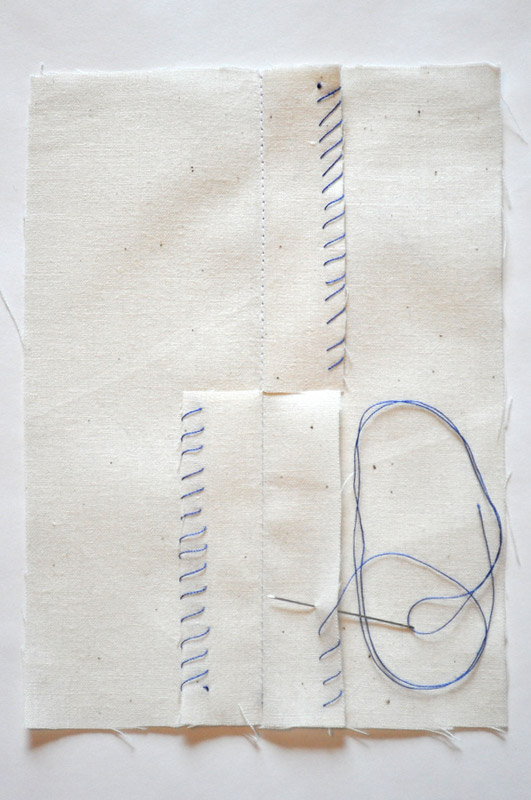
Zig-Zag One of my favorites in my pre-serger days. You can just zig-zag in the seam allowance, close to the cut edge and on most fabrics this will be fine. However, an extra-layer of protection against raveling that I learned years ago in a sewing class: next to the zig-zag (inside or outside) do a row of straight stitches. Works great--I have lots of garments in my closet that have this finish! Can be done with seams together or pressed open.
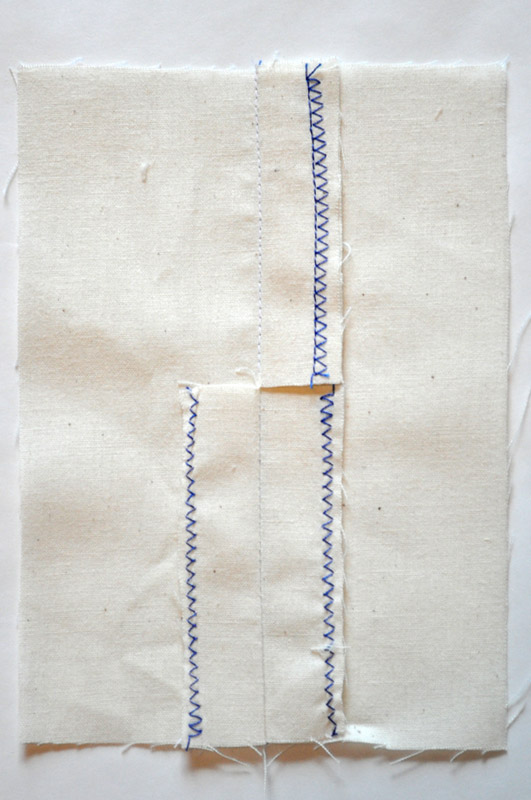
Zig-zagged seams
One finish I did leave off the list is bound seams. This finish, while producing a very nice seam, is a bit bulky for the majority of fabrics recommended for this design. That being said, I do know there is a tricot seam binding tape out there that would suit this better if you were set on binding. I would highly recommend doing up a sample first, just to check how it reacts with your fabric and if there is any show-through on the right side!Now onto underlining. Underlining is great to add a bit of body to any fabric and/or make it a bit more opaque when working with sheers. I found some great resources to introduce you to the concept of underlining (if it's new to you!):
Diary of a Sewing Fanatic (part two here)
Gertie's Blog for Better Sewing (Gertie's tip for attaching underlining is brilliant as well!)
Part Nine: The Midriff
So far I've underlined all the dress pieces, serged the edges, constructed the shoulder seams, interfaced the midriff and topstitched it to the bodice--it's starting to look like a dress instead of a pile of pieces! Since I already covered how to sew the tricky shoulder yoke, I thought I'd show a bit about the midriff piece. Now, the directions say to stitch the skirt back to the bodice before attaching the midriff, but I find it a lot less cumbersome to attach the midriff first and then move on to the skirt. So I'm assuming you've completed up to step 5 in the pattern instructions, and we'll skip 6 and 7 for now.Cut out the midriff from interfacing. If you're using sew-in, simply baste (by hand or machine) the interfacing to the wrong side of the midriff.
If you're using a fusible, trim away 1/2" (or the seam allowance you decided on) from all edges and follow the manufacturer's directions to fuse the interfacing to the wrong side of the midriff. If you're worried how it'll look on the inside with the exposed interfacing, don't worry! Anna shared with me a little secret she uses to finish the midriff area. After constructing the bodice and attaching the skirt, she simply cuts another midriff piece from the fashion fabric, folds the seam allowances under, and slipstitches it to the inside of the dress, covering up the interfacing (and also neatly concealing all the edges). Brilliant! So keep that in mind if you'd like to neaten the inside a bit further along in construction.
Follow the directions for running gathering stitches along the bottom edge of the bodice pieces.
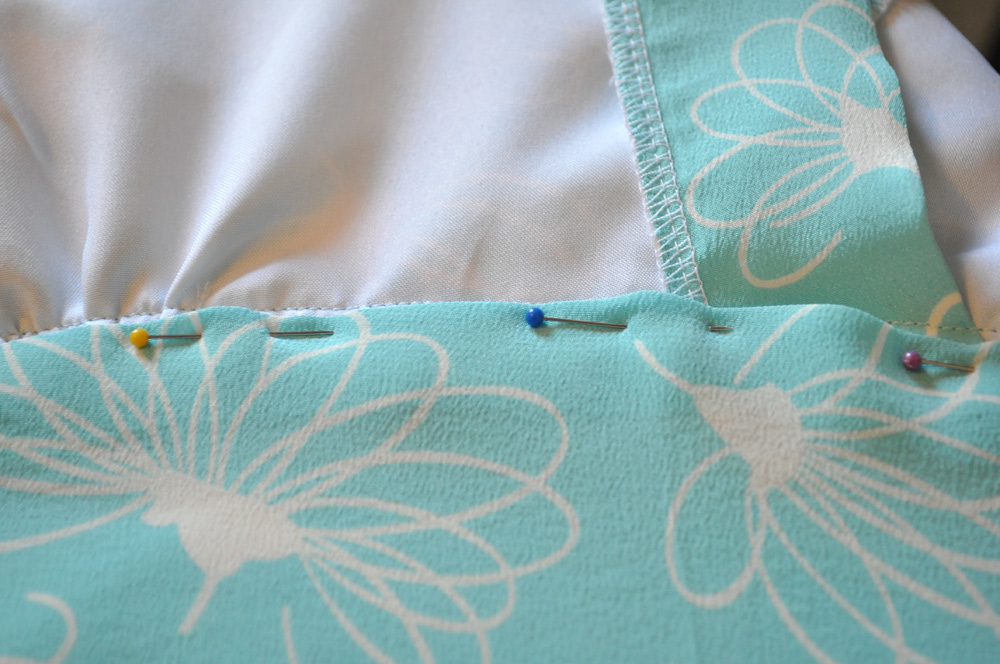
Press under the top seam allowance of the midriff piece, and place on the bodice front overlapping the seam allowance. I like to indicate where the notches are with pins at this point, because it's an awful pain to keep flipping the piece back and forth to make sure that the notches along the bodice and midriff are aligned:
Begin by pinning the center front section, between the gathering, to the midriff, matching notches. Once you reach the gathering sections, pull the threads to gather the fabric and fit between the two notches on either half of the midriff piece. Make sure the gathers are evenly spaced and aren't bubbling in any way.
Pin the gathering area and remainder of the midriff to the bodice front, securing the ends of the basting stitches used for gathering.
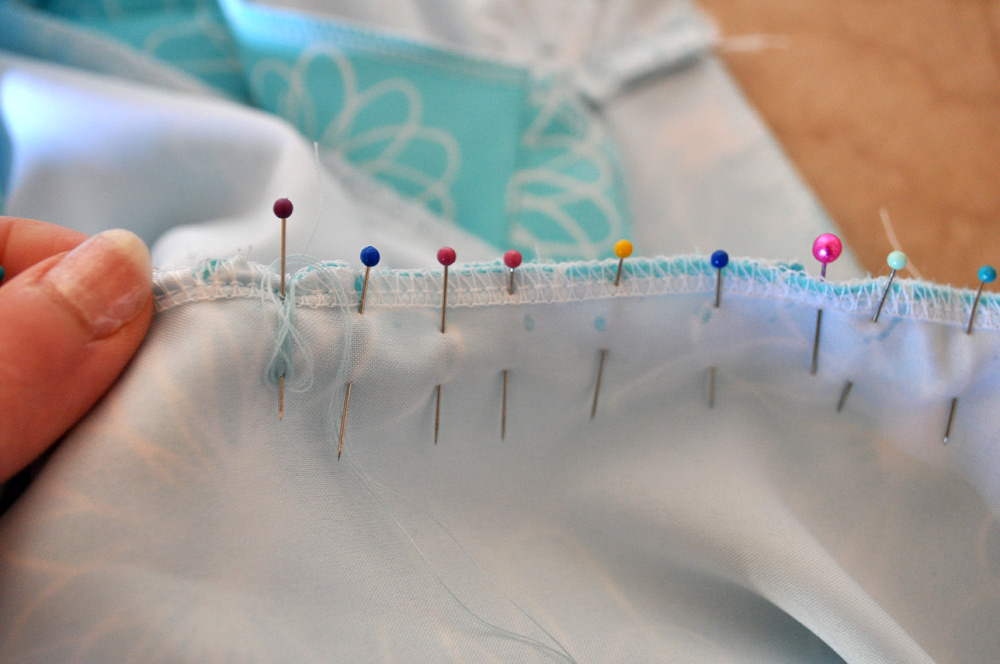
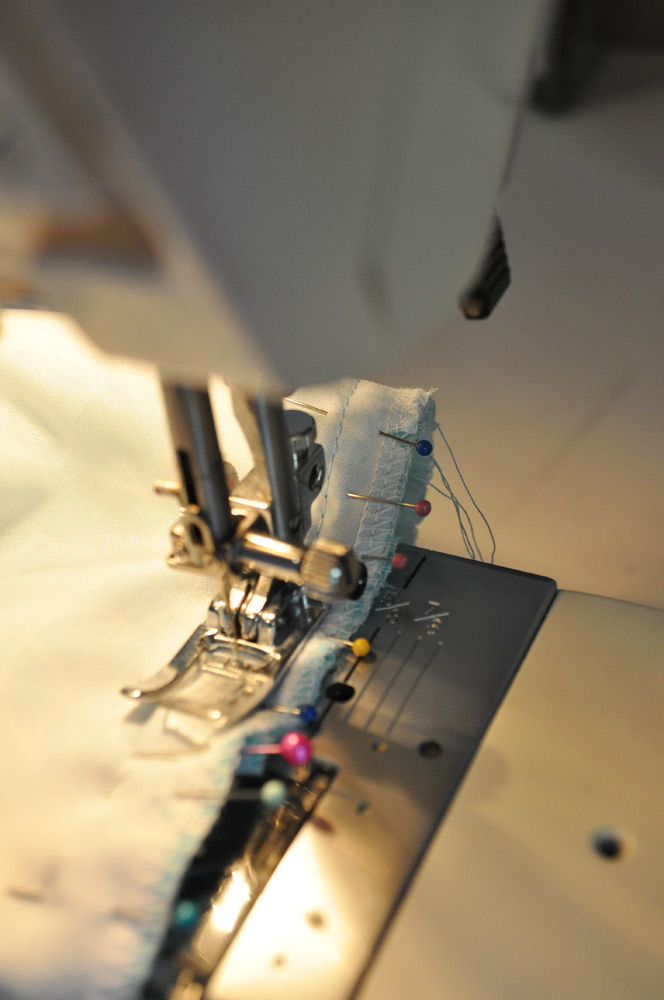
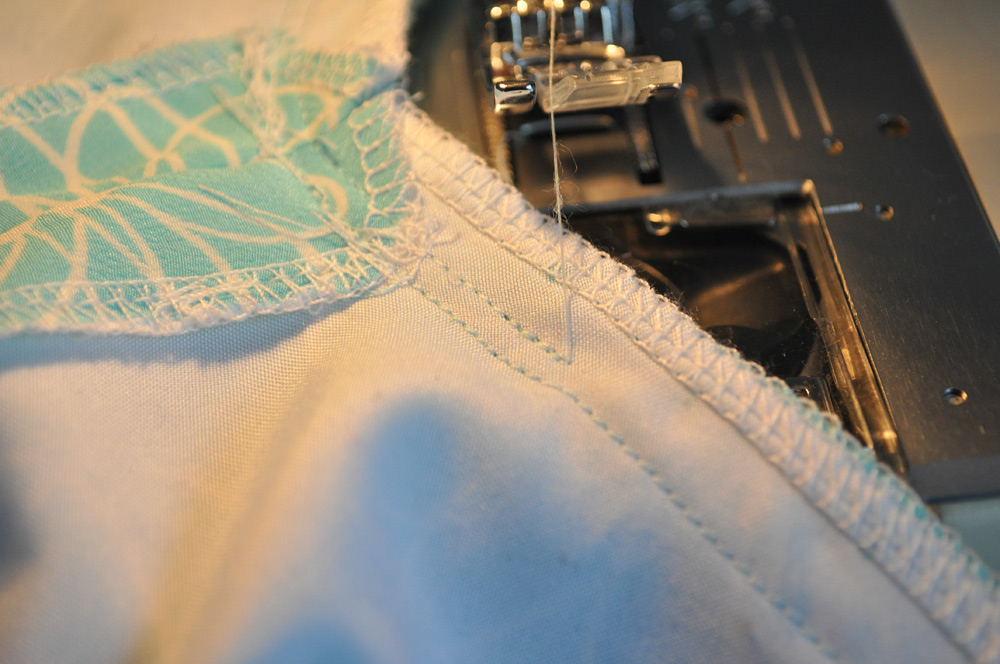
If you're using a thin, slippery fabric like I am, then you'll want to hand baste the midriff and bodice together before you topstitch. Why? Partly because it is more secure than pinning, and it'll also help the line of topstitching to remain unbroken and even (you don't have to stop every few centimeters to take a pin out!). I used Gutterman's silk thread for basting, but any thread will do as this is purely temporary. Run the basting stitches about 1/4" to 3/8" from the top edge of the midriff. We'll be stitching really close to that edge, so just make sure the basting won't interfere.

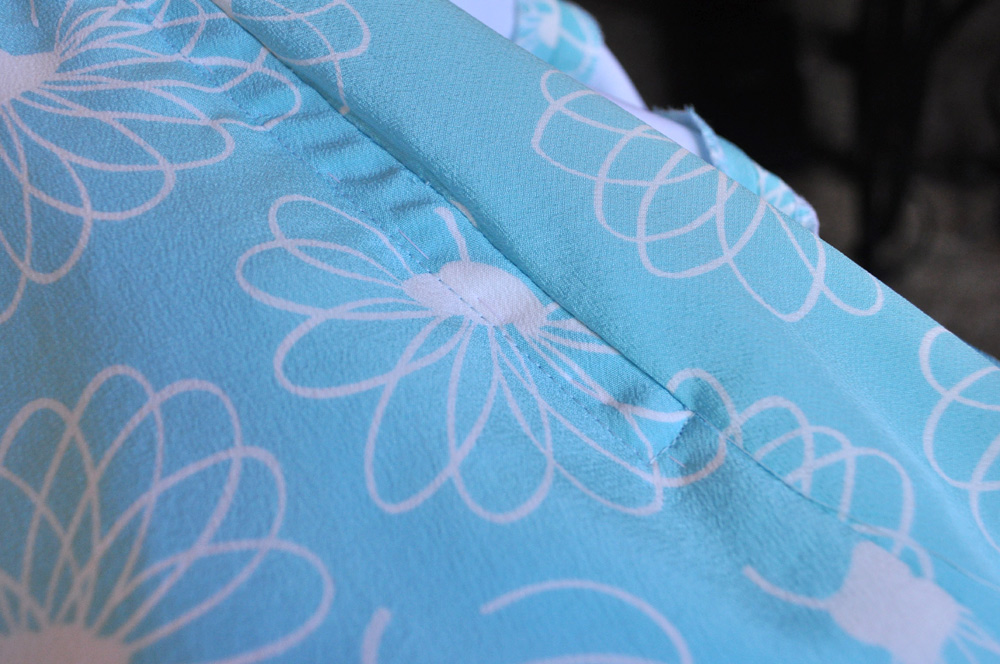
Now take the bodice over to the machine and begin topstitching at one end of the midriff piece, about 1/16" from the midriff top edge. Go slowly so you don't have uneven stitches. If you're using a lightweight material, you'll want to use a stabilizer (I like lightweight paper) underneath to protect the fabric from the feed dogs.
Once you have completed the topstitching, remove the basting stitches and secure/trim the gathering threads on the backside of the midriff (I usually like to tie these off before I trim them, but I tend to be a bit paranoid!).
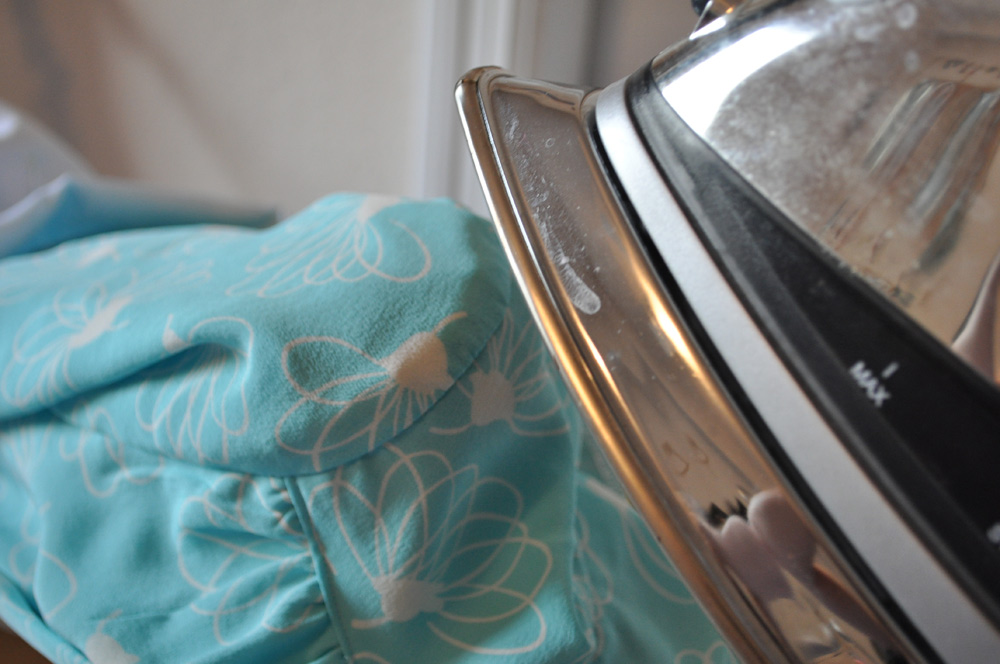
Press the midriff piece lightly to set the stitches, being sure to press the gathers. Easy!
Part Ten: Sewing Side Seam Pockets + the Skirt
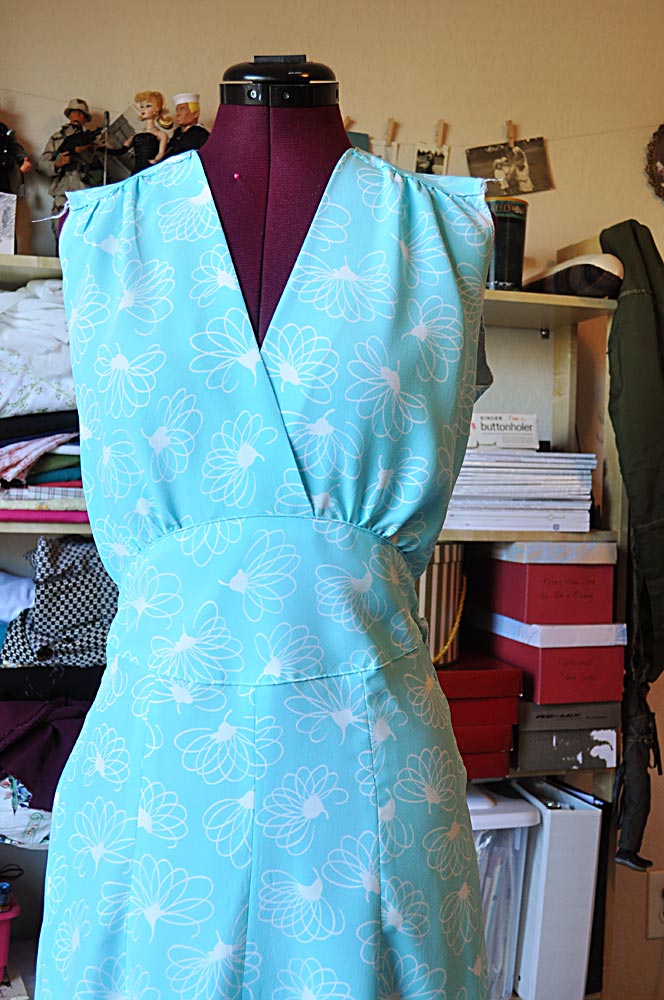
The dress so far (excuse the messy shelves behind... lol.)!
Time for attaching the skirt! Isn't this getting exciting? It's at this point in almost every dress project that I start to go from being excited to really excited about the project, because it's starting to look like something I'll wear. After we quit sewing in the last part, we stopped at attaching the midriff pieces and skipped steps 6 and 7. If you aren't attaching a side seam pocket on the right side, go ahead and complete those steps to attach the back to the waist. The principles for basting and carefully topstitching are the same; just go slowly and work on an even line of stitching. Also go ahead and sew the skirt front pieces together as indicated in the directions (or skip to the section below about patch pockets if you opted for those).
If you'd like to add that side seam pocket, here's the procedure to do so, which you'll want to do before attaching the skirt pieces to the bodice (but go ahead and sew the darts on the skirt back first). Pin one of the pocket pieces to the right back piece, matching notches.
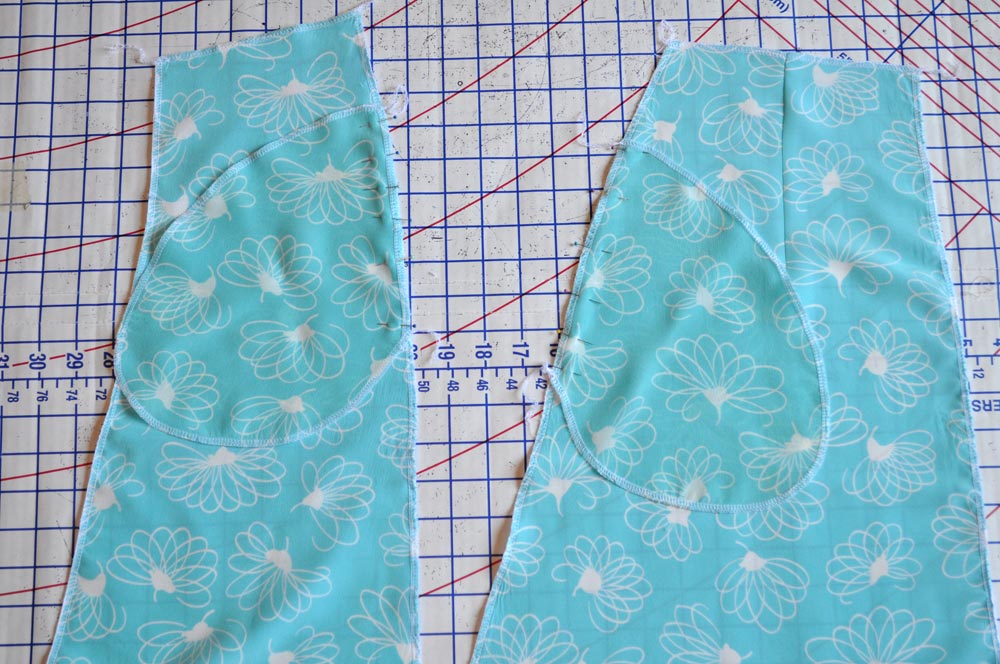
Pinning the side seam pockets. (Don't laugh, but I wasn't paying attention and stitched these to the left side first! Don't repeat my mistake--attach the pockets to the right side seam!)
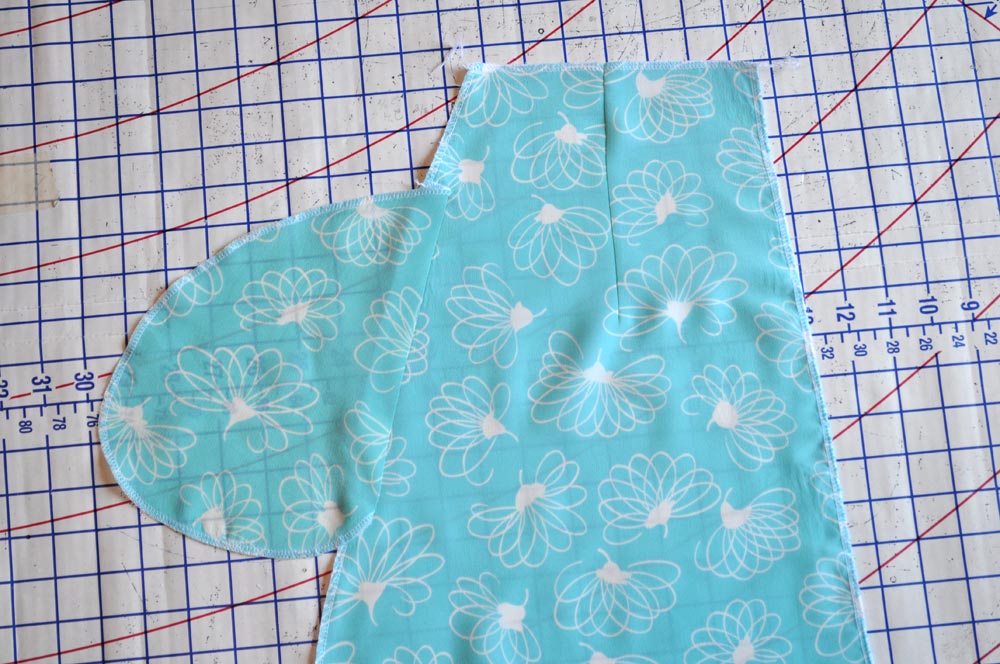
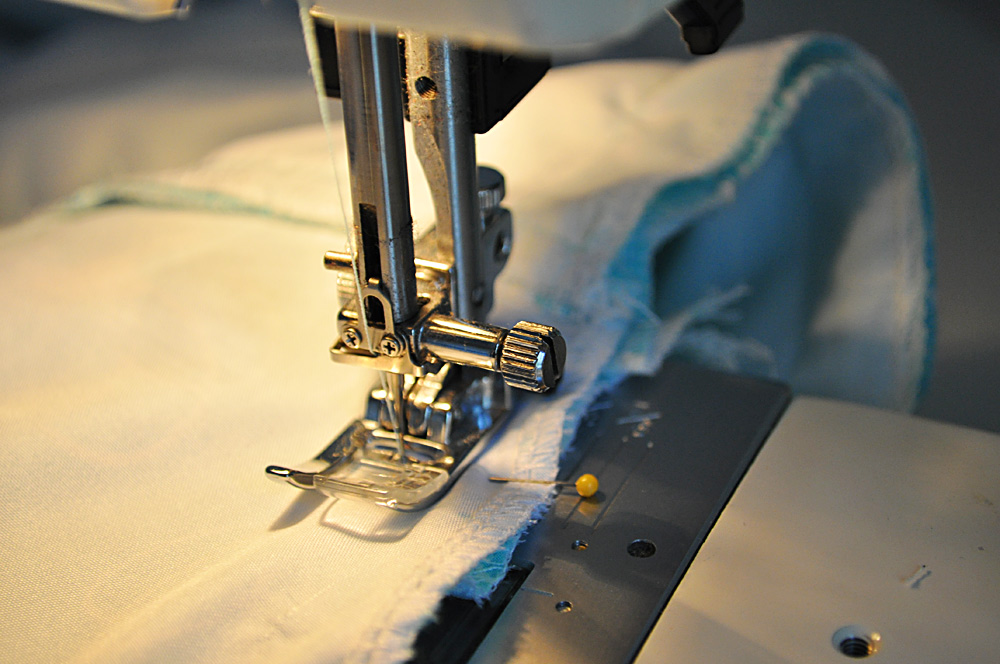
Sew from the top to the bottom of the pocket piece (I had a 3/4" side seam allowance). Repeat for the right side-front and remaining pocket piece. Press seams toward the side seam.
Construct the skirt back as directed, and attach to bodice as directed in step 7. Piece together the front skirt pieces (steps 9 and 10), being careful not to accidentally catch the pocket piece in the seams! Attach the midriff piece to the skirt front as indicated in step 11 (same rules apply as for sewing to the bodice).If you are adding waist ties, follow step 12. Pin and sew left side seam as indicated in step 13, being sure to leave the opening for the zipper!
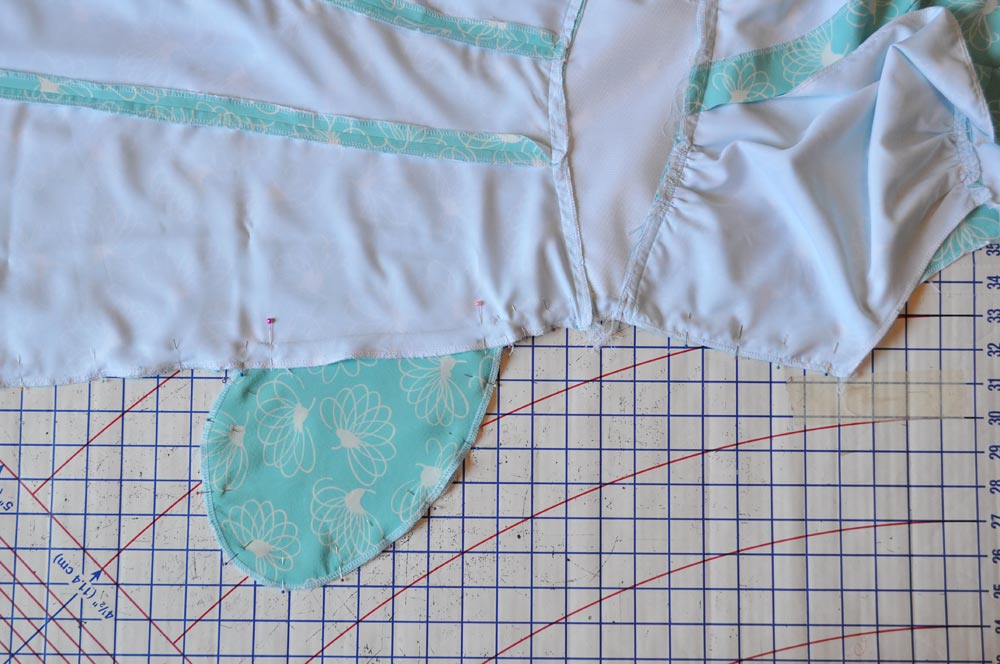
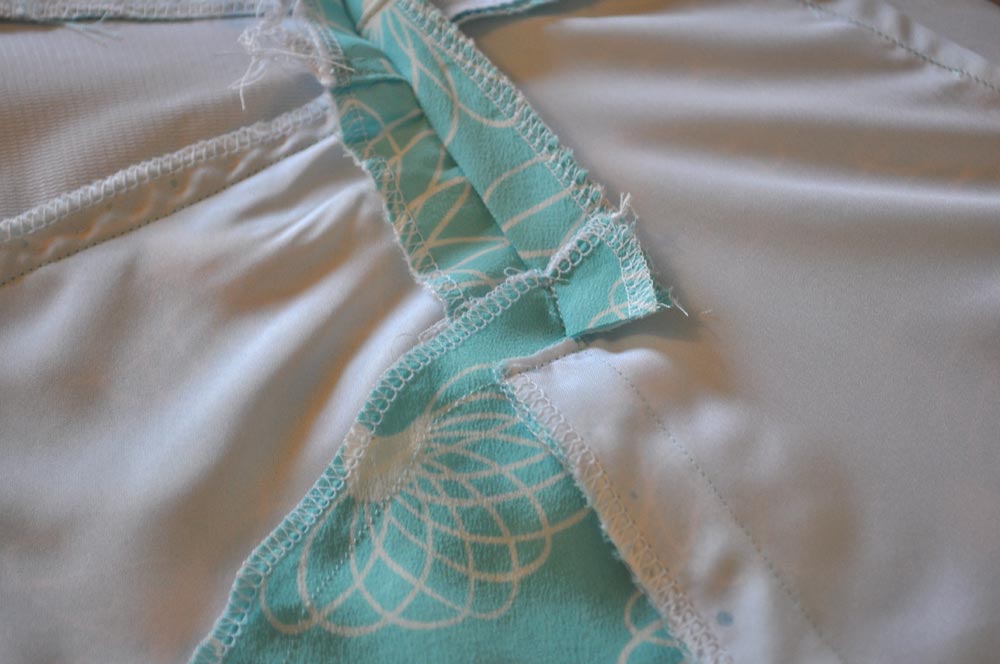
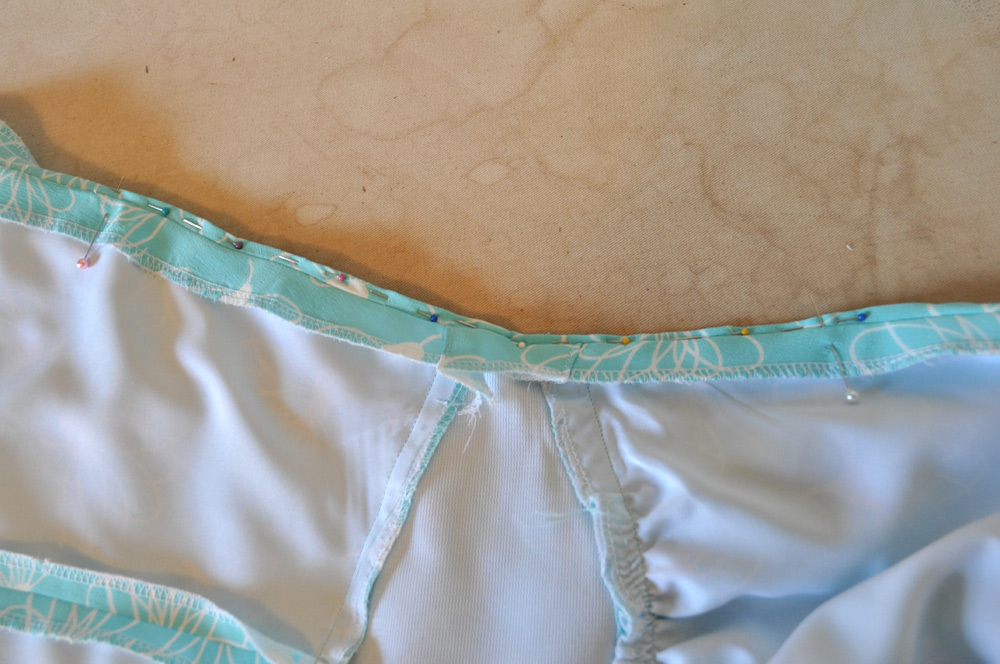
On the right side, pin together the side seam and around the pocket as shown. You'll also want to mark at the top and bottom where to pivot at the dress side seam and stitch around the pocket. I've allowed for a 1/2" seam around the edges of my pocket pieces, which meant I stitched down about 1/2" from the top of the pocket along the side seam, pivoted and stitched around the pocket edges, stitched to meet the 3/4" stitch line at the skirt side seam, pivoted and continued sewing the side seam. (See the diagram below.)
Once you have sewn this seam, press the side seam open. You'll need to clip at the back side seam, right above and below the pocket to allow it to press open properly (below).
Part Eleven: Sleeves
For most of my teenage years I had disaster after disaster with sleeves, particularly the set-in sort. I used to joke that I'd rather move to a tropical island and never have to sew another sleeve than wrangle with them. Well, fast forward a number of years, and I think I hit the lightbulb moment when I finally figured out how to adjust sleeve patterns to actually fit an armhole. Many set-in sleeve patterns curiously have far too much ease, meaning they don't ease smoothly and pucker-free. But after adjusting patterns and learning how to sew a set-in sleeve properly, it's made a world of difference! So I hope perhaps this little section of the sew-along will help a few of you who also struggle with set-in sleeves as well (assuming there are others out there who were in the same predicament as I!).
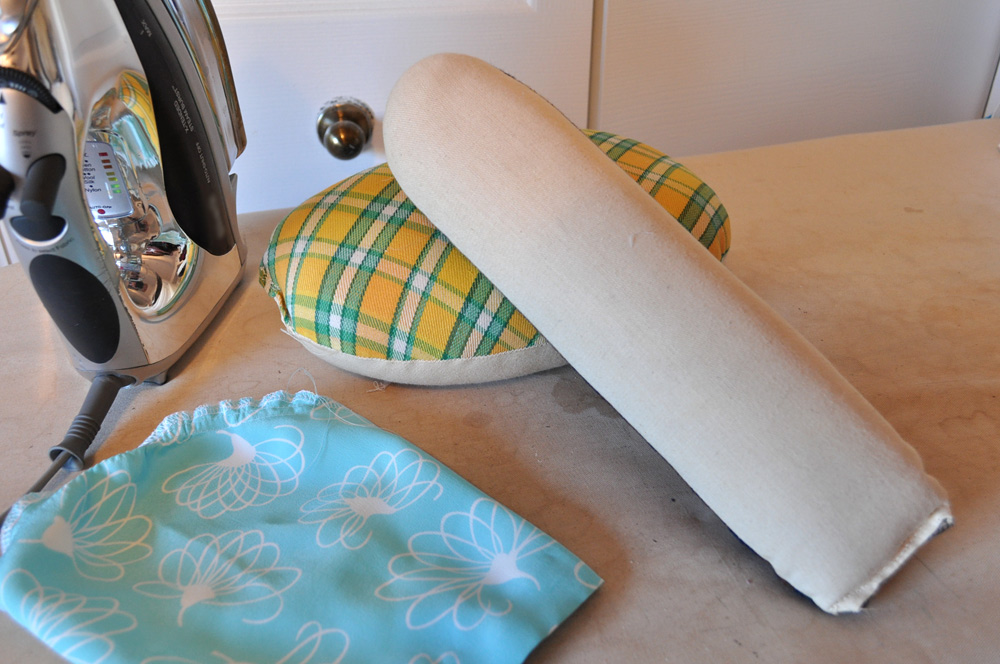
We'll need to do a little prep work before we get to actually sewing the sleeves to the armholes. Firstly, make sure you have some shoulder pads made up (I'm planning on covering mine with underlining fabric, but just had them in the initial, muslin-covered stage for this). You'll also want to have one of the pressing aids* pictured below on hand; the large one is a pressing ham and the other is a sleeve roll. I prefer to use the sleeve roll for this, because my sleeve cap area is small and didn't fit easily over the ham. But other will work.
Begin by running two lines of gathering stitches between the dots marked on the sleeve cap on either side above the notches. If you're using a 1/2" seam, run the first line of (basting-size; I use about a 4 on my machine) just shy of 1/2" and the next about 1/4" from the cut edge. Then follow the directions for sewing elbow darts (3/4 sleeve version only), the side seam and finishing the bottom edge as instructed in the directions for the Swing Dress.
Turn your dress right-side out, and pinning the sleeve to the armhole right sides together. (With the way the dress is positioned, this means that the sleeve is inside the dress.) I always start at the underarm seams, matching those and then working up to the beginning of the ease stitches that run along the cap of the sleeve.
Match the shoulder points on the sleeve and dress back/yoke; pin. You should notice that the front cap section that is unpinned has a bit less excess fabric than the back. This is because the back of the sleeve cap typically has a tiny bit more.
Gently pull up either end of the ease stitches to fit the cap to the armhole. Evenly spread out the ease so there are no folds or visible gathers. Pin about every 1/2" apart to keep things secure.
Baste the sleeves by machine or hand, using long stitches along the seamline. Do not press the sleeves after basting! Check to make sure that there are no puckers on the outside of the sleeve cap (beyond the stitching line) or gathers that have been caught. If there are, take out a short section of basting, redistribute the fullness and re-baste.
Try on the dress to check the fit and hang of the sleeve (this is when you'll want to slip those shoulder pads in if you opted for them). If anything isn't draping right, undo the basting and redistribute the fullness or rotate the sleeve a bit until you're satisfied.
Tie off the gathering stitches to secure them. The next step may seem a bit like extra work--and it is--but it really helps to give the set-in sleeve a bit more polish. (Note: this really only makes a difference if you are using a natural fiber that can shrink with steam. It's pretty useless with polyester and other synthetics, so proceed with that in mind.) Carefully unpick all the basting stitches around the armhole, and remove the sleeve.
With your iron set to a steam setting (you will not be pressing or touching the iron to the fabric, so a higher setting to produce a stream of steam is fine), place the sleeve cap on the ham/sleeve roll, so it gently curves over the ease stitching. Holding the iron above the cap, steam the ease stitches. As I mentioned above, this really only works on natural fiber materials (wool, silk, cotton, etc.), and will help shrink out some of the excess fullness at the cap both in the seam allowance and outside it. This, however, is not a remedy for getting rid of large gathers or sloppy easing--it only helps set the curve of the sleeve cap and erase a bit of the even easing that you did earlier.
Once you have steamed the ease out of both sleeve caps, re-pin the sleeves to the armholes, matching notches and shoulder points as before.

Stitch the armhole seam, starting and ending at the underarm seam. For extra security, you can stitch a second row of stitches at the underarm about 1/16" away from the first line of stitching (in the seam allowance).
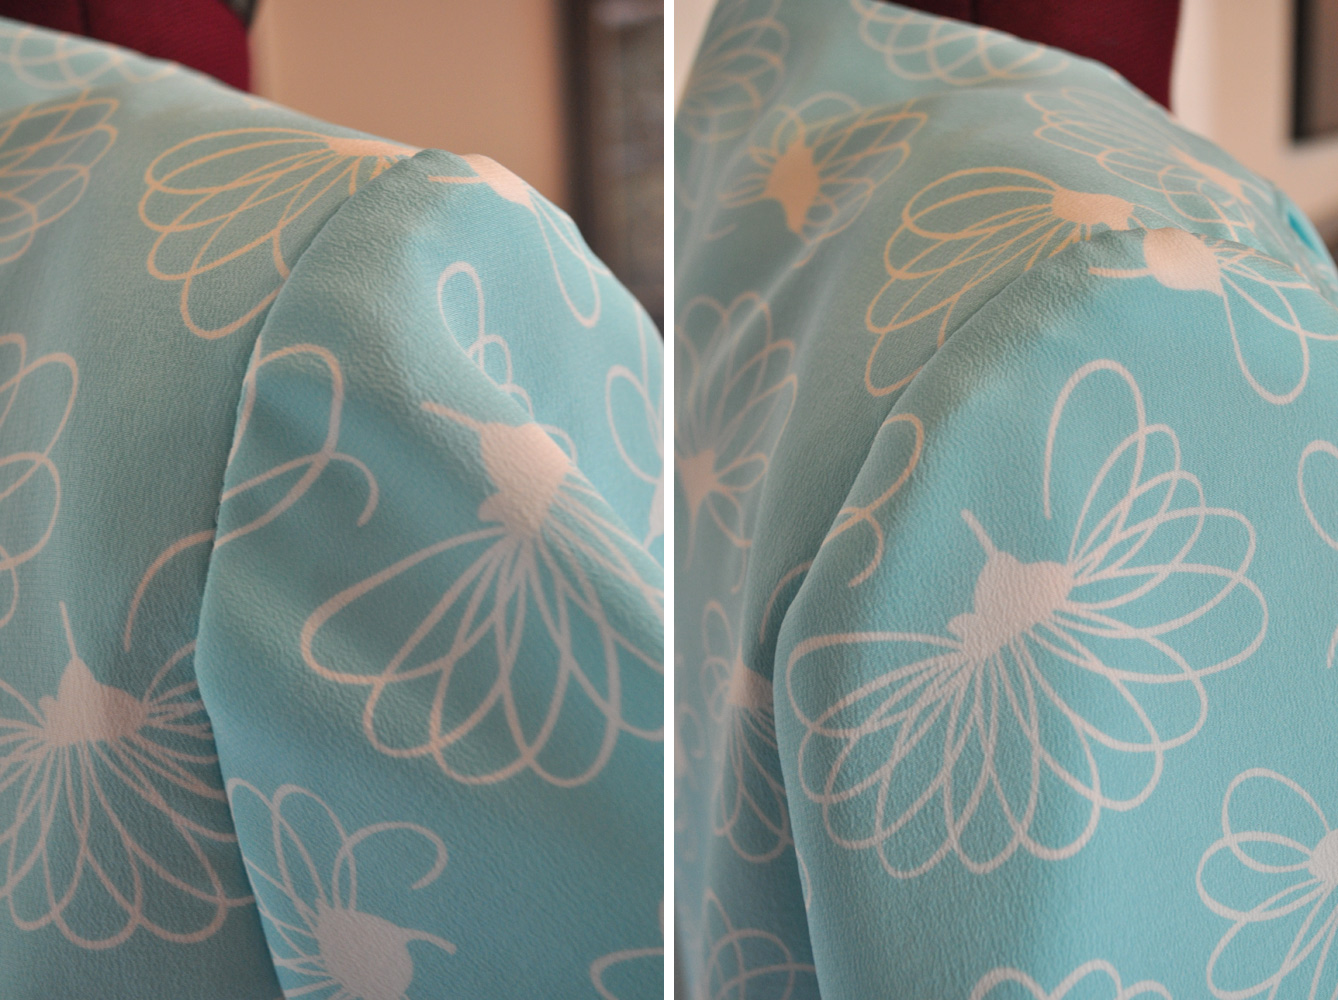
Now steam your sewn-in sleeve using the sleeve roll in the cap to help give it some form and not crush it. I like to start by steaming the cap and seam, and then pressing (lightly!) it so the seam allowances are pressed toward the sleeve.
Whew--that was a bit of a challenge to type and explain! Hopefully it isn't too intimidating; setting sleeves correctly is something that I have found really helps with the overall finished look of a garment. It's a bit of time and effort, but will be worth it! You can tack in those shoulder pads now if you wish as the directions state, or wait until you do all the finishing work (I tend to wait... but there is no particular reason!).
*Don't have a pressing ham? It's one of those tools I can't recommend highly enough to have in your sewing room; and really comes in handy for a wide array of pressing jobs while sewing. They can be pricey, but there are also a ton of great tutorials online! (This is just one of many, many tutorials out there--do a Google search for "how to make a tailor's ham" for loads more!)[line]
Part Twelve: The Zipper
Zipper time! If you've decided to use the recommended invisible zipper in the side seam, then go ahead and install it according to the package directions (or check out a tutorial. There are a lot out there, so this is certainly not the only one!). I cannot recommend enough that you should also have an invisible zipper foot to install it with; it is very frustrating and nearly impossible to get a smooth and professional installation otherwise.
I prefer regular, old-fashioned zippers; particularly on dresses like the Swing Dress that harken back to another era. Today I'll be covering my favorite insertion method for a side-zipper-opening: the dress placket zipper. It's the "overlap" style that you see on a lot of dresses from this era; I originally taught myself how to do this method from a 1940s sewing manual!
Do keep in mind though that you need a 5/8" to 3/4" seam allowance to work with. If you don't, you can easily add additional width by seaming on narrow strips of fashion fabric to your side seam allowances over the zipper opening (on this pattern between the bodice and skirt side seam notches)--which is perfectly period and I've seen suggested in several sewing books of the era.
Prepare your zipper prior to sewing it in. Does it need to be shortened? Also press the zipper flat with your iron at a low-heat setting. Most zippers over a certain length come folded up in the package, and you want to get those creases out!
To begin with, baste the seam opening using large stitches so you can easily remove them later (on my machine I usually set it to a 4 or 4.5 stitch length). Press seam open.
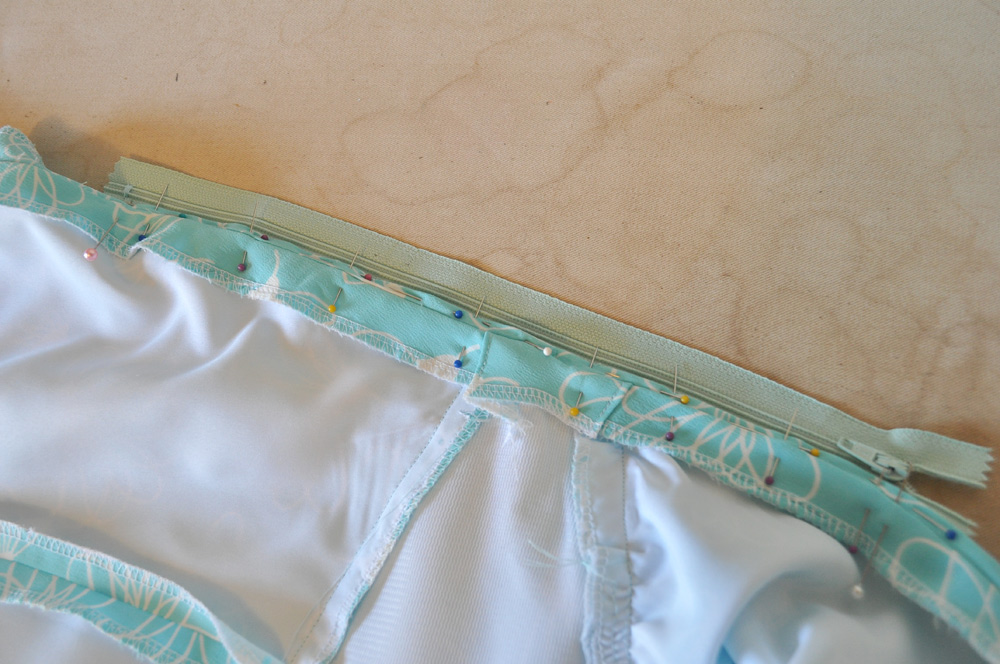
With the dress inside out, mark the top and bottom of your zipper opening with pins at either end, or a chalk line. Turn under the back seam allowance so that 1/8" is visible along the seamline and pin.
Lay the zipper right side up, the top (pull) facing towards the top of the garment and side seam opening. Place the folded back edge over the right side of the zipper tape, pinning it close to the teeth (but not so close you can't open the zipper!). Hand baste the foldline to the zipper tape.
Using a zipper foot, stitch by machine as closely to the edge of the back fold as possible, through the zipper tape. Start and stop at the point you previously marked where the opening begins and ends. Backtack/secure the thread ends.
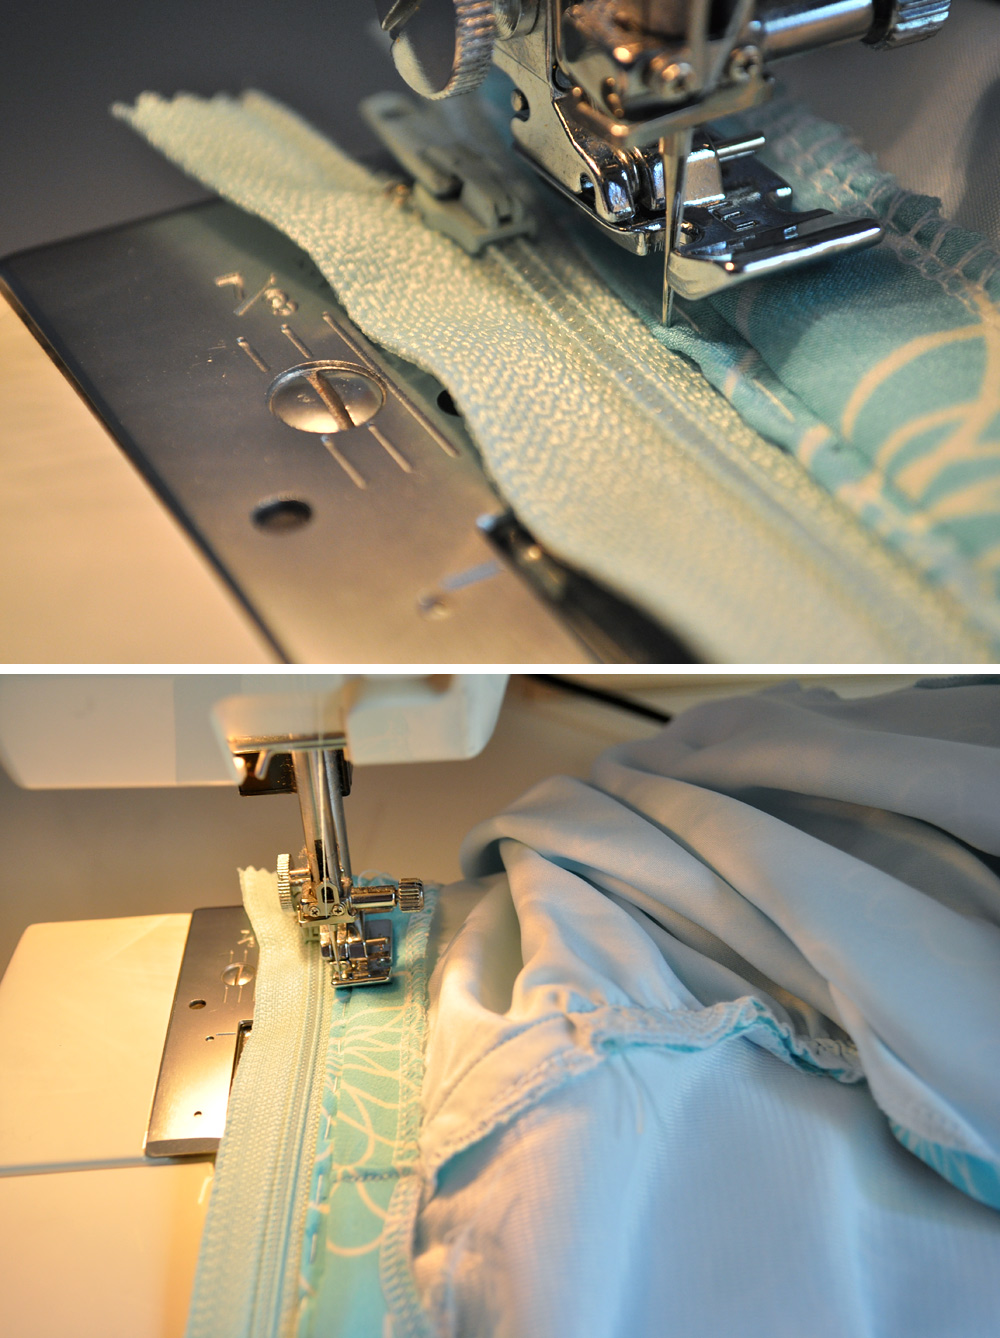
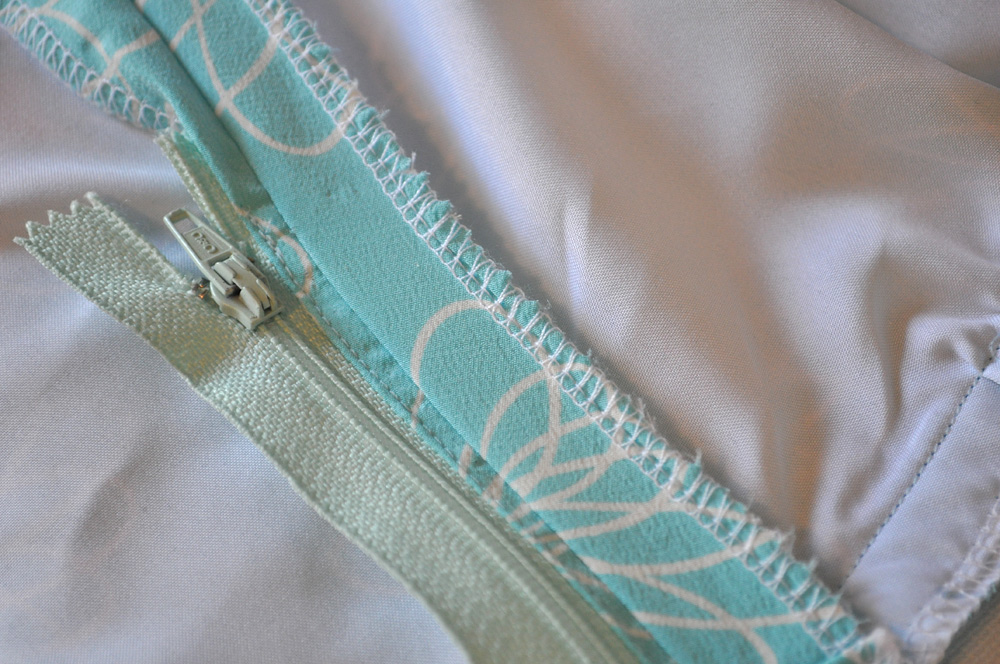
This is how it looks after stitching.
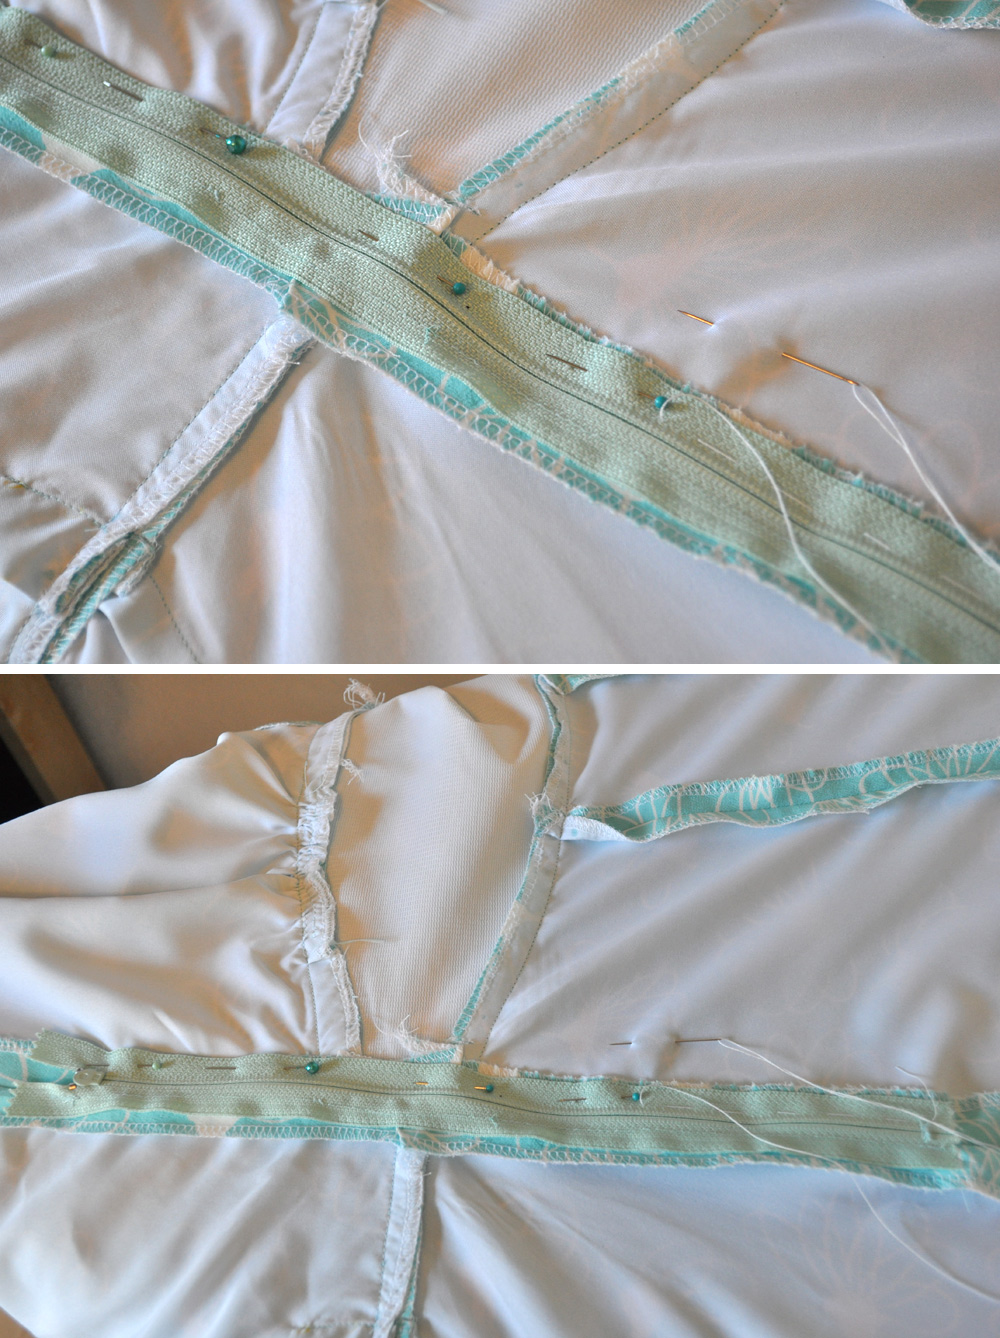
Flip the zipper over, so the unsewn edge is positioned overtop the front seam allowance. Smooth the zipper over the seam allowance, and pin. Make sure there is not a fold on the back seam allowance; everything should be smooth and flat. Hand baste in place just to the outside of the zipper teeth (this will act as your stitching line guide, so try and keep it straight).
Turn your dress right side out. Mark where the pull at the top and stopper at the bottom is with pins (you don't want to stitch over these--they could result in broken needles!). Begin sewing at the bottom just below the marking pin, from the side seam to about 1/2" (or just outside your basting). Pivot and begin sewing up along the length of the zipper. Stop above the top marking pin, pivot and sew to the side seam.

Bring the threads to the inside and tie off at the top and bottom of the zipper. Lightly press. Remove the hand basting stitches. Now carefully clip or remove the basting on the side seam that you did at the beginning.

Your zipper placket is now done! Don't you feel accomplished? It's not an easy style to master, but sure does help add a bit of an authentic look to reproduction pieces from this era. Sometimes I attach a hook and eye at the waist seam if needed.
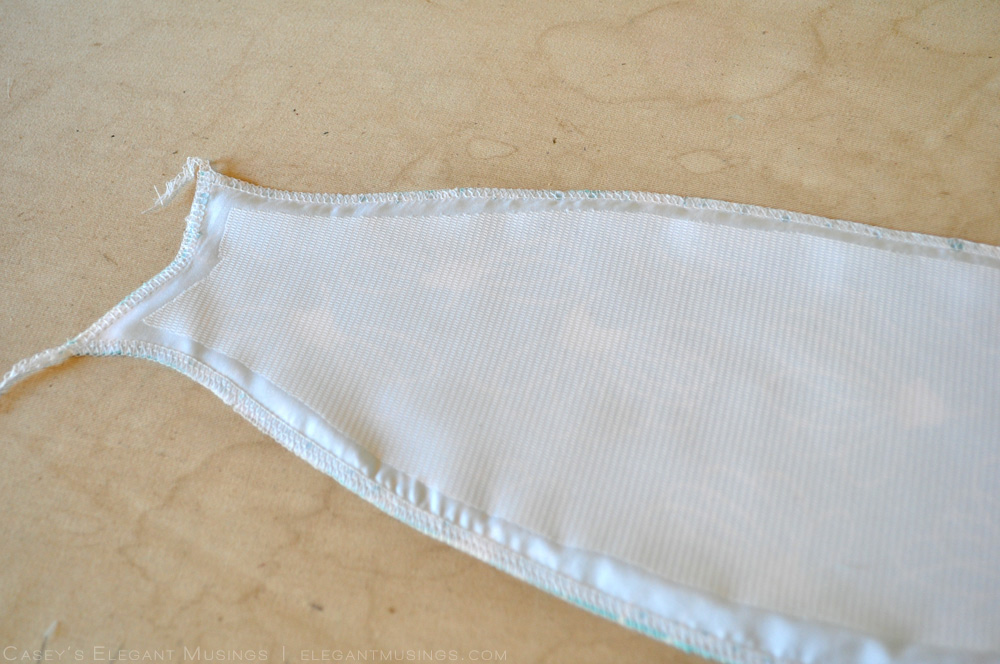
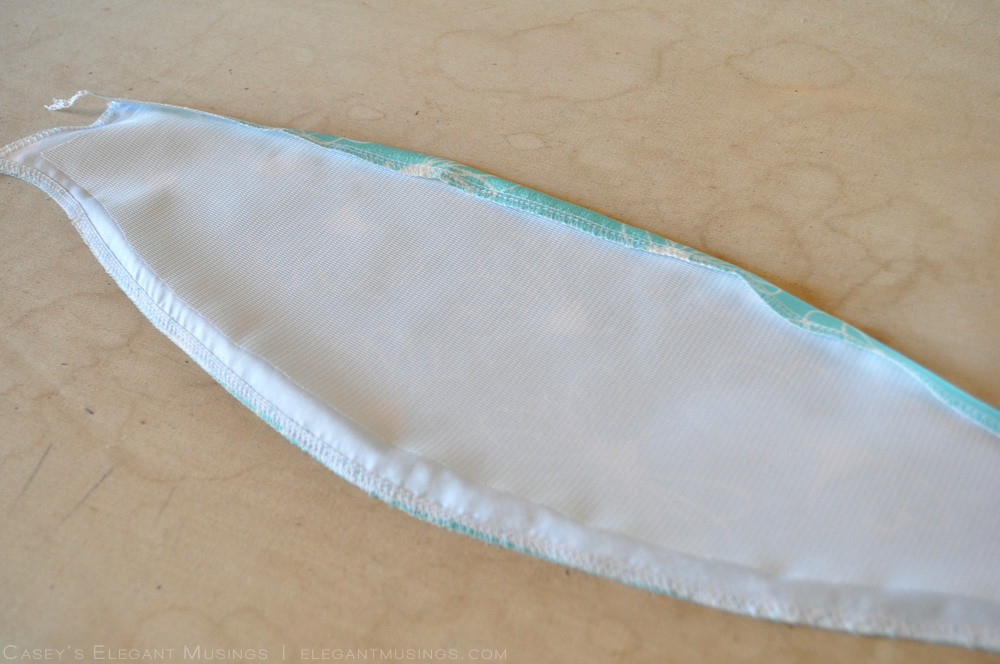
We're just a couple steps away from finishing! In the meantime, you can also go ahead and cover those shoulder pads if you wish with fashion or underlining fabric, and tack down the neckline facing at the shoulders and center back with a few inconspicuous stitches. I also went ahead and used Anna's method I shared earlier for finishing the inside of the midriff area; it looks pretty spiff with the dress fabric inside if I do say so myself!
Finishing off the midriff inside the dress
Part Thirteen: Hemming and Finishing
Hemming is probably one of my favorite parts of sewing--I love hand stitching a hem and tend to opt for that over a machine blind hem. But, you can certainly do that if you'd like (just consult your machine's manual for instructions). Below is how I hemmed my Swing Dress, but it certainly can be done with just a plain turn-under hem (turn under 1/2" and then another 1/2" for the 1" hem allowed) and then slipstitched.
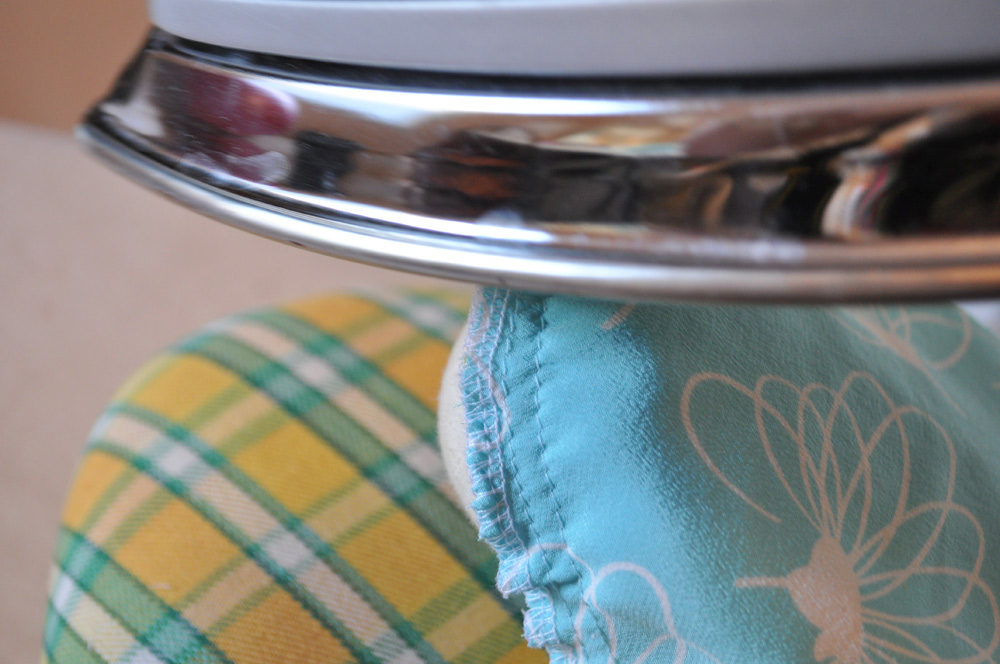
Turn under your hem 1", lightly press and pin. Try on the dress to make sure the hem is even around. As you can see on the left image, my hem was originally a bit long on the left side, so I refolded the hem to achieve an even line all around.

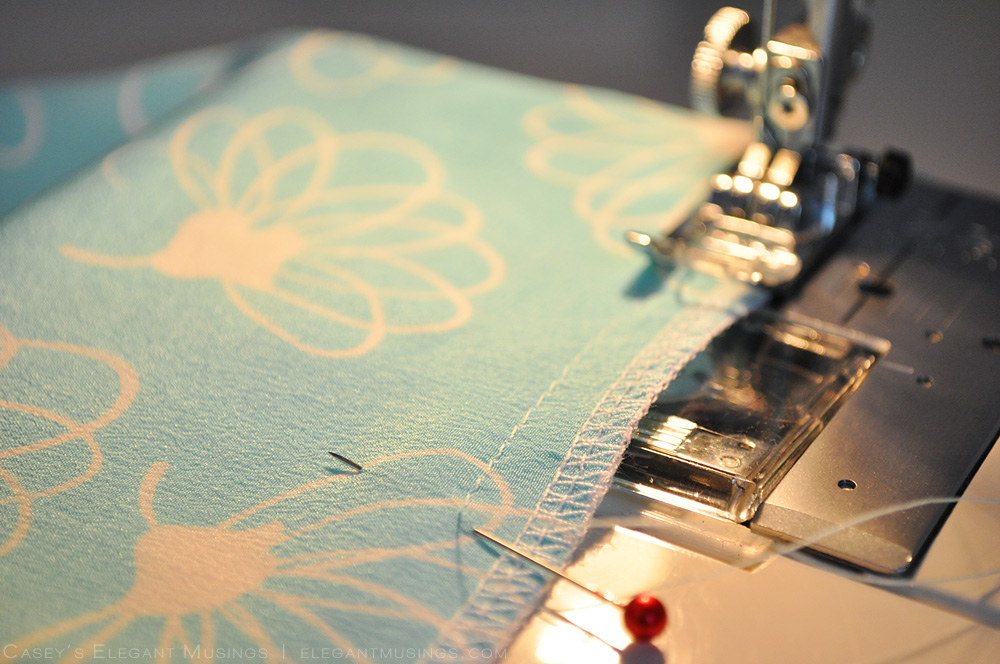
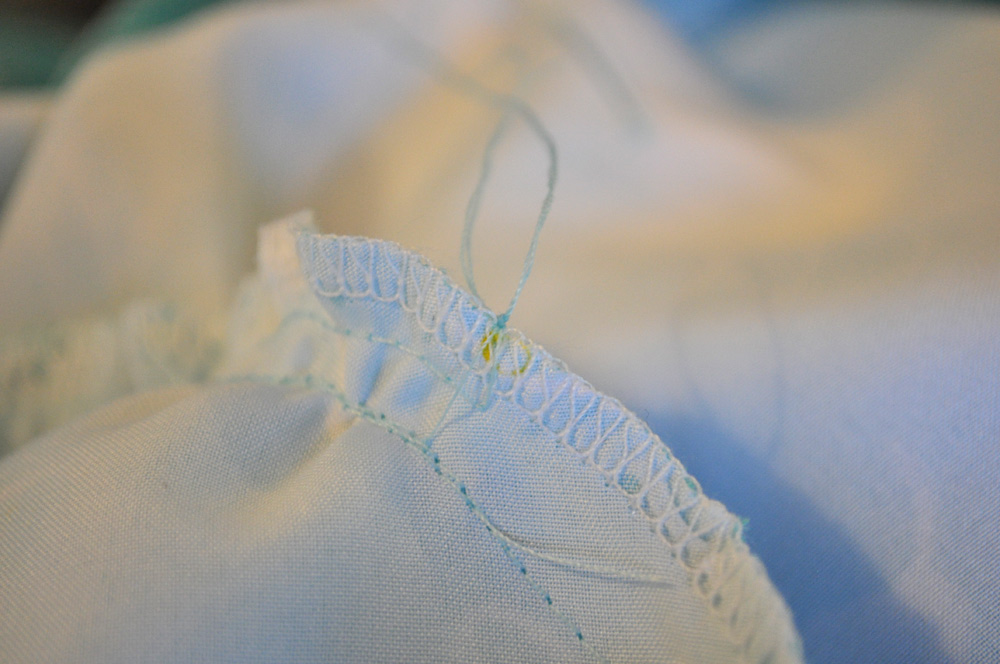
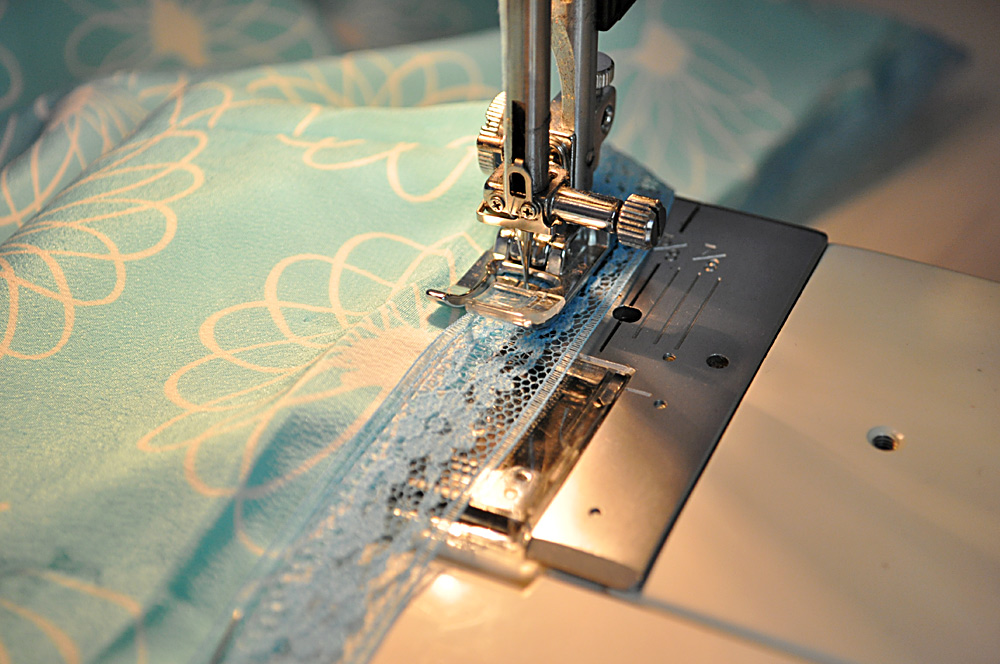
I decided to use the same lace tape I used on the sleeve hems (it's just so fun!) on the skirt hem. Trim the edge of the hem to an even length and finish with a zig-zag stitch or serge. Pin one edge of the lace hem tape over the edge of the dress hem (covering the finishing stitches) and then stitch it to the edge using a straight stitch (although a zig zag is acceptable too).
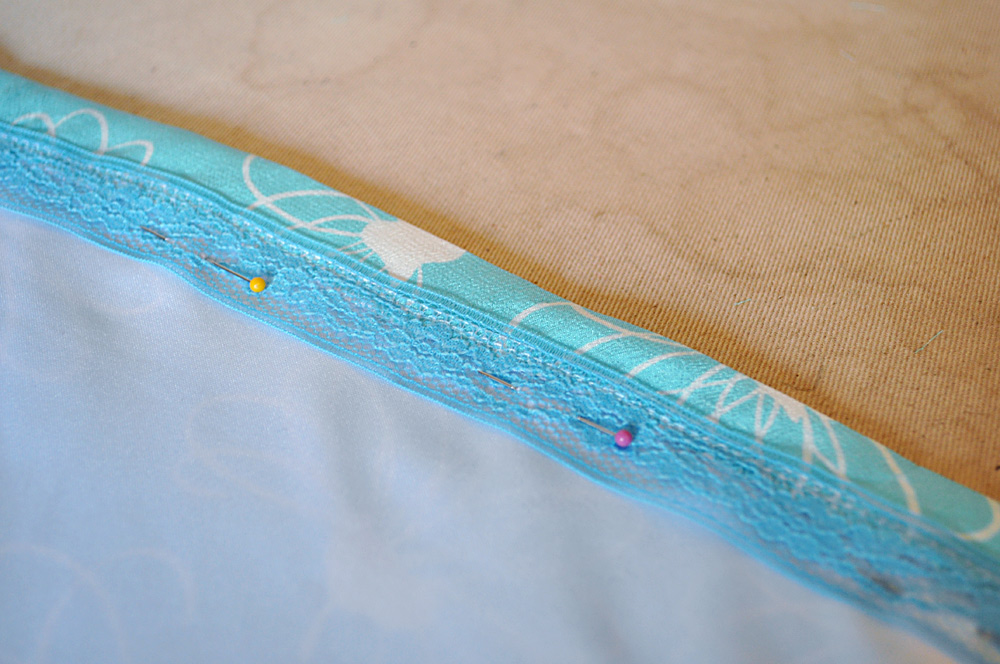
Turn up the hem and pin in place along the previously-pressed crease.
Thread a needle with thread that matches your dress material and hem using a whip or slip stitch. Give the hem a final press and you're done!

If you haven't already, now is the time to do any more finishing work like adding a button to secure the bodice overlap and tacking down the neckline facing. Try on your dress, admire your handiwork and give yourself a pat on the back--you did it!
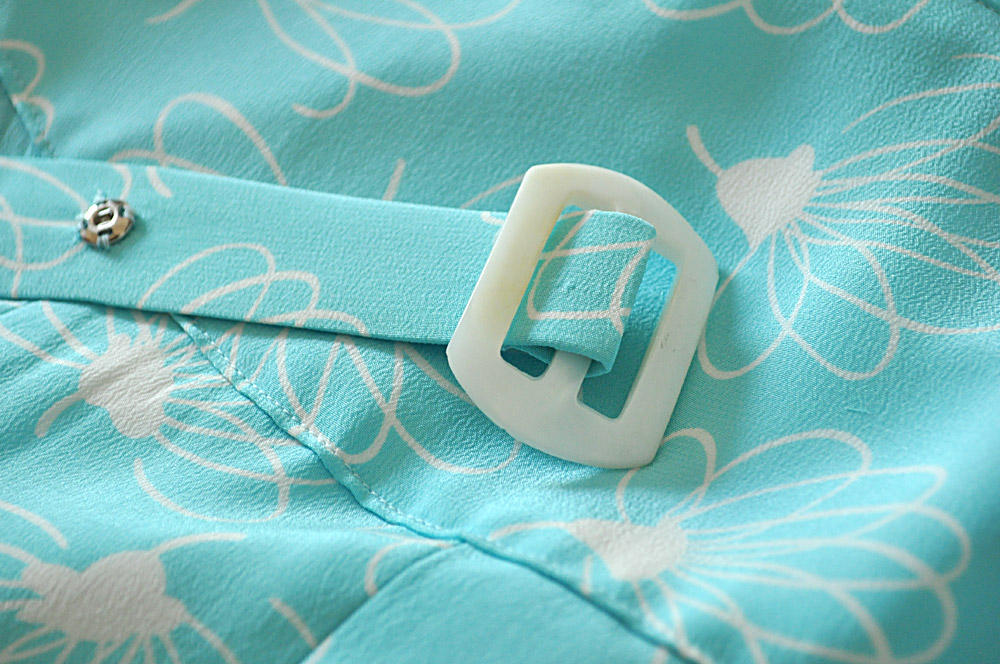
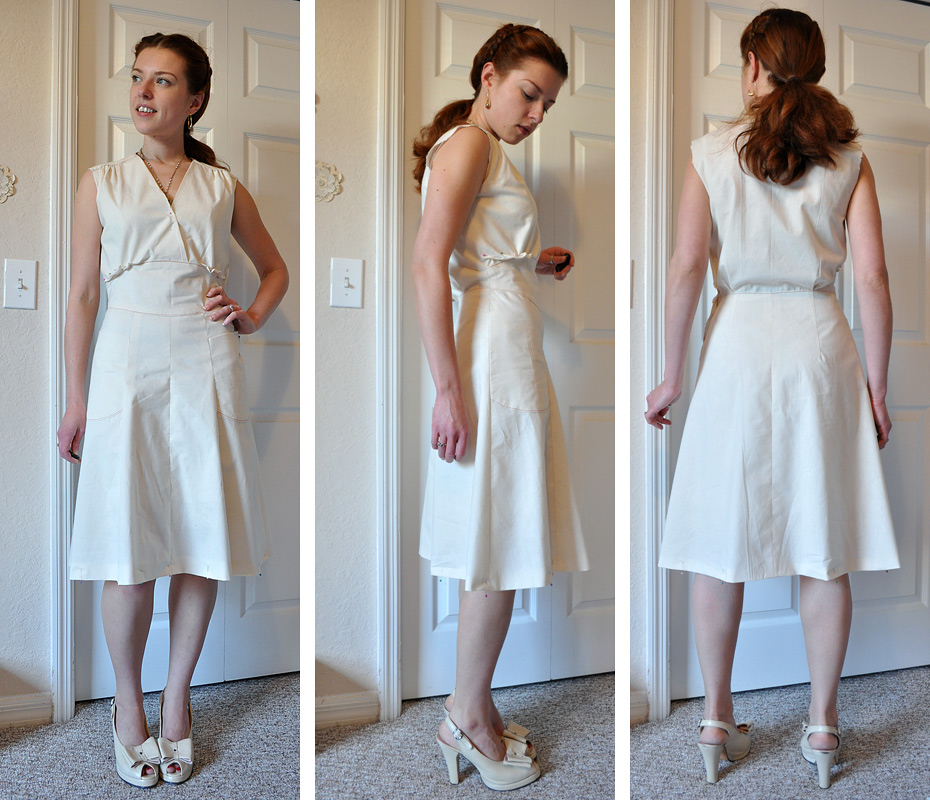
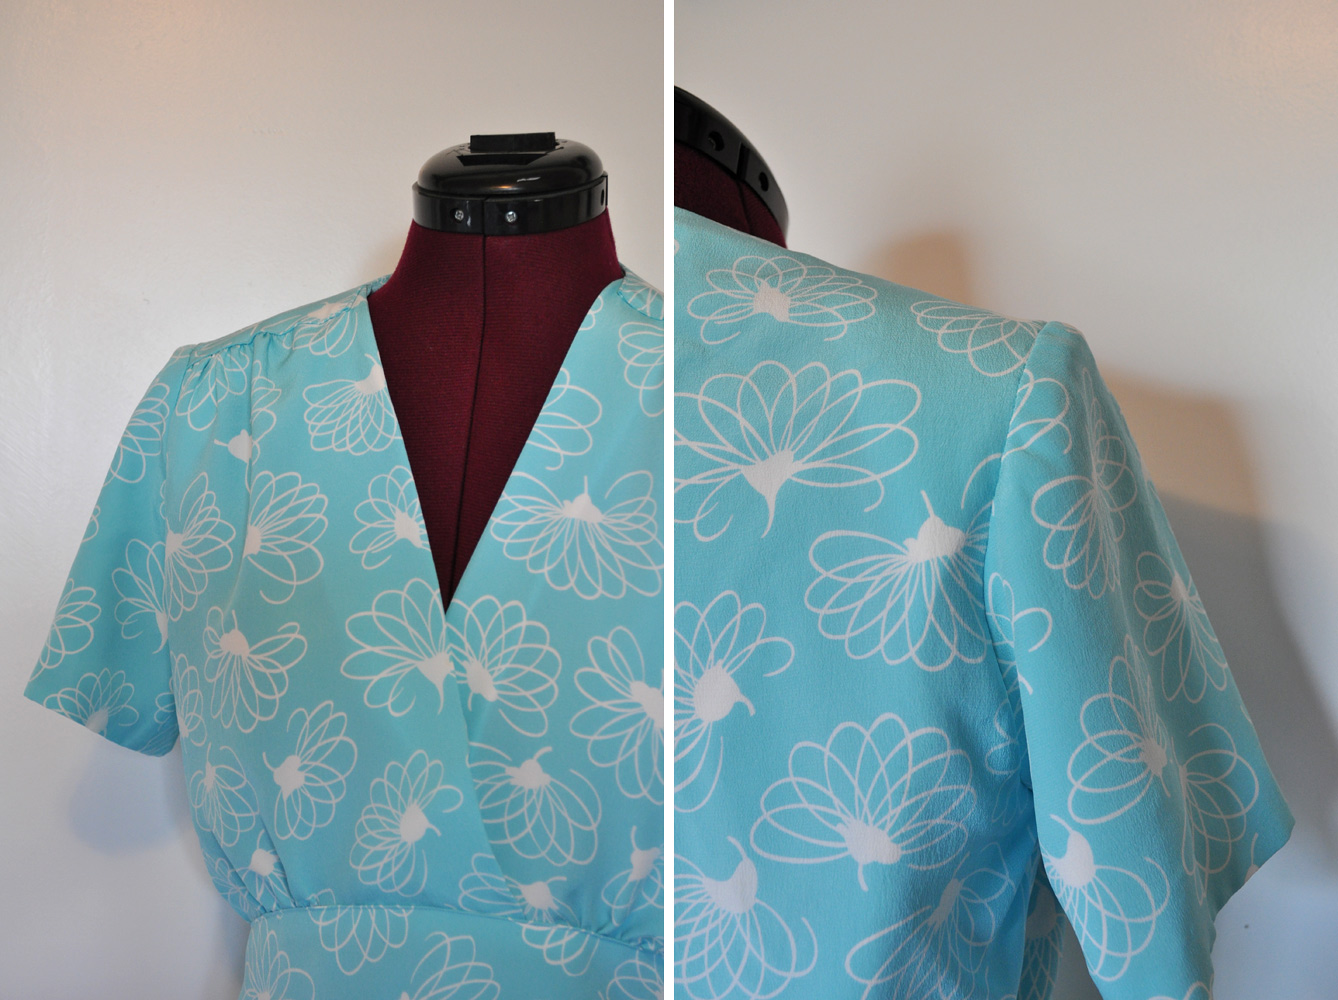
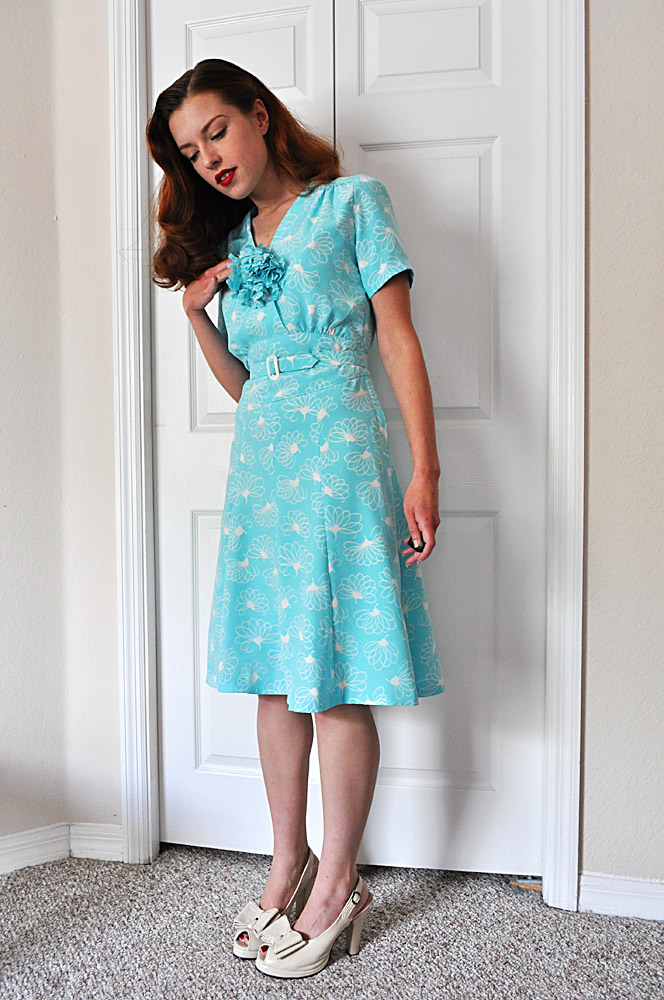
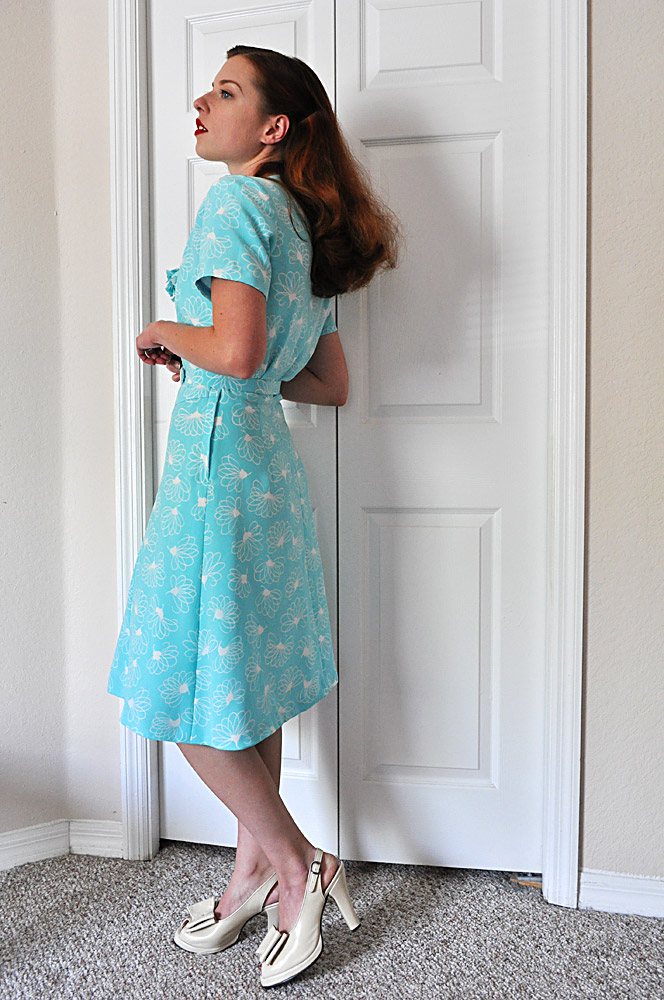
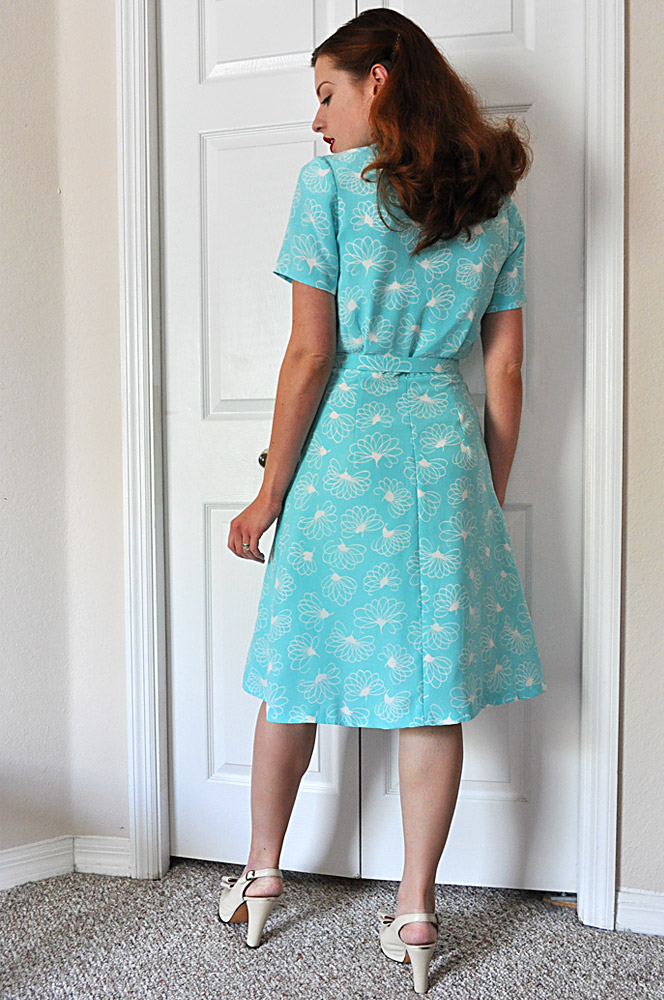
Here is what my final dress looks like. Instead of using a brooch or button at the neckline, I made a little fabric flower.


If you'd like to make a separate, fabric covered belt to wear with your dress (if you've left off the sash ties on the dress), be sure to check out my tutorial on how to make one!