Diary of a Dress: Regency Gown with Train
August 8, 2000:
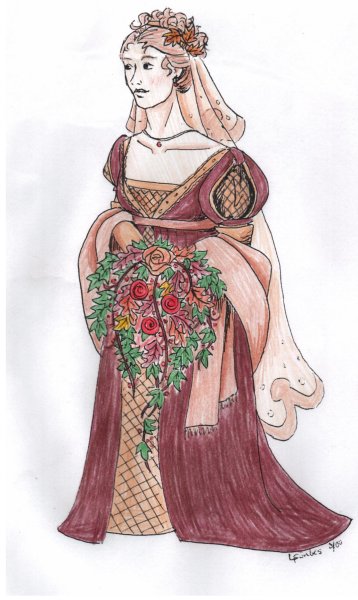
My customer, Laurie, sent me a box loaded with goodies! She placed her order back in January of this year for her Fall wedding gown, which she would design. Pulling inspiration from the Renaissance and Regency eras, she came up with the smashing sketch at left. Into the box went yards of sumptuous chocolate brown silk taffeta, diamond-patterned peach silk dupioni and three beautiful ribbon trims in varying widths.For the next month and a half, I worked to create a gown that would closely match Laurie's design and incorporate all of the details she wanted, including "slashed" sleeves, a split overskirt and a foot-and-a-half long train. Below is the diary which chronicles what I did and how I did it. I hope it will serve as an inspiration for your own sewing efforts, demonstrating how simple it is to take my Regency Gown Pattern (or another!) and modify it for your own tastes.
August 10, 2000:
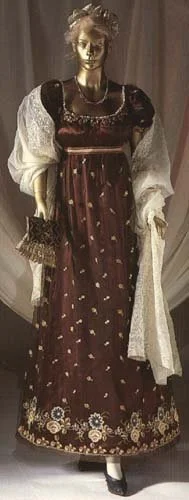
First, let's take a look at some of the images that inspired Laurie. When it came to choosing her colors, she adored the French Empire evening gown shown at left below. The deep brown silk caught her eye immediately. She also loved Mrs. Weston's gown in the Miramax "Emma," seen at center below. That's where she got the ideas for the bodice and sleeve treatment. Finally, the train on a Regency gown from the Kent State collection rounded out her "wish list" for the gown.


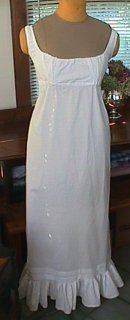
Along with her measurements, Laurie sent a bodiced petticoat that another seamstress had made her. She wanted the wedding gown to be made to fit over the petticoat. Here you can see the petticoat on one of my mannequins. The first thing I had to do was to puzzle out how to modify my pattern pieces to match Laurie's design and fit nicely over the petticoat. Laurie’s original color sketch is at the top of this post, and her black and white detail sketch is below the petticoat photo.
Click to enlarge.
August 17, 2000:
I finally had time today to cut out the entire dress. I won't show you that whole process, since there are photos in my PDF Photo Instructions that show the basic layout of the pieces on fabric. What I did differently was to cut the front neckline square and alter the shape of the bodice front slightly to accomodate darts rather than gathers under the bust. At left below is a photo of the bodice pieces laid out on the muslin lining before I cut into that.

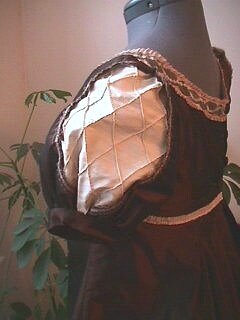
People often ask what type of fabric I use to line my gowns, and I try to use 100% cotton unbleached muslin unless a customer requests otherwise. I launder the muslin to pre-shrink it and make it soft, then iron it before cutting. A muslin lining is far more comfortable than a polyester acetate, it "breathes" well, and you don't have to worry about colors bleeding onto your skin (this has happened to me with poly lining!). Second from left below is a photo showing how I created the sleeves. First I cut two short sleeves of the peach dupioni. Then I cut two more sleeves out of the chocolate silk taffeta. I folded each brown sleeve in half and followed Laurie's sketch to cut out the "keyholes" that would allow the peach silk to show through.

September 19, 2000:
In the series of photos below you can see how I made the keyhole sleeves. First I hemmed the edges of the keyhole to prepare for the trim. Below that is a picture of the upper sleeve with the trim sewn in place. Next is a close-up shot of the keyhole trimming, which is a lovely narrow ribbon with a miniature floral motif and tiny ruffles at the edge. Fourth is a picture of the upper sleeve pinned to the lower in preparation for running the gathering stitches on the tops and bottoms of the sleeves. After that I've included a shot of the one unfinished and one finished sleeve "pull," which you can see in Laurie's sketch. Finally, there is a photo illustrating how the sleeve pull was placed before I ran the gathering stitches. This pull is a neat little detail that Laurie incorporated, and it was easy to make. I simply cut two rectangles of material, folding each one in half lengthwise and stitching the top and sides closed. Then I turned them right-side out and pressed them before folding them in half and placing them at the top of each oversleeve as you see in the last picture.


September 19, 2000:
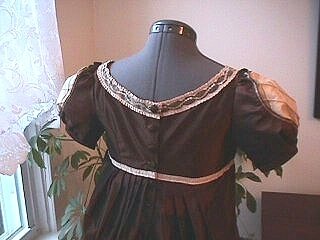
The reason there is a jump of one month from the time I cut out Laurie's dress to the time I began sewing is that I had to travel during the months of August and September and ended up getting back a week later than expected. I was eager to get started on the sewing by the time I returned. I pulled out Laurie's sketches again and set up two mannequins to work on. Below again is Laurie's black and white sketch, which includes a detailed look at the back of her gown:
Click to enlarge.
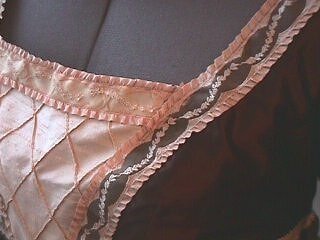
I first draped the bodice pieces on the mannequin wearing Laurie's petticoat. I wanted to get some idea of how I would sew on the trims (either before putting the bodice together or after by hand). Below left is a picture of the ribbon trims Laurie sent. In the center is a photograph of the bodice pinned to the mannequin with the inset of peach dupioni and the ribbon trimming pinned in place. On the right is a picture of the dart taken below the bustline in the bodice. (Click to open images in lightbox.)


I decided to sew the bodice inset directly to the bodice by machine after I had taken up the darts in the bustline. I did not want to sew on the ribbon trimming until later, because it would get caught in the neckline seams when I put the bodice and lining together. I sewed the bodice pieces together, then sewed the inset in place, turning under a tiny allowance on the side edges. After sewing the bodice lining pieces together and sewing the lining to the bodice at the neckline, I tackled one sleeve to see how it would work out. I was very pleased with the results and so made the second sleeve and sewed them both in place. Now the bodice was finished except for the trim work! Below you can see the progress of the bodice and sleeves, as well as a picture of how I cut the train for the gown.


For those who would like to re-create this train, it is very easy to do. Using the illustrations below as a guideline, cut out your skirt front piece, adding 2.5" to the side seam. Now cut out the skirt back, adding 2.5" at the side seam where it will join the skirt front, then sloping gently down and around into the train, adding anywhere from 6-18" (depending upon how long you want the train to be). You can add up to 24", but I find such a long train more cumbersome than elegant. Laurie's dress had an 18" train, which makes for a very elegant sweep. Adding a ribbon loop beneath the center back of the train makes it possible to loop the train over your hand when you are walking or dancing.


September 21, 2000:
I couldn't wait to get the skirt and overskirt onto the bodice now! I had already trimmed the train the day before, so I sewed the overskirt pieces together and hemmed the front edges along the split. Then I sewed the underskirt pieces together. I always French seam my skirts to make a nicer finished edge and prevent any unravelling. Now I was ready to put the bodice and skirts together, but--wait!--I was sewing over at my mom's house this day and realized I had forgotten to bring the skirt placket with me! I had not brought the extra chocolate silk material with me, either, so I was stuck. No way to cut a placket, which meant I couldn't attach the skirts to the bodice. To console myself, I pinned the entire gown to the mannequin, including all of the trimming. Then I took digital pictures for Laurie so she could see my progress. I couldn't wait to get home and get my hands on that placket, though! Below are photos of the dress pinned together with the trimming.
September 22, 2000:
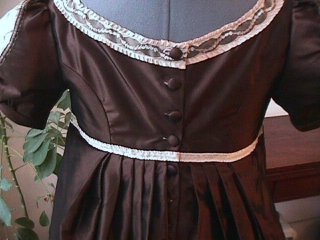
Well, I couldn't find the placket, so I cut a new one from the leftover material. That problem solved, I sewed the placket into the back skirt opening and pinned the skirts to the bodice, matching the split overskirt to the center front of the bodice. Then began the slow process of pinning the back pleats of the skirt in place between the two side back seams of the bodice. After much pinning, unpinning and repinning, I was finally ready to sew. Voila'! Now the gown had its skirts. I hooked up my trusty Singer buttonhole attachment and made buttonholes down the bodice back and the placket (as per Laurie's sketch). I then put the gown on the mannequin and marked where the buttons should be sewn. In the evening, once the children were in bed, my husband sat down to read out loud to me while I sewed. I made covered buttons for the gown and sewed them in place. Then I pinned the bodice trimming in place and set the dress aside for the morrow. I completely forgot to take pictures this day, so I have nothing to show for my labors!
September 23, 2000:
Today I sewed all of the bodice trimming in place by hand. My sons played on the floor at my feet while I worked--with occasional interruptions to "build a castle" or "read Father Bear Comes Home!" :-) Once all of the trimming was secure, I whipstitched the bodice lining to the inside waistline seam for a nice, smooth finish. Below you can see the gown with the trim "in progress" as well as a picture of me sewing the bodice lining in place.


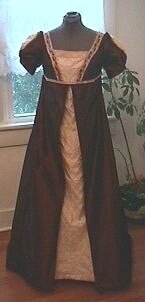
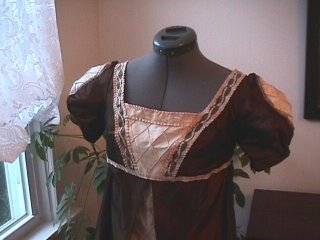
All I had left to do now was to try the gown on the mannequin once more and mark the hemlines. That done, I sat down again to hand sew the underskirt and overskirt hems. Finally, it was time to iron Laurie's gown and take pictures of the final results (unfortunately, my computer ate my only picture of the back of the gown with its train--eek!). Below you can see the gown in all of its glory right before I shipped it off. Laurie will wear it for her October wedding, and her groom will be scrupulously attired in his own Regency finery. Won't they make a handsome couple?
December 13, 2001:
Here, at last, are the pictures from Laurie and Pete's wonderful wedding day! Wouldn't you have loved to be a fly on the wall? What a fun celebration it must have been! Pete writes, "Laurie and I want to thank you for the wonderful work you had done on her wedding gown last year. I've attached several photos of the wedding for your viewing. I hope you enjoy them."

The bride and groom!

The bride and maid of honor

Laurie in her lovely veil.

Best man and groom

The scrumptious wedding cake!